



















Official plugin guide
Amazing WP Forms
Build contact forms, multi-step quotes, order and payment forms, registrations, job applications and guest-post submissions with a drag-and-drop builder — and move over from Gravity Forms, WPForms, Fluent Forms, Ninja Forms or Contact Form 7 in a few clicks.
Requirements
WordPress and PHP
WordPress 6.0 or newer and PHP 7.4 or newer. Tested with WordPress 7.1 and PHP 8.4.
Database
Three tables are created on activation: awpf_forms, awpf_entries and awpf_entry_meta (with your table prefix).
Browser
Forms are submitted with JavaScript (fetch). Any current browser works; visitors with JavaScript disabled see a short notice.
Optional
An SMTP plugin for reliable email, WooCommerce for the WooCommerce features, Stripe and/or PayPal accounts for payments, Akismet for extra spam filtering.
Installation and quick start
- Upload the
amazing-wp-formsfolder towp-content/plugins/, or install the ZIP through Plugins → Add New → Upload Plugin, and activate it. - Open Forms → Add New and pick a template (Contact, Multi-step quote, Registration, Order / payment, Job application, Feedback, Guest post) or start blank.
- Drag fields from the left panel onto the canvas, or click a field to append it. Click a field on the canvas to edit its settings.
- Review the Notifications and Confirmations tabs, then press Save (or Ctrl/⌘ + S).
- Copy the shortcode shown in the top bar, e.g.
[awpf id="1"], into any page — or use the Amazing WP Form block.
Pick a template → Arrange fields → Set notifications → Embed the shortcode → Read entries
Switching from another plugin?
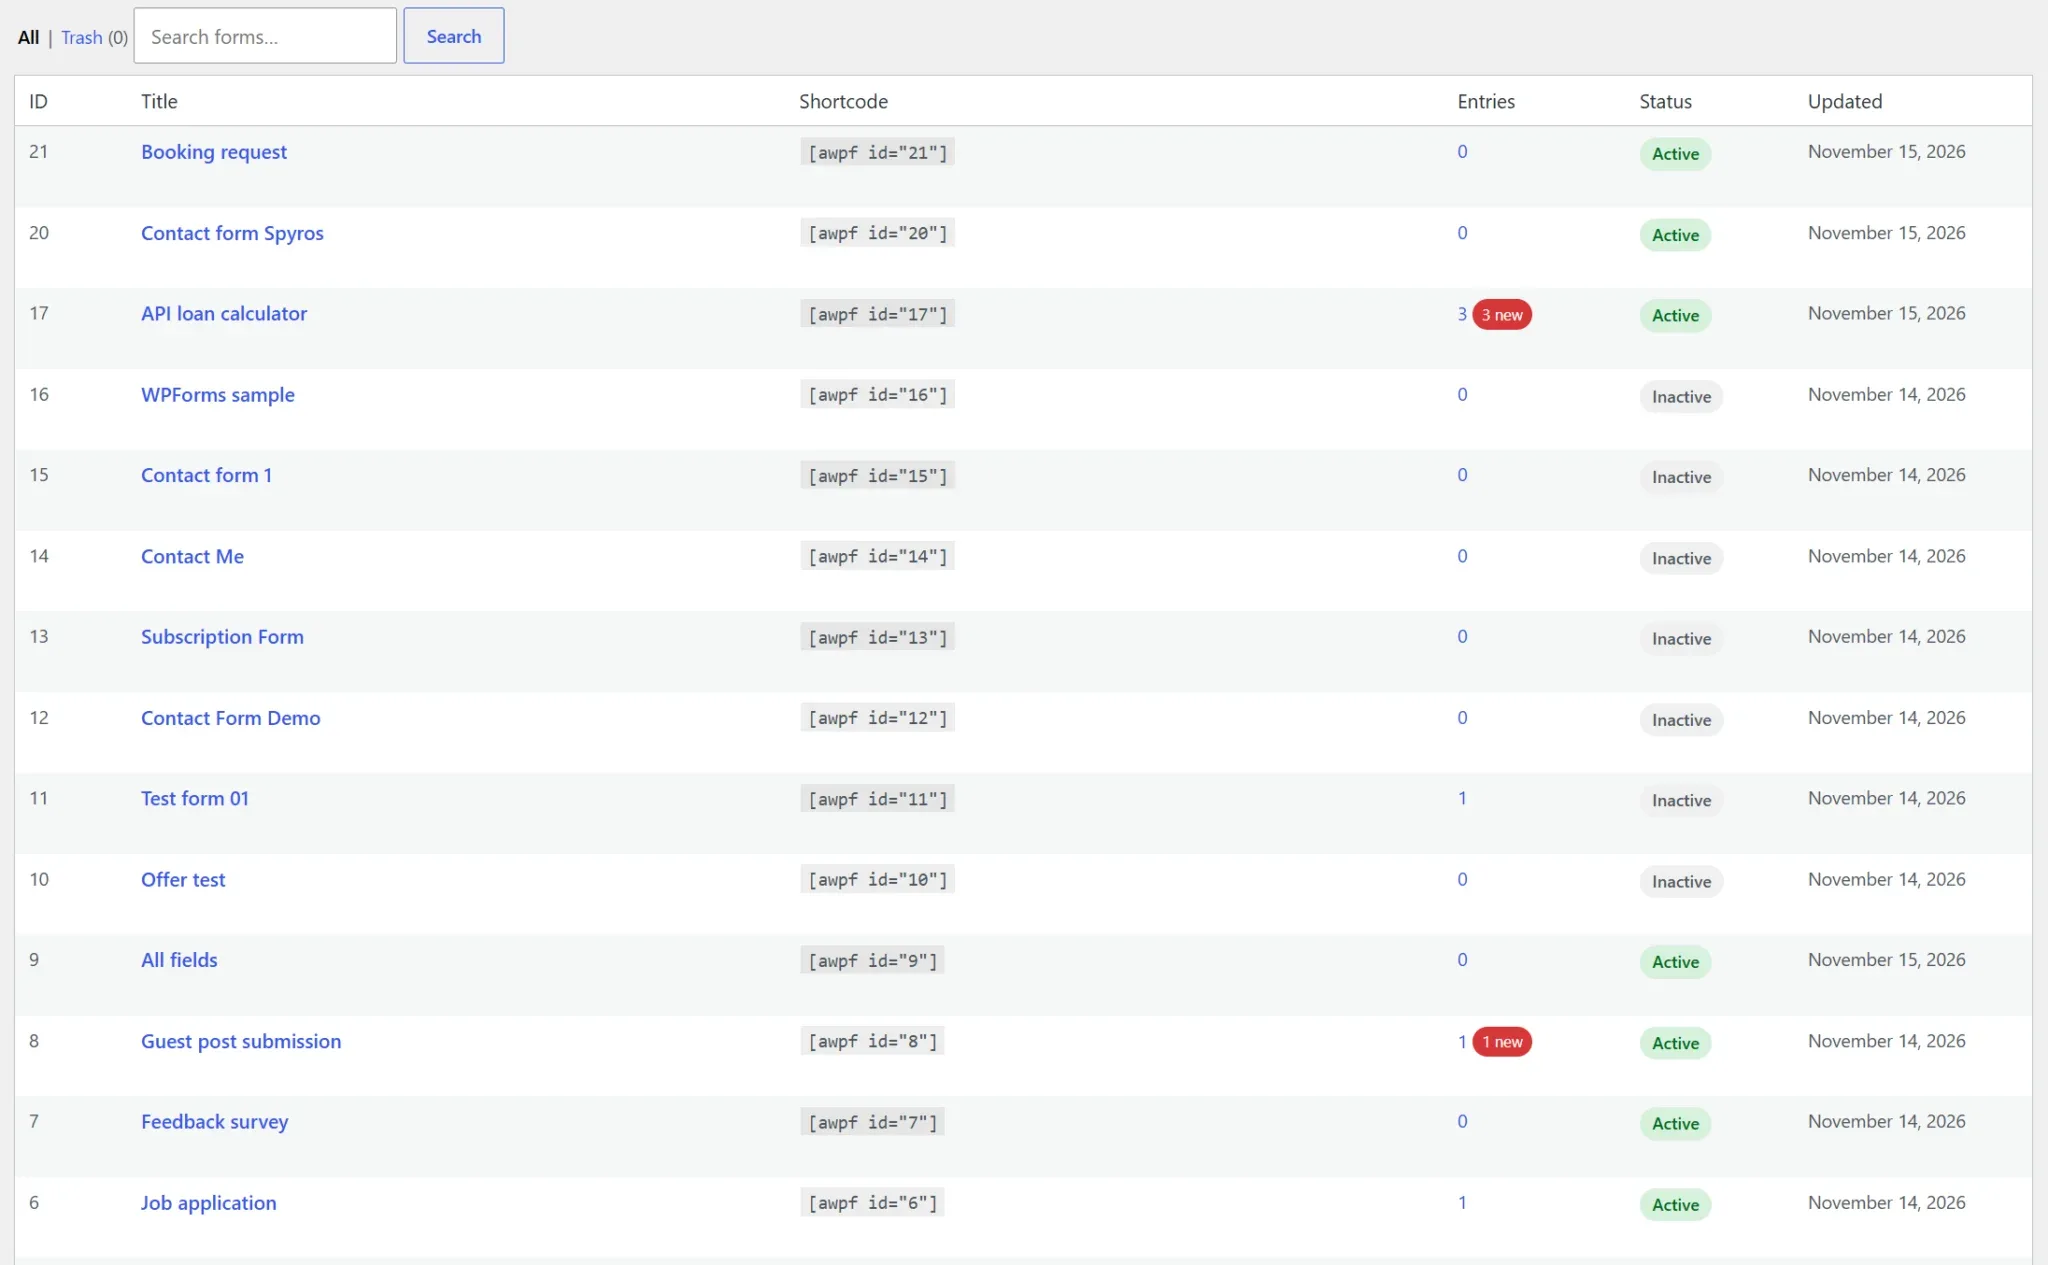
Go straight to Forms → Import / Export. Your existing forms, notifications, confirmations and entries are copied over; the source plugin is left untouched.
License and updates
Your license key is in your purchase receipt and in your account on amazingwpplugins.com.
- Open Forms → License (or the License link under the plugin on the Plugins screen).
- Paste the key and press Activate License. The key is then shown masked; the renewal date is listed below it.
- New versions now appear under Dashboard → Updates and on the Plugins screen, like any other plugin. Check for updates now asks the store straight away.
- Optionally tick Enable automatic plugin updates (the same switch as on the Plugins screen).
- Each license covers the number of sites of your plan. Moving to another site? Press Deactivate License & Remove Key on the old site first, or manage your sites in your account on the store. Staging and local copies usually do not count against the limit.
- The license is checked once a day. If the store cannot be reached, a valid license stays valid.
- Entries, Sales, Import / Export and Settings need an active license. Without one they are marked with a lock in the menu and lead to the License page, and new versions are not offered through WordPress.
- Your forms keep working on the site without a license: submissions, notifications, payments and confirmations carry on, and new entries are still saved. Activate (or renew) the license and everything is available again, nothing is lost.
- Users who may view entries but are not administrators see a short message asking them to have the license activated.
- Developers: the License page and update checks can be switched off with
define( 'AWPF_LICENSING_ENABLED', false );inwp-config.php. Filters:awpf_license_store_url,awpf_license_item_name.
Form builder
The builder has a top bar (title, Active switch, shortcode, Preview, Entries, Save) and eight tabs.
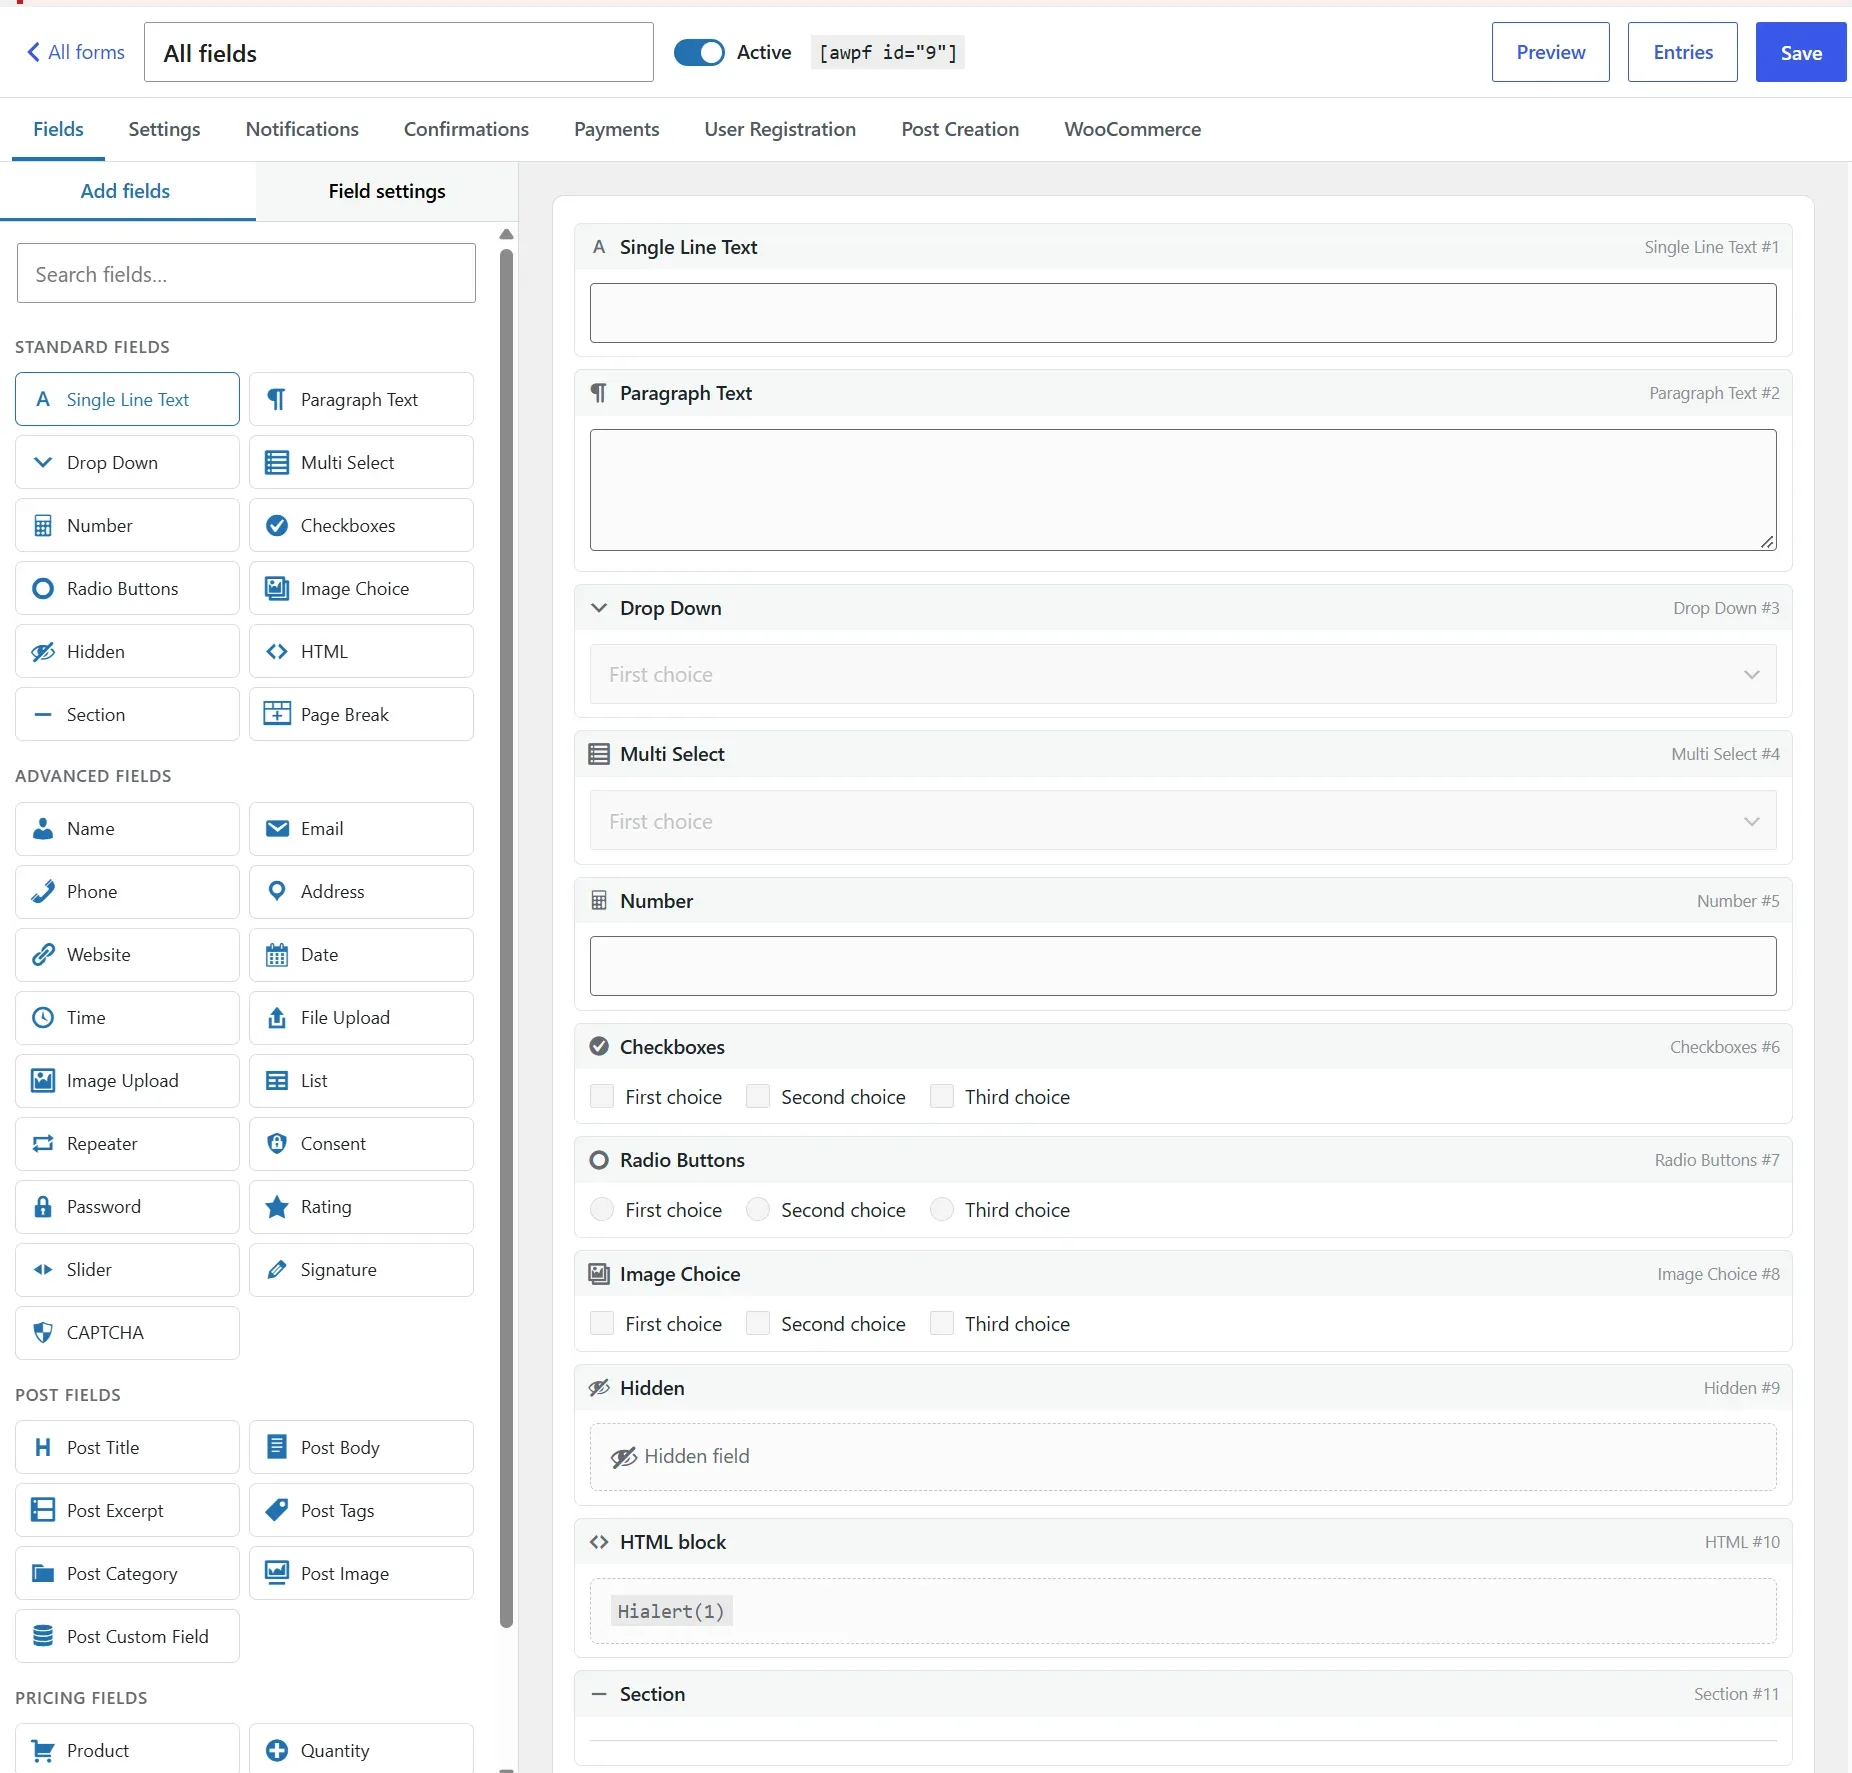
| Tab | What it controls |
|---|---|
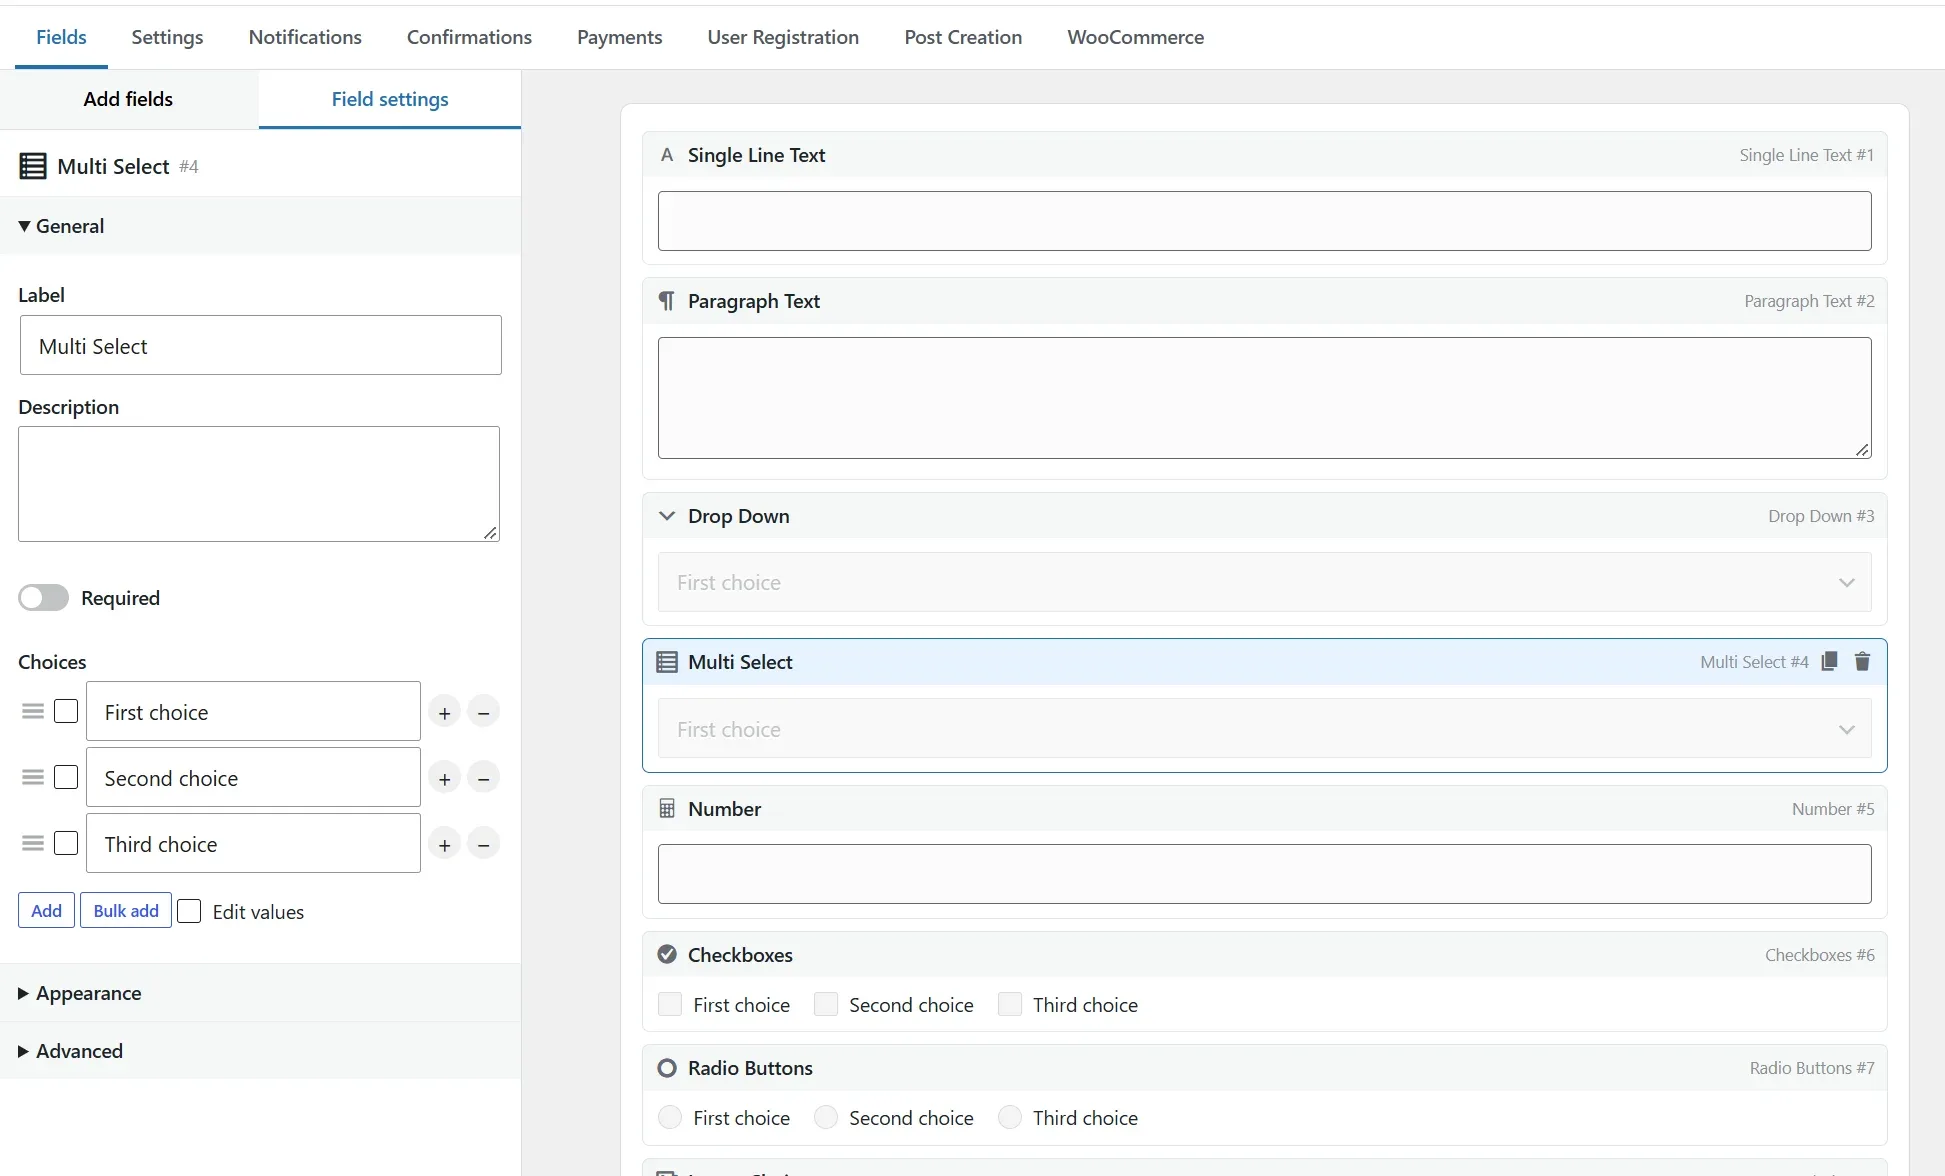
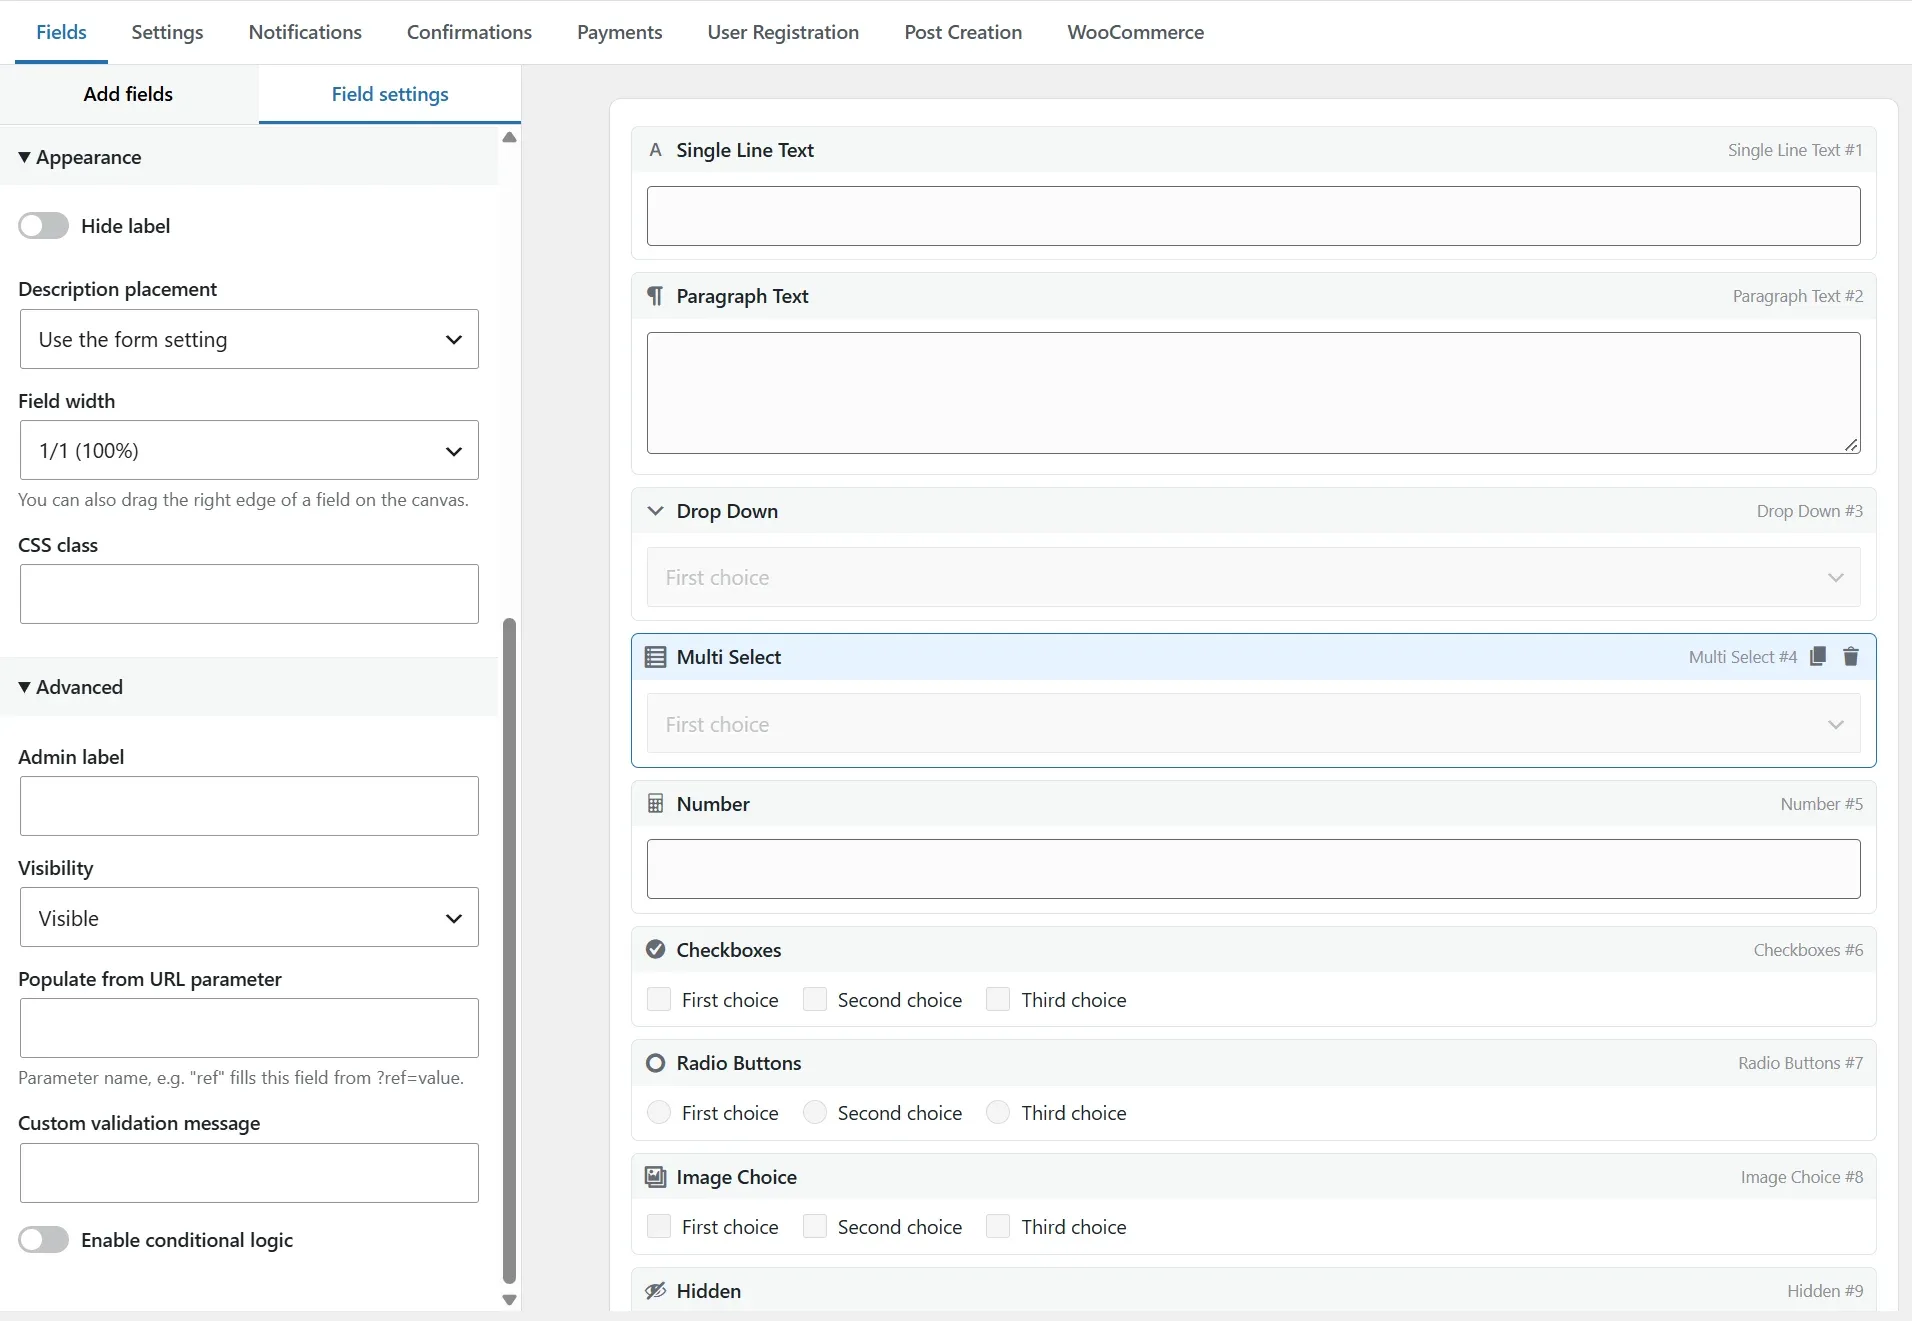
| Fields | The canvas. Left panel switches between Add fields (searchable palette) and Field settings (General, Appearance, Advanced). |
| Settings | Description, label placement, button texts, entry storage, multi-step options, partial entries, spam protection and restrictions. |
| Notifications | Any number of emails, each with recipients, routing rules and conditional logic. |
| Confirmations | One default confirmation plus any number of conditional ones. |
| Payments | Stripe and/or PayPal, one-time or subscription. |
| User Registration | Create or update a WordPress user. |
| Post Creation | Create a post of any public post type. |
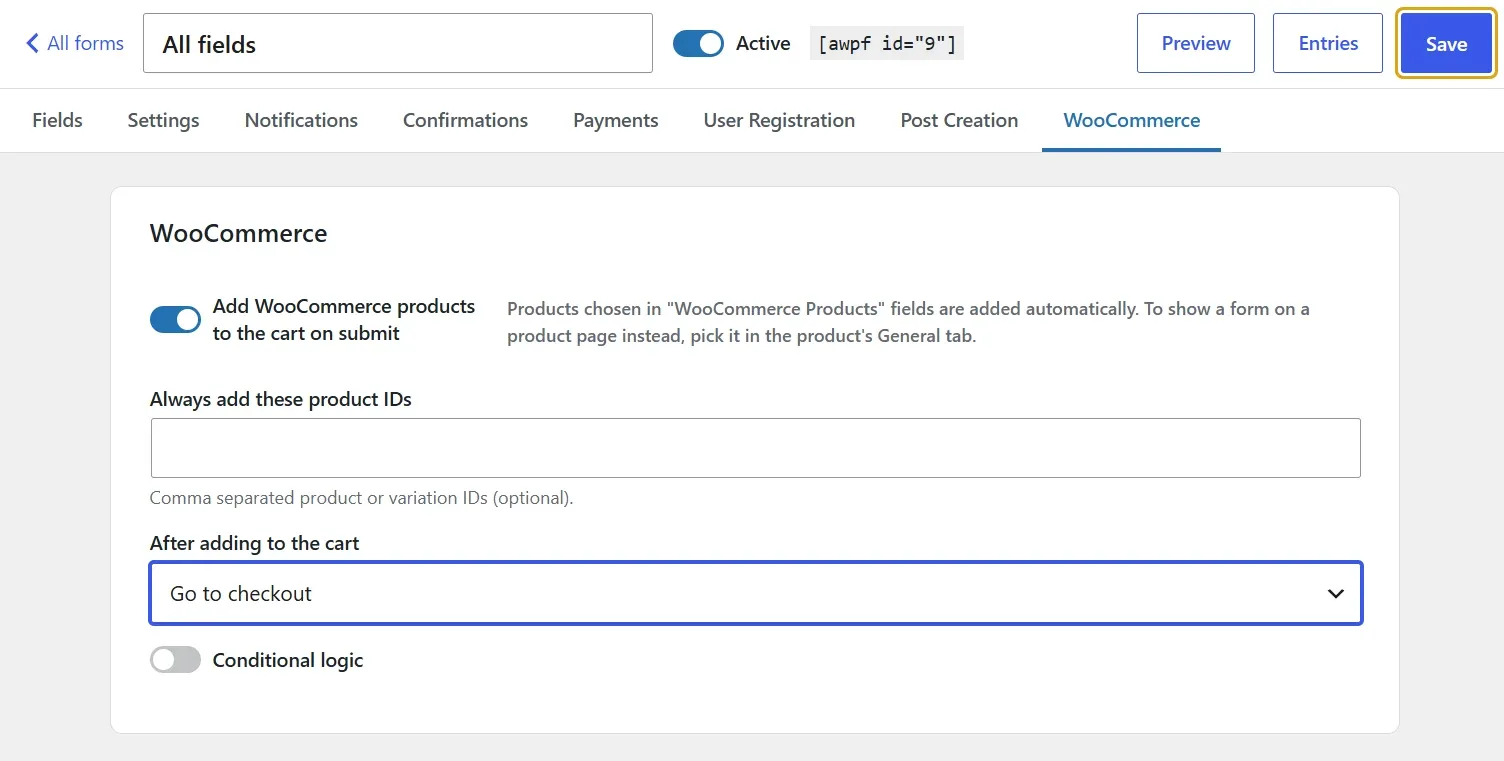
| WooCommerce | Add products to the cart when the form is submitted. |
Working with fields
- Add: drag from the palette to the exact position, or click to append.
- Reorder: drag a field by its header bar.
- Columns: drag the right edge of a field on the canvas to resize it. It snaps to 1/5, 1/4, 1/3, 2/5, 1/2, 3/5, 2/3, 3/4, 4/5 or full width, and a label shows the fraction while you drag. Adjacent fields whose widths add up to a full row sit side by side (they stack on phones). The same widths are available under Appearance → Field width.
- Duplicate / delete: icons in the field header.
- Visibility: Hidden submits the field without showing it; Administrative never renders it and takes its value only from the default (useful for internal tags).
- Dynamic population: set Populate from URL parameter to
refand the field is filled from?ref=value, or from the shortcode’sfield_values. - No duplicates: rejects a value that already exists in an active entry for that field.
- Description placement: Settings → General → Field description placement puts field descriptions below the field (default) or below the label; each field can override it under Appearance → Description placement.
- Character limit: on a Paragraph Text field set Maximum characters; typing stops at the limit and the server enforces it too. Turn on Show the remaining characters below the field for a live “120 of 500 max characters” counter, which turns red at the limit.
Form restrictions (Settings tab)
- Require login, with a custom message.
- Limit entries in total or per day / week / month / year, optionally per logged-in user.
- Schedule: open and close date-times in the site’s time zone.
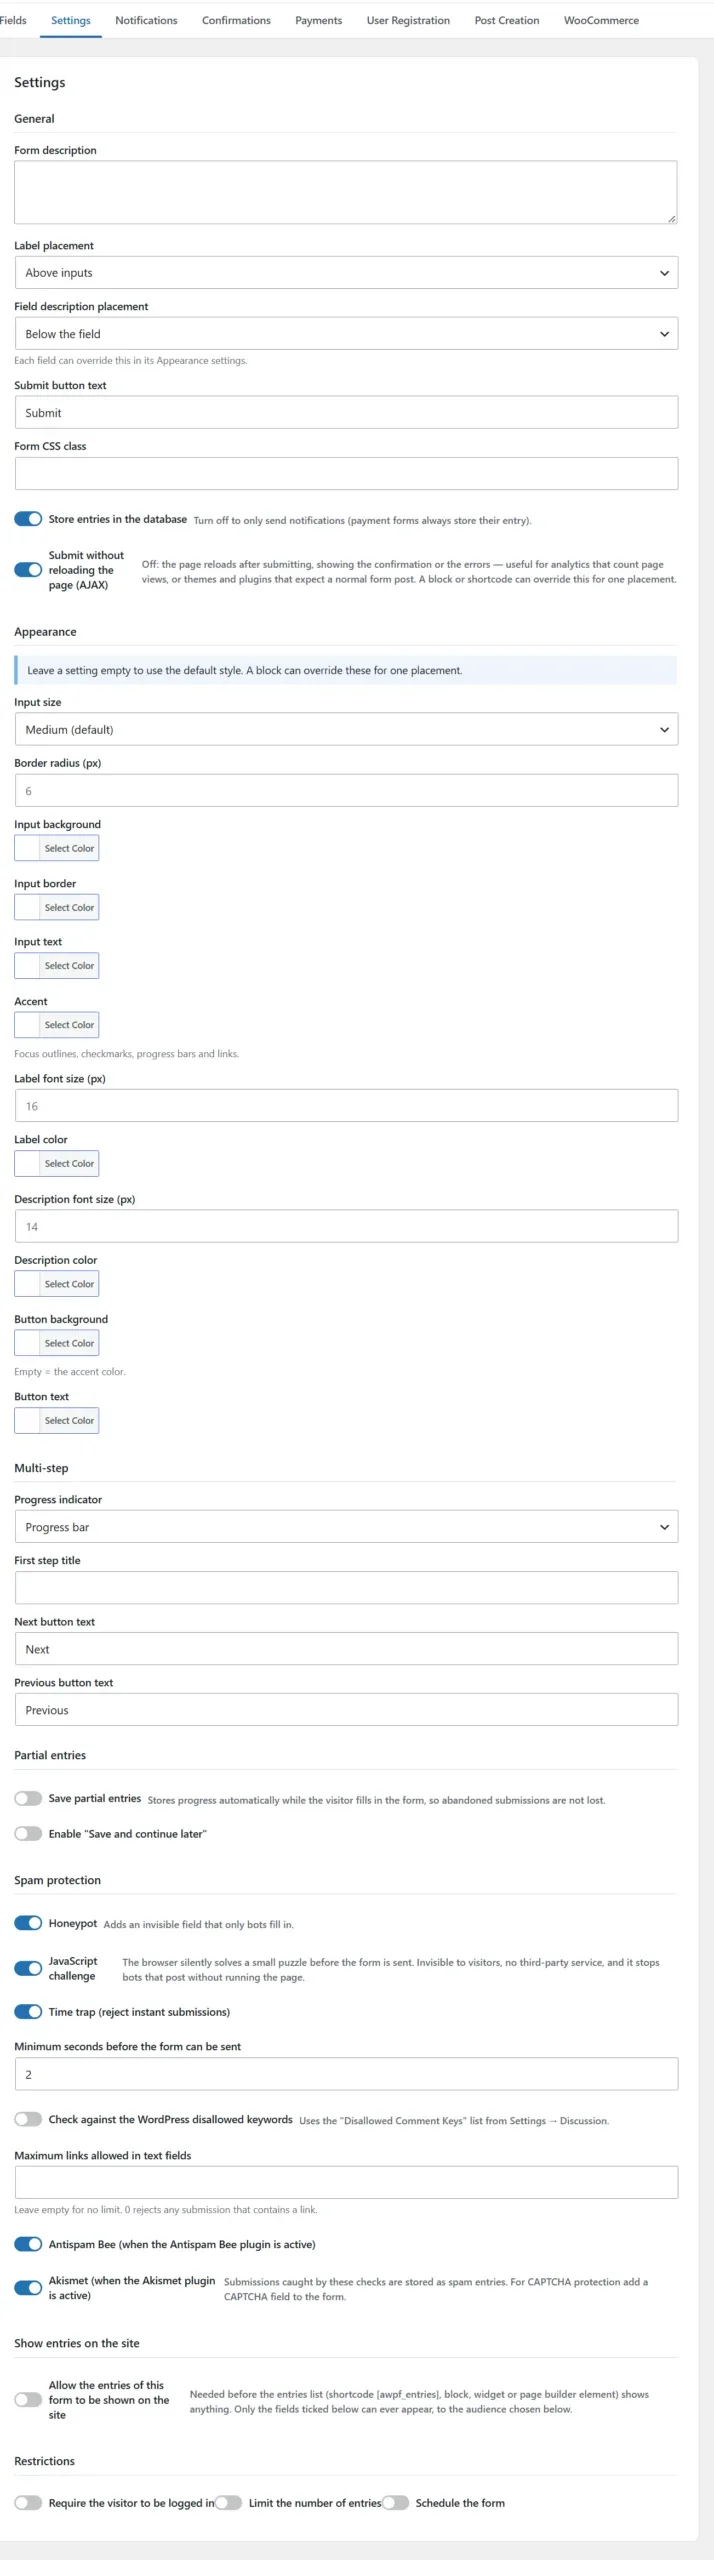
Restrictions are enforced twice.
The message is shown instead of the form, and the same rule is checked again when a submission arrives — so a cached page can never let a closed form through.
Field reference
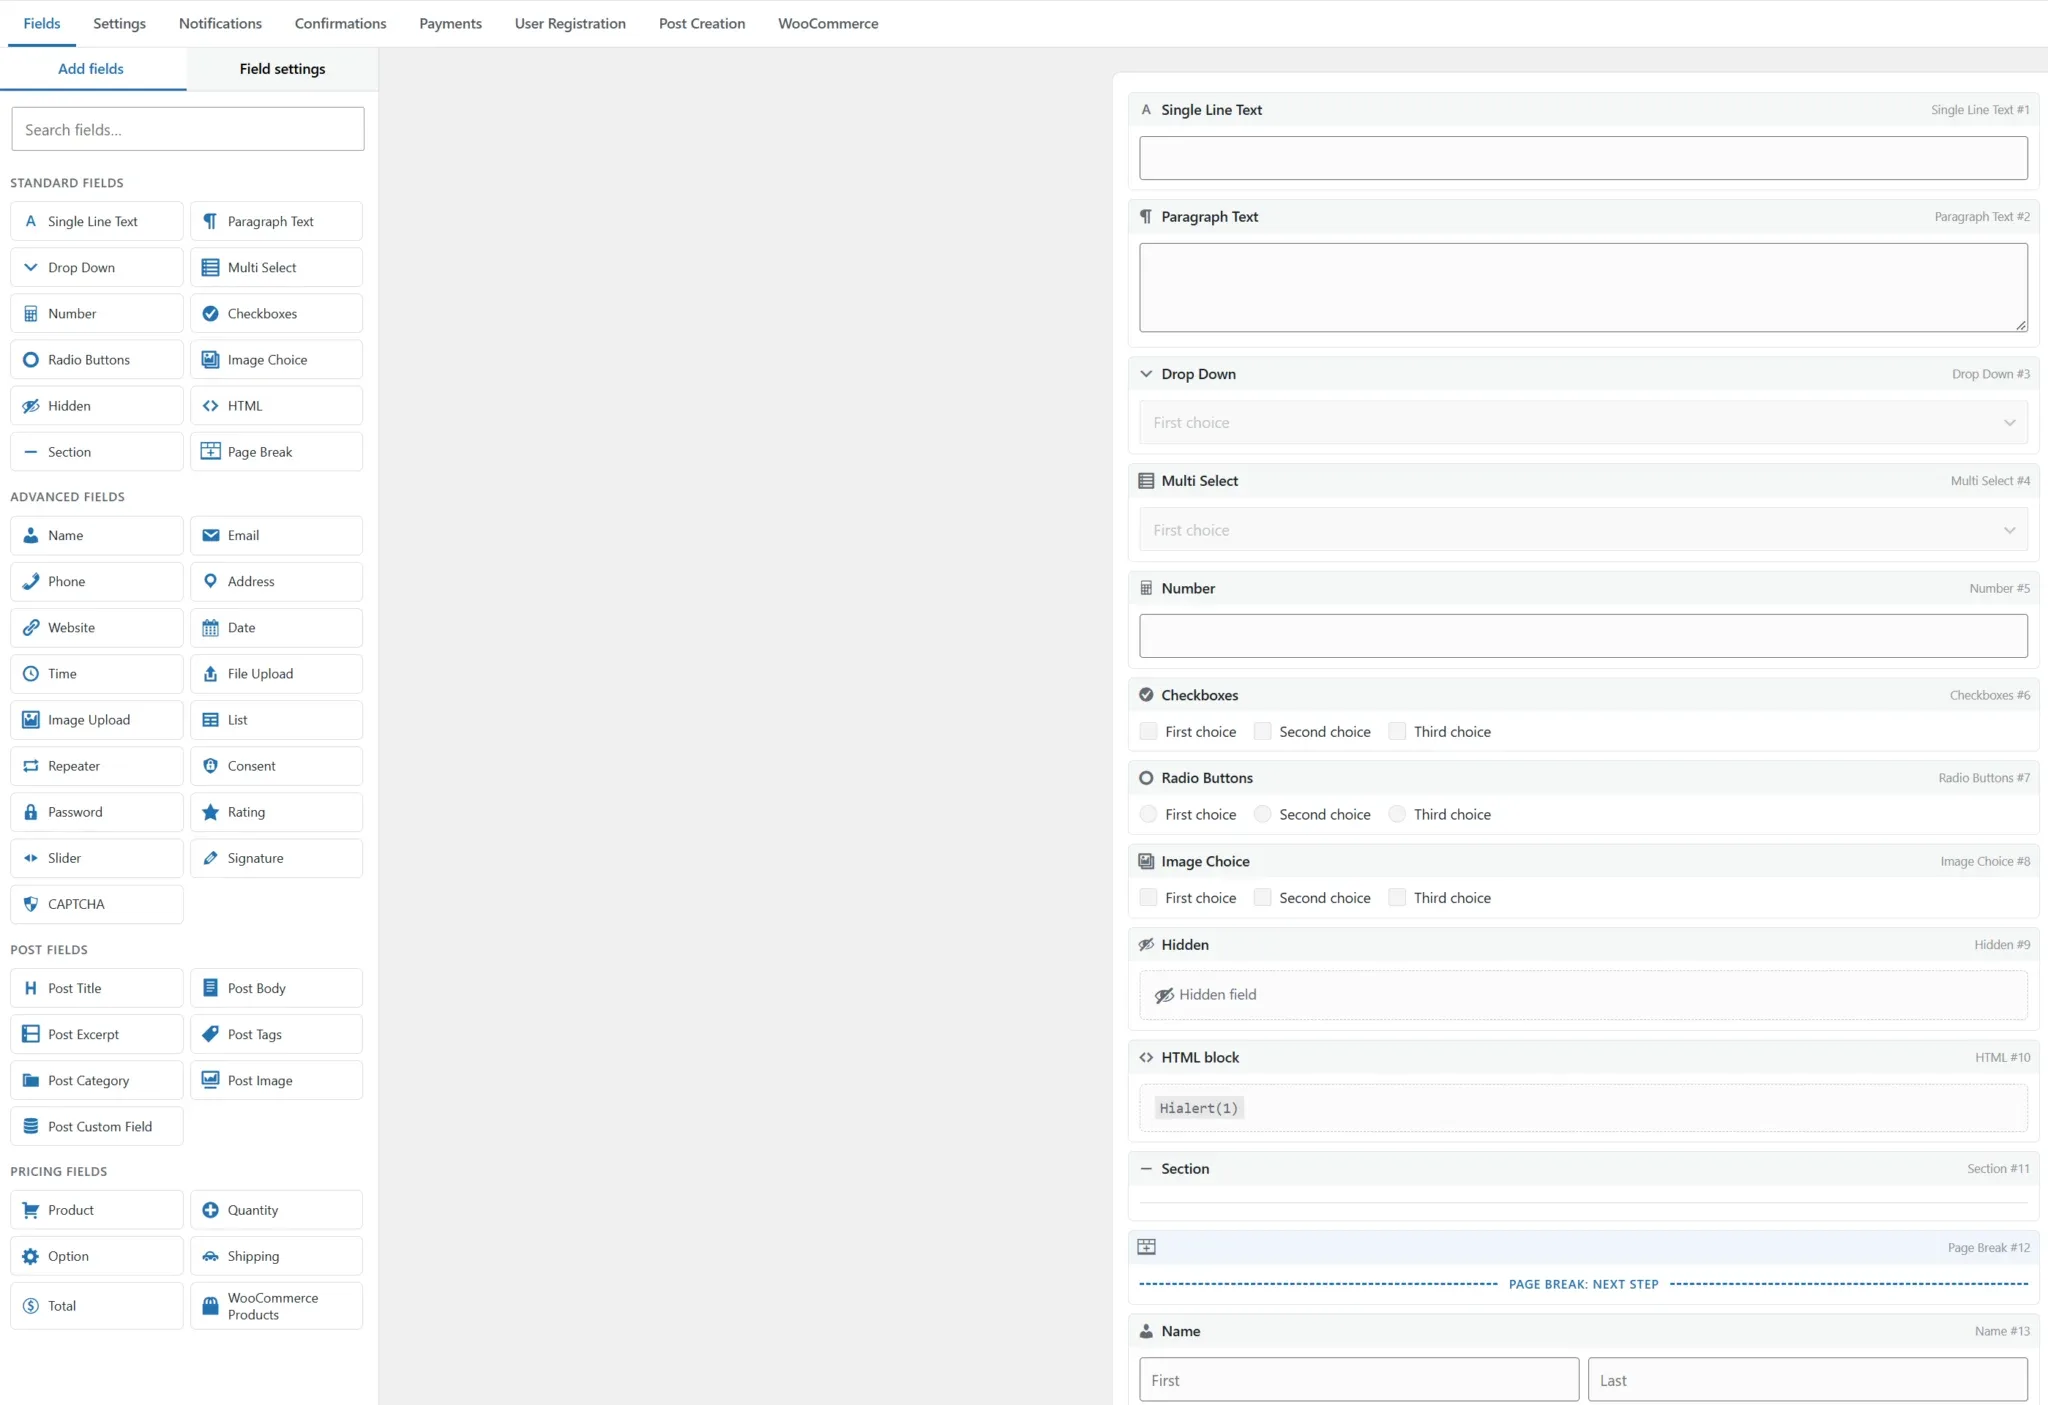
Standard fields
| Field | Notes |
|---|---|
| Single Line Text, Paragraph Text | Placeholder, default value, maximum characters (Paragraph Text: optional live character counter). |
| Drop Down, Multi Select, Radio Buttons, Checkboxes | Choices with optional separate values and defaults; bulk add; layouts (inline, 2–4 columns). Radio supports an “Other” choice; Checkboxes a maximum number of selections. |
| Image Choice | Choices with images from the media library, single or multiple. |
| Number | Minimum, maximum, step, and optional calculation. |
| Hidden | Stores a default value or merge tag, e.g. {query:utm_source}. |
| HTML, Section | Content blocks and headings. HTML accepts shortcodes. |
| Page Break | Starts a new step. |
Advanced fields
| Field | Notes |
|---|---|
| Name | First / last, optional prefix, middle and suffix. |
| Optional confirmation input. | |
| Phone, Website, Date, Time | Native inputs (no datepicker library). Date accepts earliest / latest limits such as today or +7 days, and can be linked to another Date field (see below). |
| Address | Street, line 2, city, state, ZIP, country; parts can be hidden; default country. |
| File Upload, Image Upload | See File & image uploads. |
| List | Rows of one or more columns the visitor can add. |
| Repeater | A group of fields the visitor can repeat. |
| Consent | Checkbox with your wording (links allowed); the agreed text is stored with the entry. |
| Password | With confirmation and minimum length. Used by User Registration; never stored in entries. |
| Rating, Slider, Signature | Stars (2–10), range slider, and a touch-friendly signature pad saved as a PNG. |
| CAPTCHA | reCAPTCHA, Turnstile or hCaptcha. |
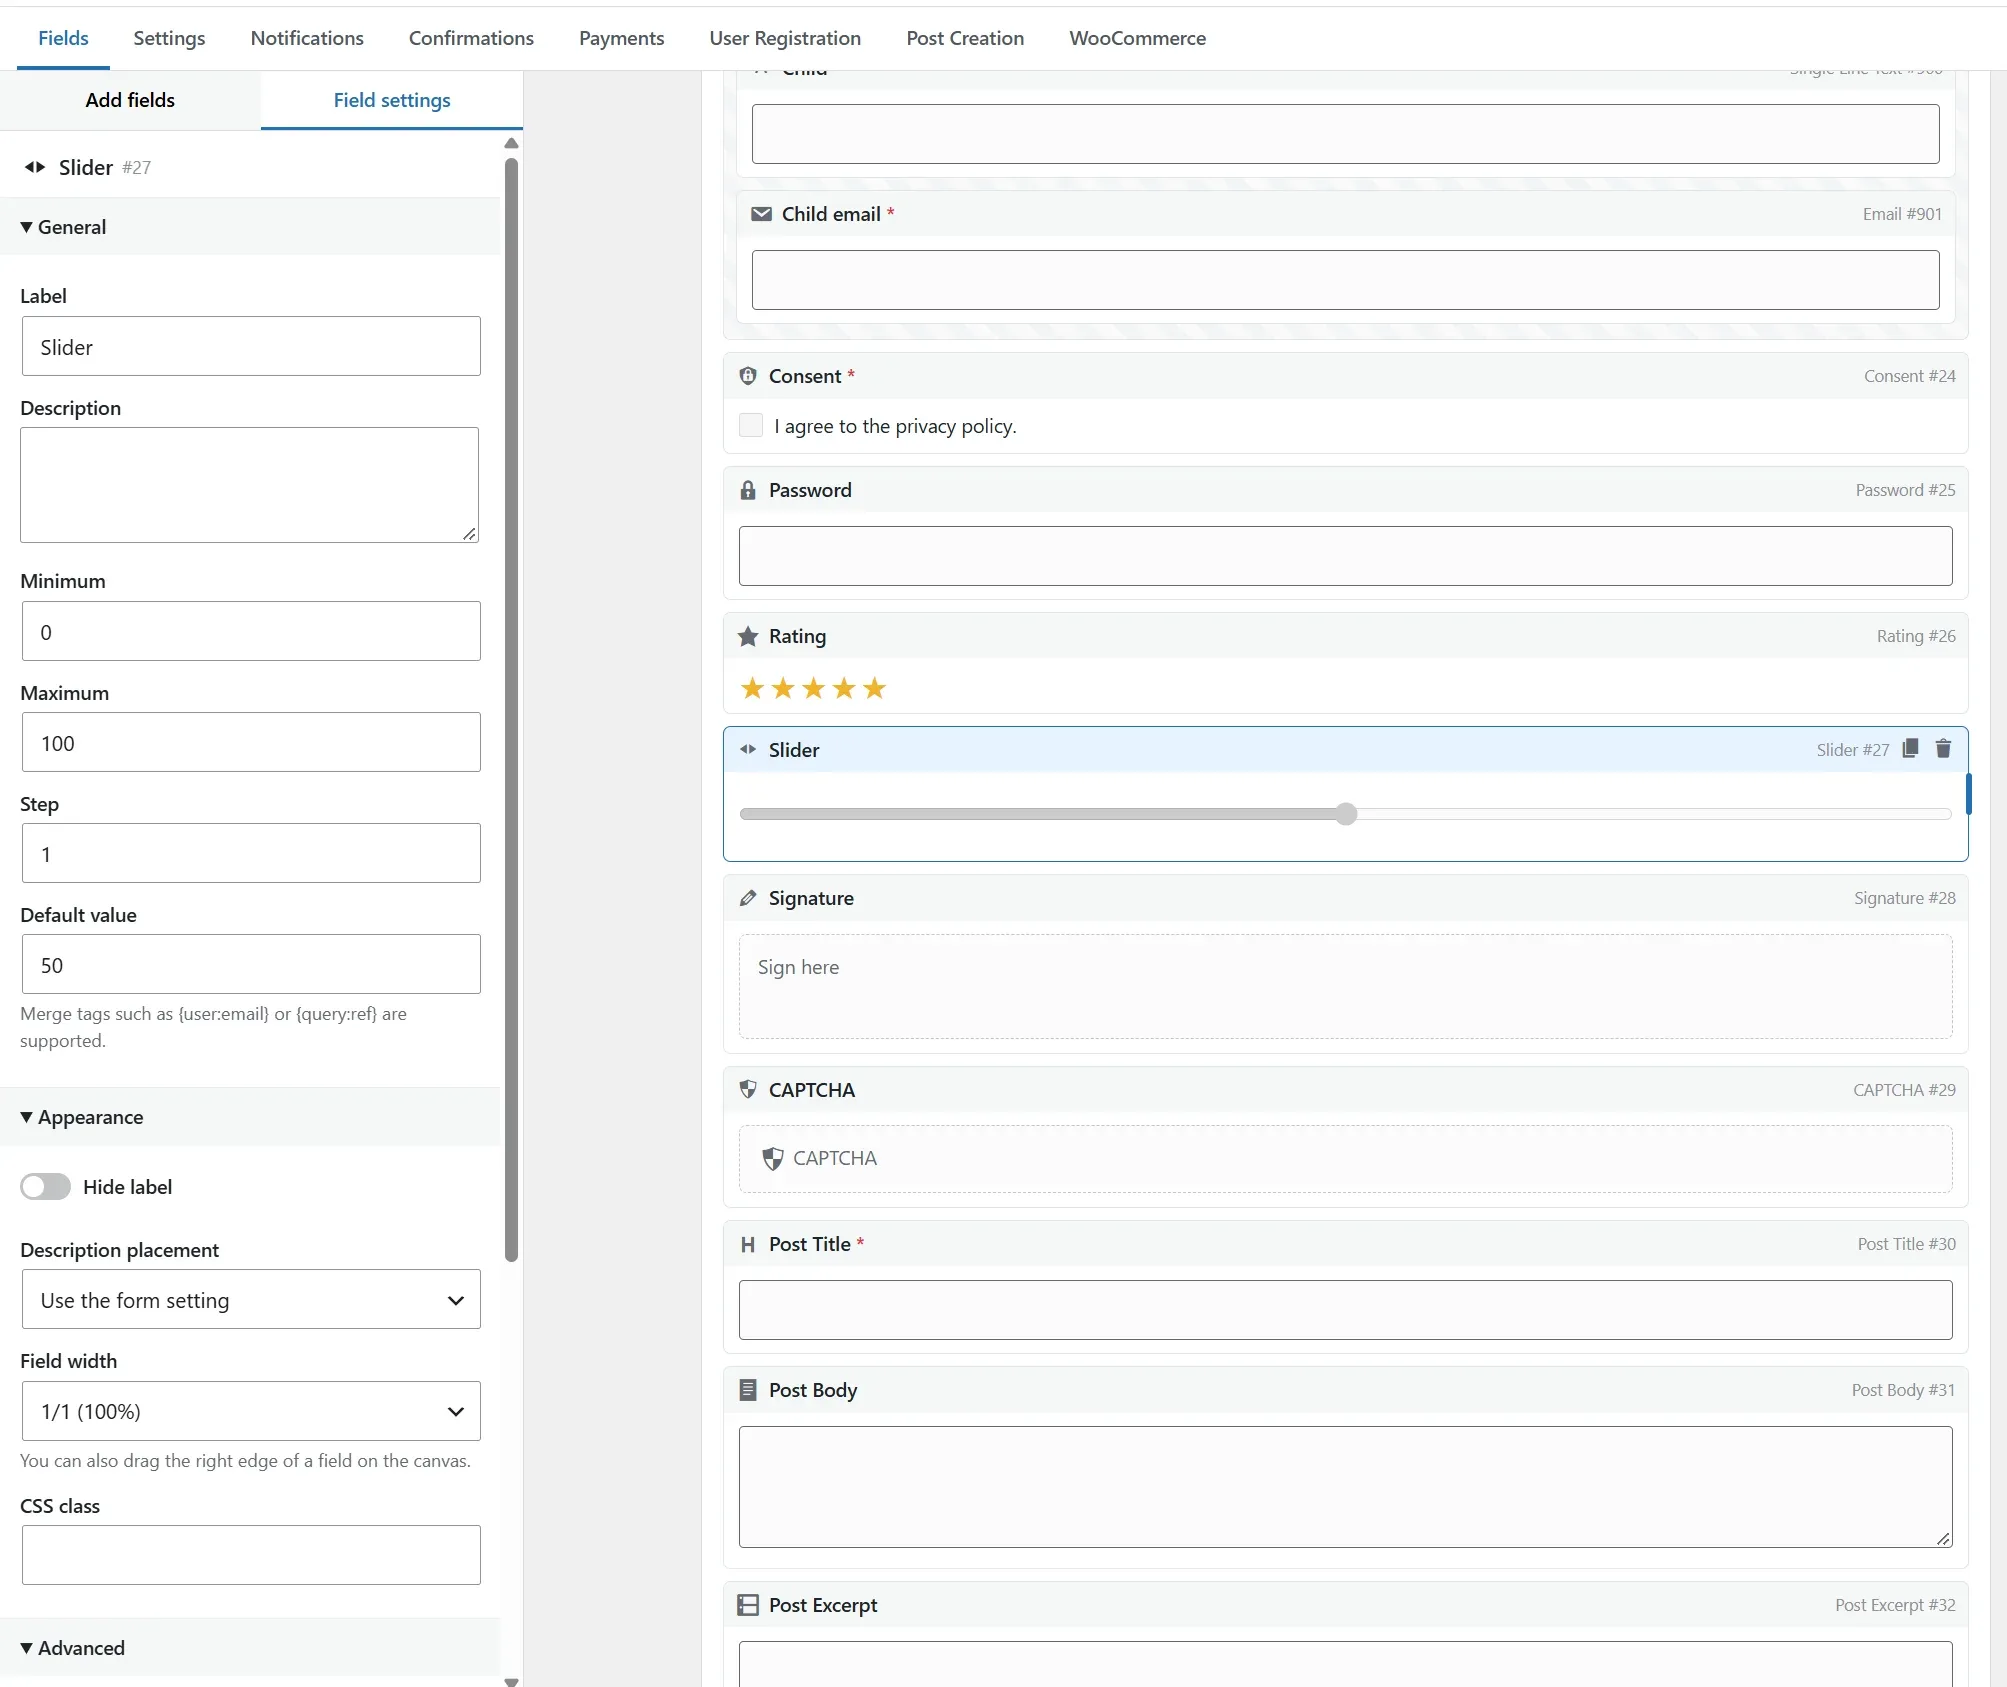
Linked dates (arrival / departure)
A Date field can depend on another Date field of the same form, so a visitor cannot pick, say, a departure before the arrival. Select the dependent field (e.g. Departure) and under Link to another date set:
- This date depends on — the other Date field (e.g. Arrival).
- This date must be — after or before the other date.
- Minimum days apart — 1 (default) means at least the next day; 0 also allows the same day; 3 enforces a minimum stay of three nights.
- Maximum days apart — optional, e.g. 30 for a maximum stay.
- Error message — optional; otherwise a message such as “Departure must be after Arrival.” is generated from the field labels.
The calendars limit each other in both directions: as soon as one of the two dates is chosen, the days that would break the rule are unavailable in the other field’s pop-up calendar (for example, with a departure chosen first, arrival can only be an earlier day within the maximum stay). Clearing a date lifts the limit again. If the other date is changed afterwards and the pair becomes invalid, the error appears immediately under the field. The rule is checked again on the server, and it is skipped while either date is empty or hidden by conditional logic. Combine it with a calculated Number field to show the number of nights: datediff( F2, F3 ).
Post fields
Post Title, Post Body, Post Excerpt, Post Tags, Post Category (any taxonomy), Post Image (featured image) and Post Custom Field. See Post creation.
Pricing fields
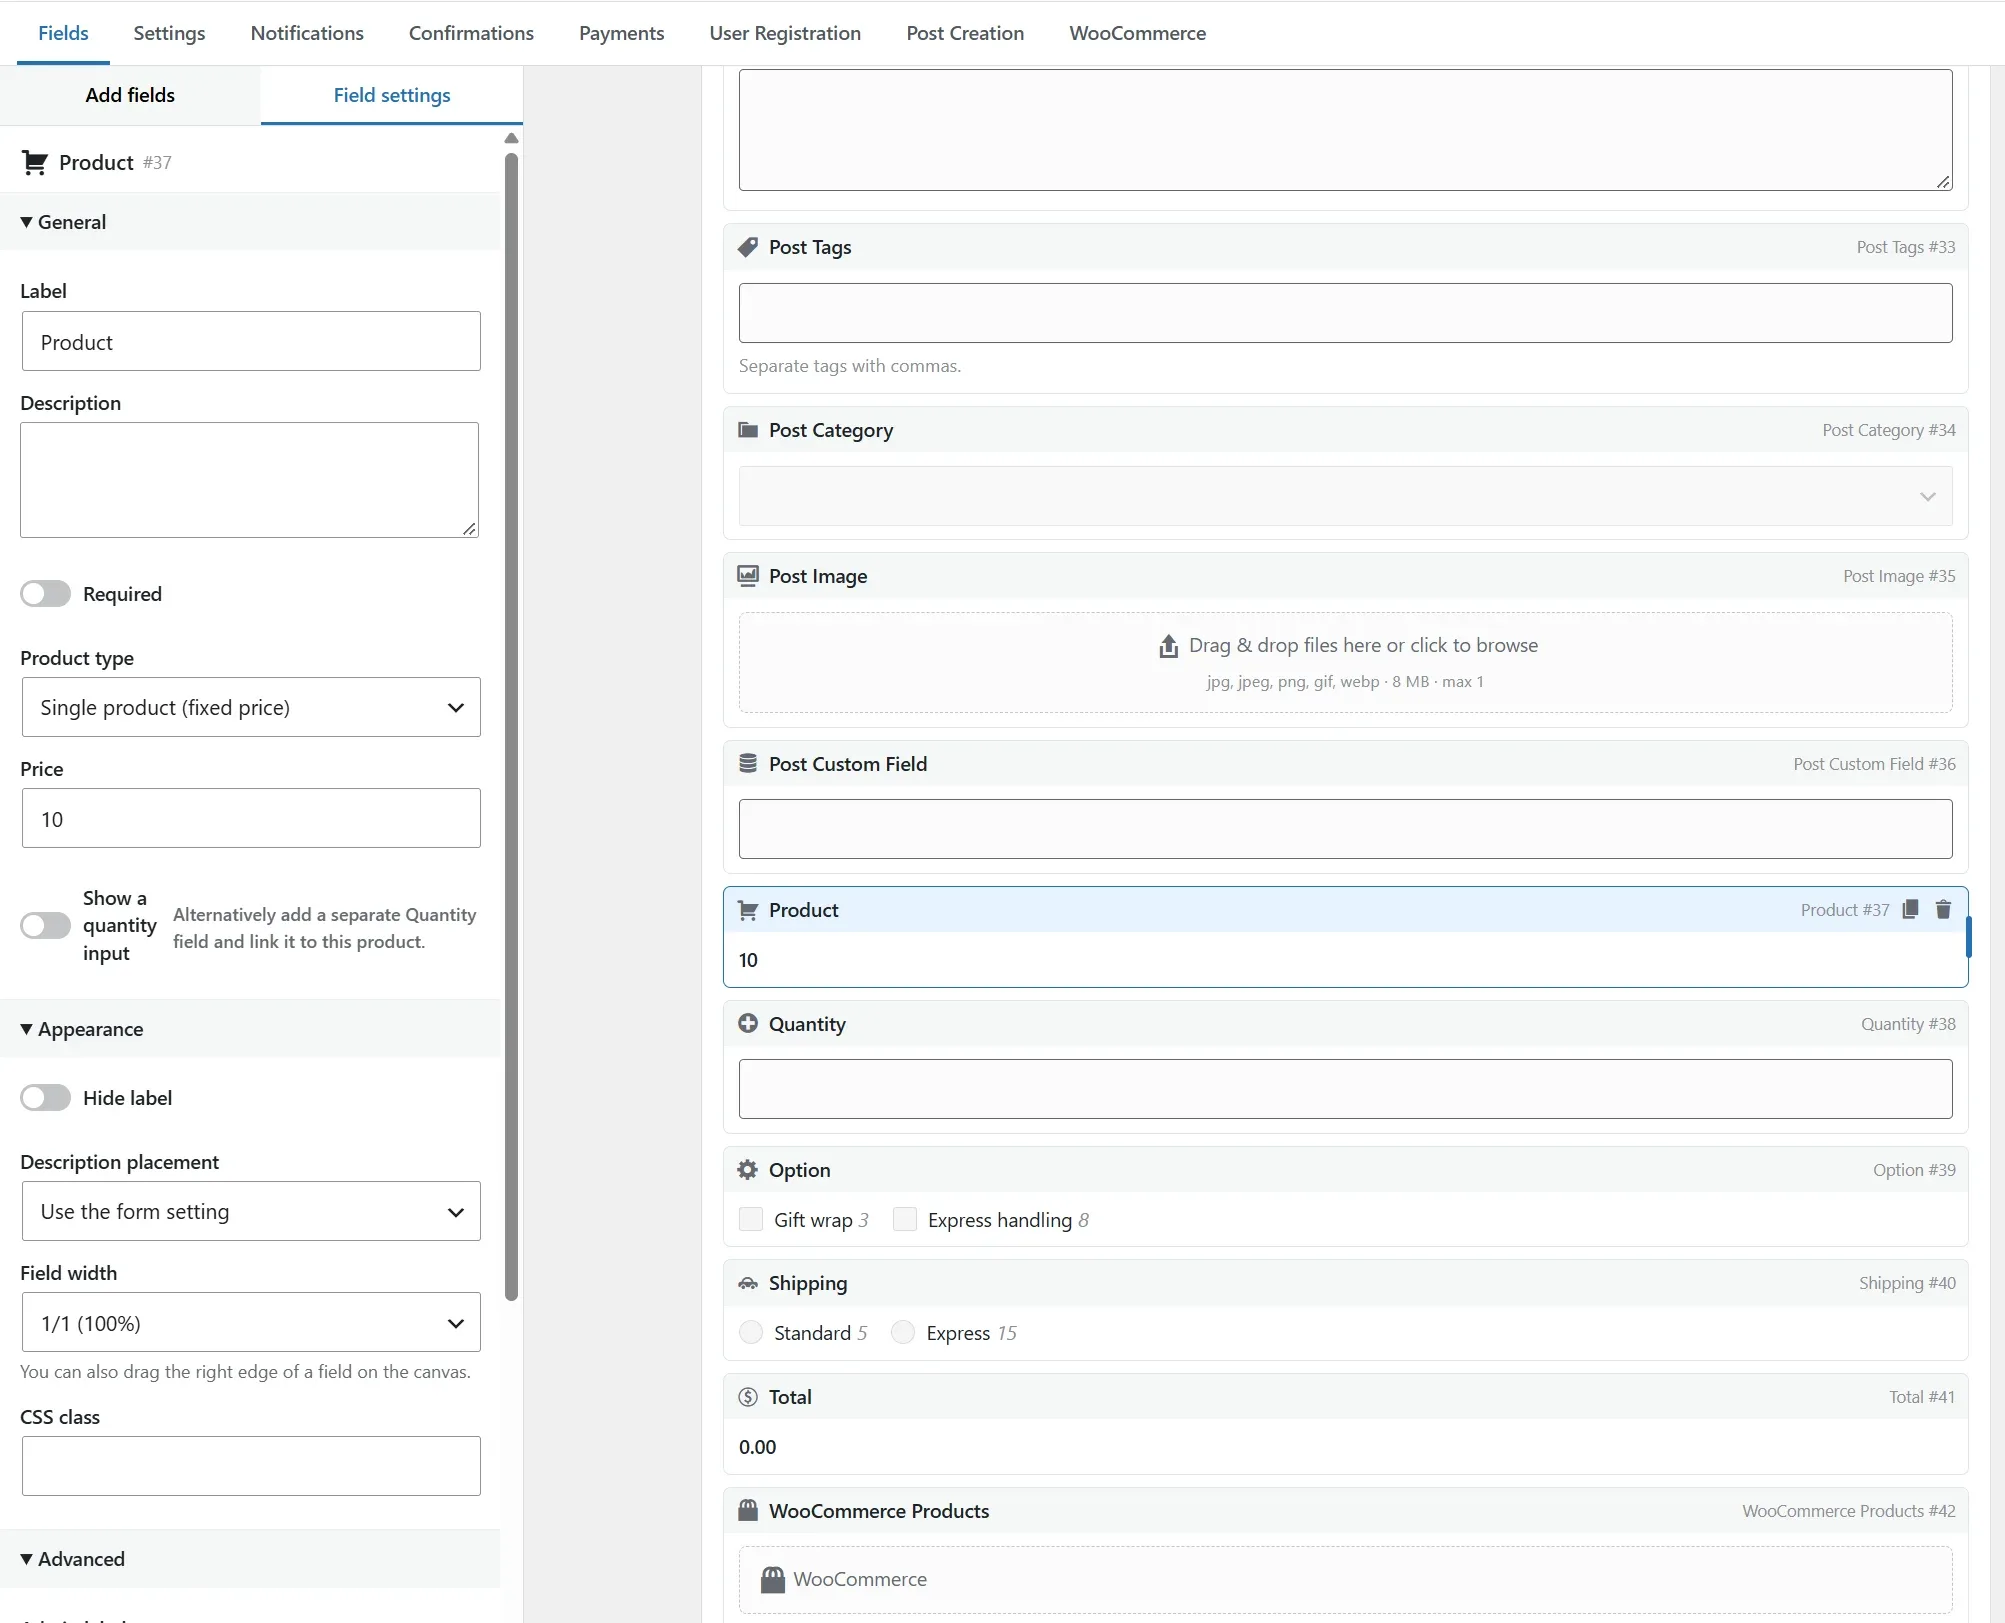
| Field | Notes |
|---|---|
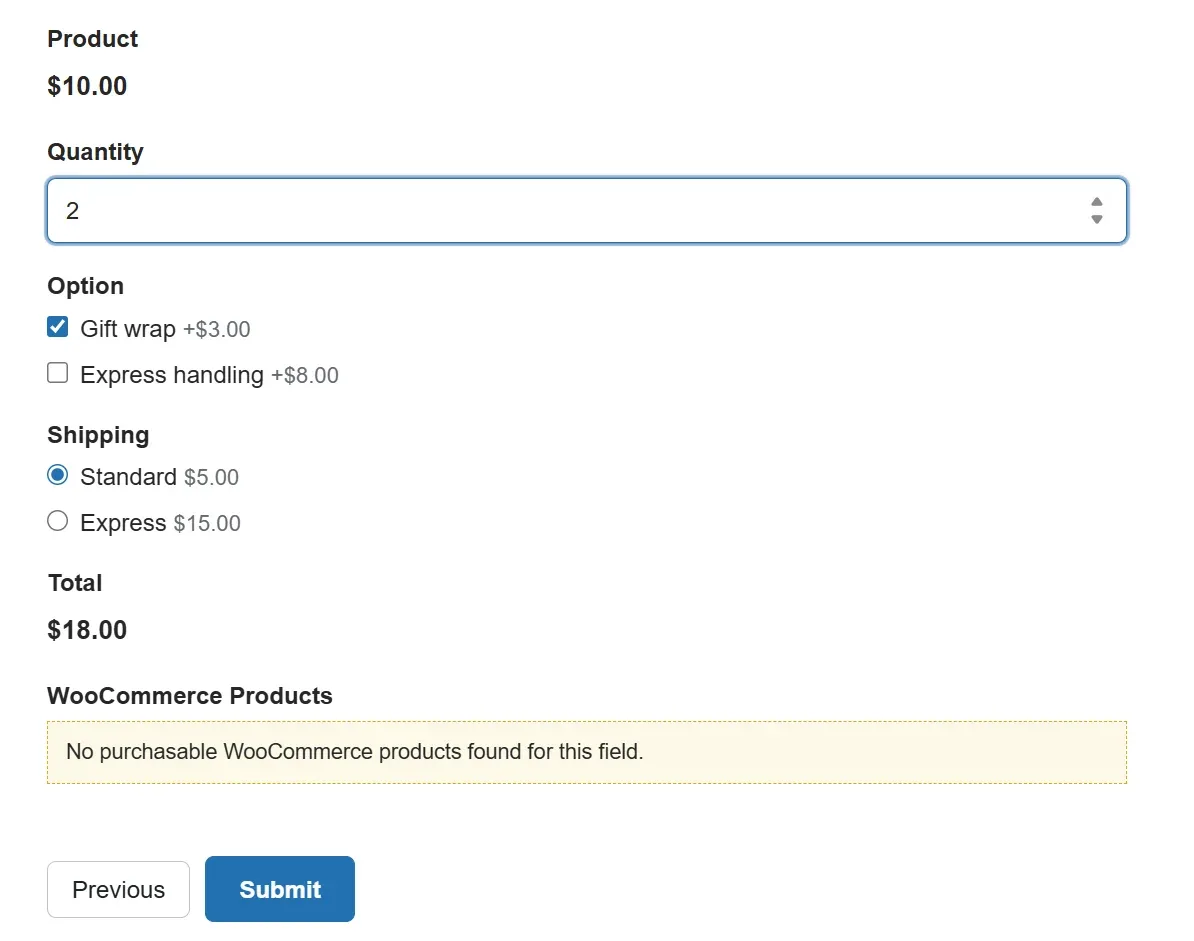
| Product | Fixed price, drop down, radio buttons, user-defined amount (donation) or hidden. Optional quantity input. |
| Quantity | A separate quantity linked to a product. |
| Option | Priced add-ons linked to a product (multiplied by its quantity), or a flat add-on when not linked. |
| Shipping | Single method or a choice of methods. |
| Total | Live total. The amount charged is always recalculated on the server. |
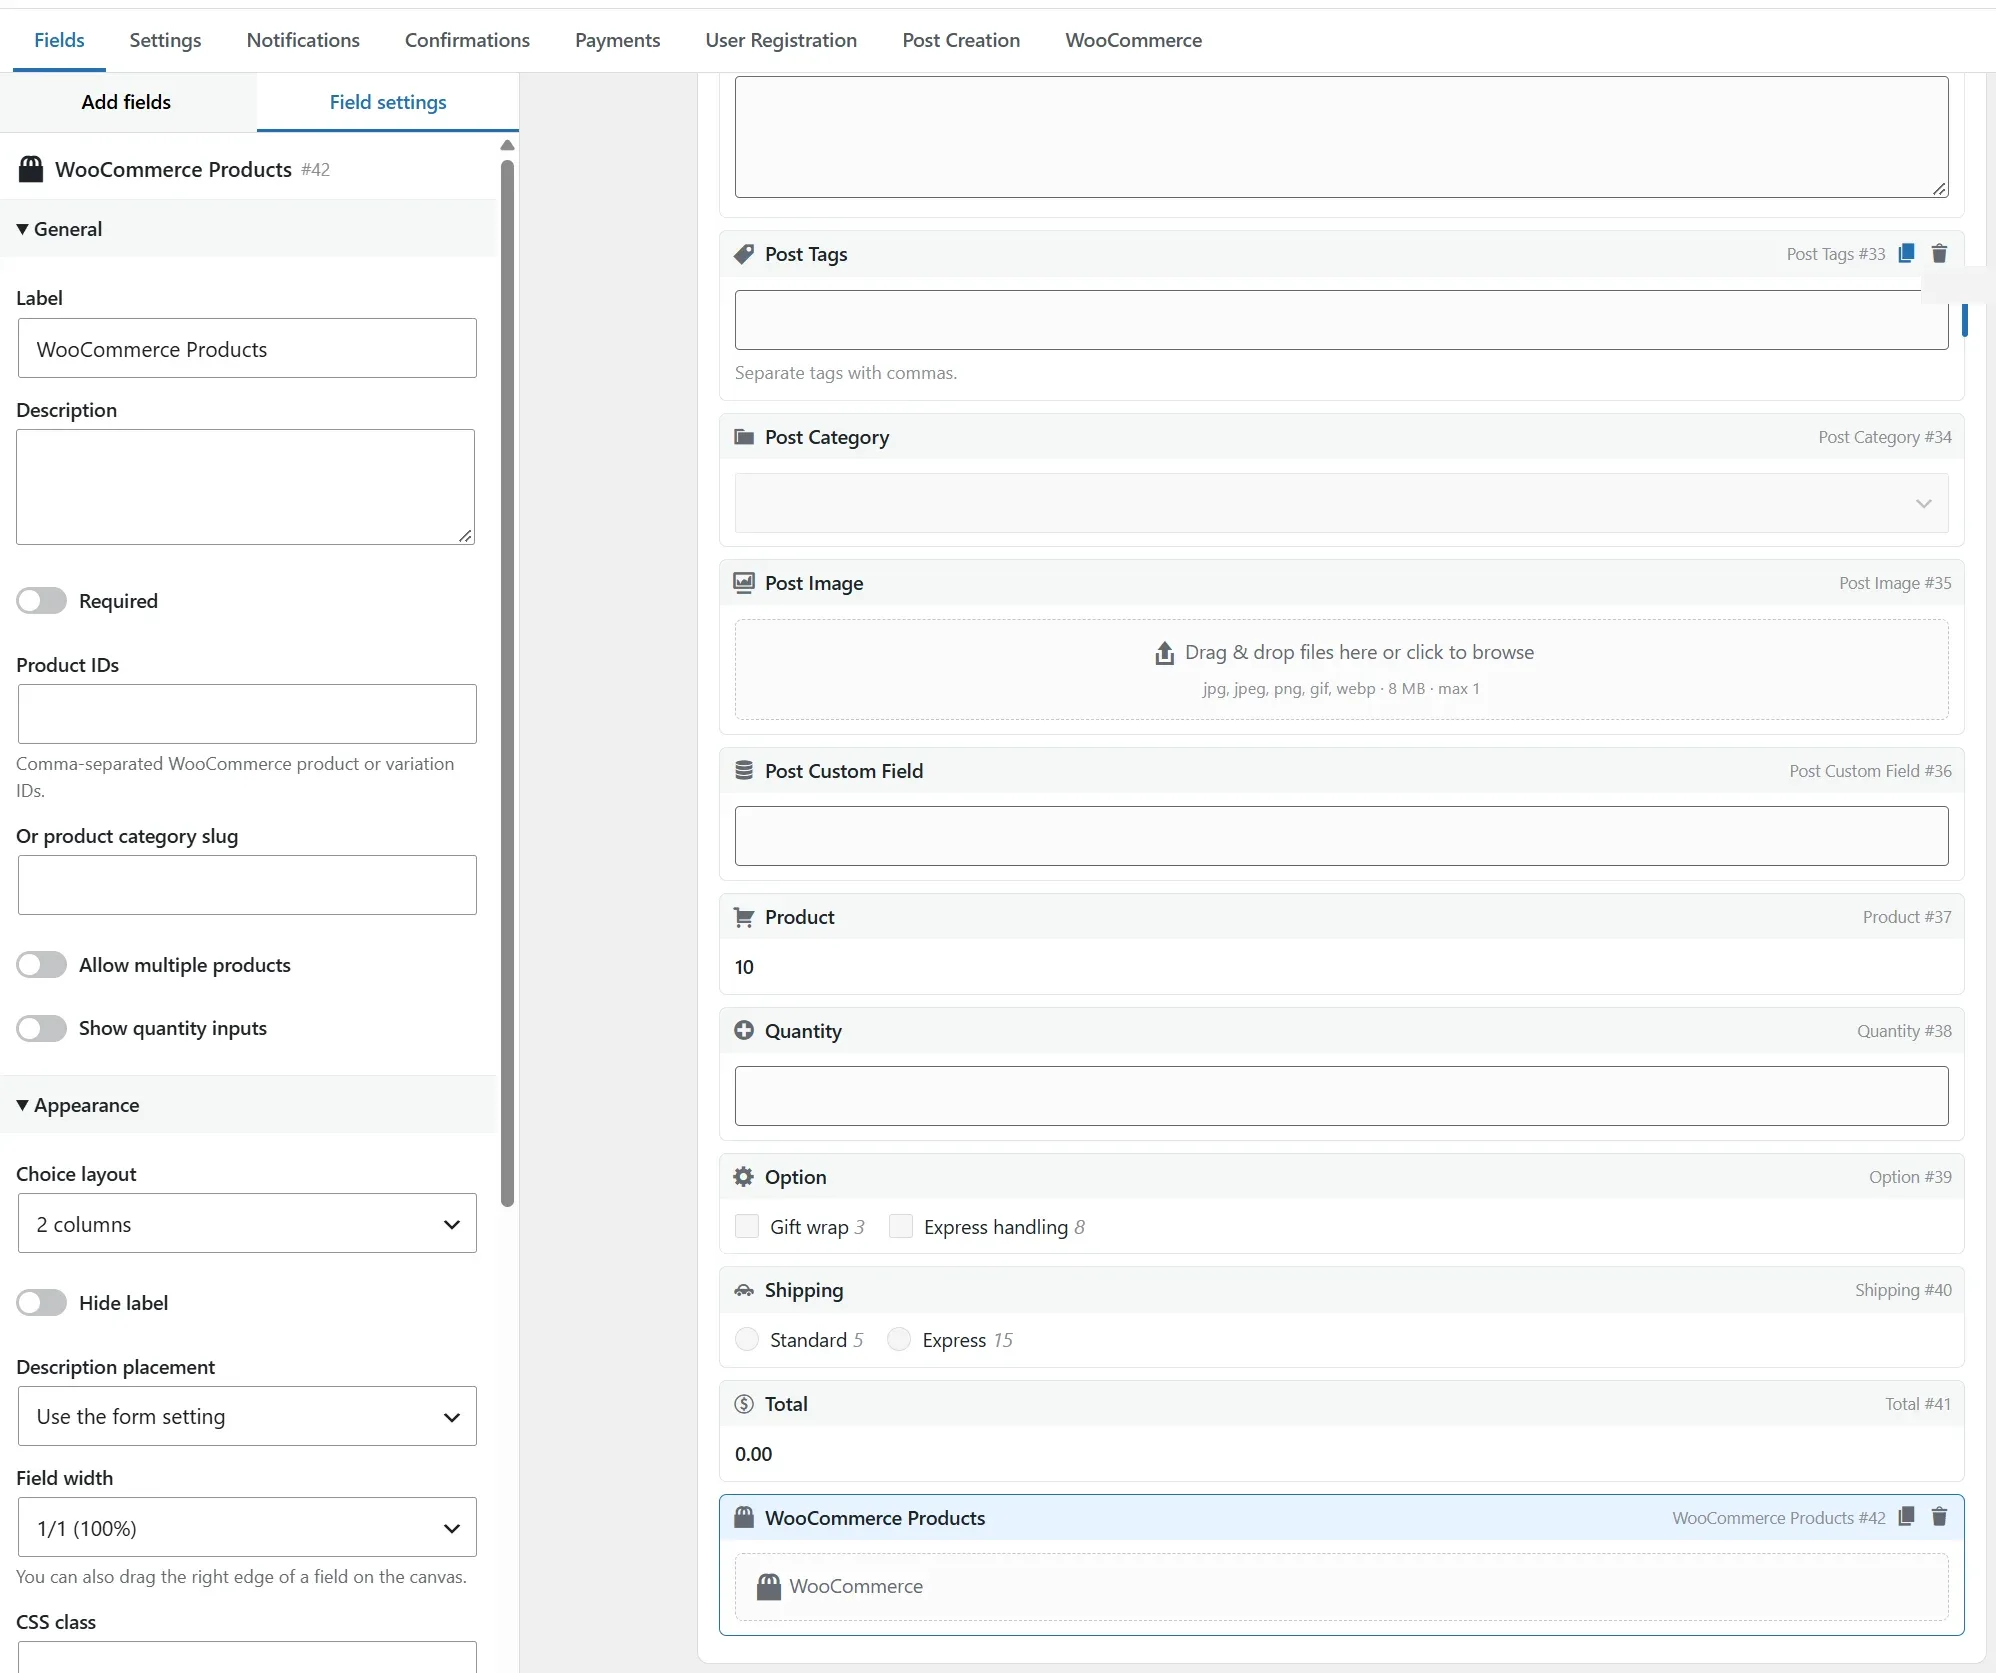
| WooCommerce Products | Lets the visitor pick WooCommerce products to add to the cart. |
Conditional logic and calculations
Every field has Advanced → Conditional logic: Show or Hide this field if all or any of the rules match. The same rule editor is available on notifications, confirmations, payments, registration, post creation and the WooCommerce feed.
Operators: is, is not, greater than, less than, contains, starts with, ends with, is empty, is not empty. Comparisons are case-insensitive.
Hidden means not submitted.
Logic runs in the browser for instant feedback and again on the server. A field hidden by logic is never validated, stored or charged — even if someone tampers with the request.
Calculations
On a Number field enable Advanced → Enable calculation and enter a formula. The result updates live while the visitor fills in the form and is recalculated on the server when the form is submitted, so it cannot be tampered with. The formula box checks the formula as you type, and its {…} button inserts fields and functions.
( {field:3} + {field:4} ) * 1.24Referring to fields
Use the merge tag {field:3} or the shorthand F3. A descriptive form such as {Quantity:3} works too. A Product field contributes its price × quantity; a choice field contributes its numeric value (several selected choices are added up). Date fields count as a date, Time fields as a time of day. A field that is empty or hidden by conditional logic counts as 0 and as empty text.
| Modifier | Result |
|---|---|
{field:3:price} | Unit price of a Product field. |
{field:3:qty} | Quantity of a Product field. |
{field:3:count} | Number of selected choices (checkboxes, multi-select). |
Operators
| Operator | Meaning |
|---|---|
+ - * /, ( ) | Arithmetic. Dividing by zero gives 0. |
% | Remainder of a division. |
^ | Power: F1 ^ 2. |
== != > < >= <= | Comparisons; the result is 1 (true) or 0 (false). |
&&, ||, ! | And, or, not. |
Conditions
Use if / elseif / else / endif to choose between formulas. Any number of elseif branches is allowed, conditions can be nested, and a condition can be used inside a larger formula.
if ( F1 < 5 ):
	F2 / 10 * F1
elseif ( F1 >= 5 && F1 < 10 ):
	F2 / 15 * F1
else:
	0
endif;
Text can be compared as well, in single or double quotes: if ( F3 == 'Package A' && F2 > 100 ): …. Text comparisons are case-sensitive and ignore spaces at the start and end. if ( F1 ): tests that a field has a value, if ( F1 == '' ): that it is empty, and if ( F1 == F2 ): that two fields match. For short choices there is also the one-line form if( F1 > 10, 5, 0 ).
Functions
| Group | Functions |
|---|---|
| Rounding | round( x ), round( x, decimals ), ceil( x ), floor( x ), trunc( x ), abs( x ) |
| Statistics | min( a, b, … ), max( … ), sum( … ), average( … ), count( … ) (how many of the values are filled in) |
| Powers and logarithms | sqrt( x ), pow( x, y ), exp( x ), ln( x ), log( x ) (base 10; log( x, base )), mod( a, b ) |
| Trigonometry | sin, cos, tan, asin, acos, atan (radians), pi() |
| Finance | pmt( rate, periods, amount ) loan payment; fv( rate, periods, payment, start ) future value; pv( rate, periods, payment ) present value. As in spreadsheets, money paid out is negative. |
| Dates | datediff( from, to ) in days, or with unit='weeks', 'months', 'years' (completed months / years), 'hours', 'minutes'; age( date ); weekdays( from, to ); weekenddays( from, to ); today(). The end day is not counted unless you add includeEnd=true. |
| Times | timediff( from, to ) in hours, or with unit='minutes' etc. (an end time earlier than the start is taken as the next day); datetime( date, time ); now() |
| Text | len( F1 ) characters, words( F1 ) words, contains( F1, 'text' ) (ignores case) |
Examples
// Monthly loan payment: amount F1, yearly interest % F2, years F3
round( -pmt( F2 / 100 / 12, F3 * 12, F1 ), 2 )

// Savings after F2 years, paying in F3 per month at F1 % a year
fv( F1 / 100 / 12, F2 * 12, -F3, 0 )

// Body mass index from kg (F1) and cm (F2)
round( F1 / ( F2 / 100 ) ^ 2, 1 )

// Nights between check-in (F1) and check-out (F2), at least 1, times a rate
max( datediff( F1, F2 ), 1 ) * 85

// Working days needed, and hours between two Time fields
weekdays( F1, F2, includeEnd=true )
timediff( F3, F4 )

// Volume discount
if ( F1 >= 100 ): F1 * 4 elseif ( F1 >= 20 ): F1 * 4.5 else: F1 * 5 endif;
Good to know.
The result is always a number, rounded to the field's Decimal places. Dates in formulas are whole days; today() and now() use the visitor's clock in the browser and the site's time zone on the server. An invalid formula gives 0. Formulas are evaluated by a small safe parser — nothing is ever executed as code.
Developers can add functions with the awpf_calc_functions filter (PHP) together with window.awpfCalc.functions (JavaScript), so the browser and the server agree:
add_filter( 'awpf_calc_functions', function ( $functions ) {
	$functions['vat'] = function ( $numbers ) { return $numbers[0] * 1.24; };
	return $functions;
} );
// JavaScript, loaded on pages with the form:
window.awpfCalc = window.awpfCalc || {};
window.awpfCalc.functions = Object.assign( window.awpfCalc.functions || {}, {
	vat: function ( numbers ) { return numbers[0] * 1.24; }
} );
Multi-step forms
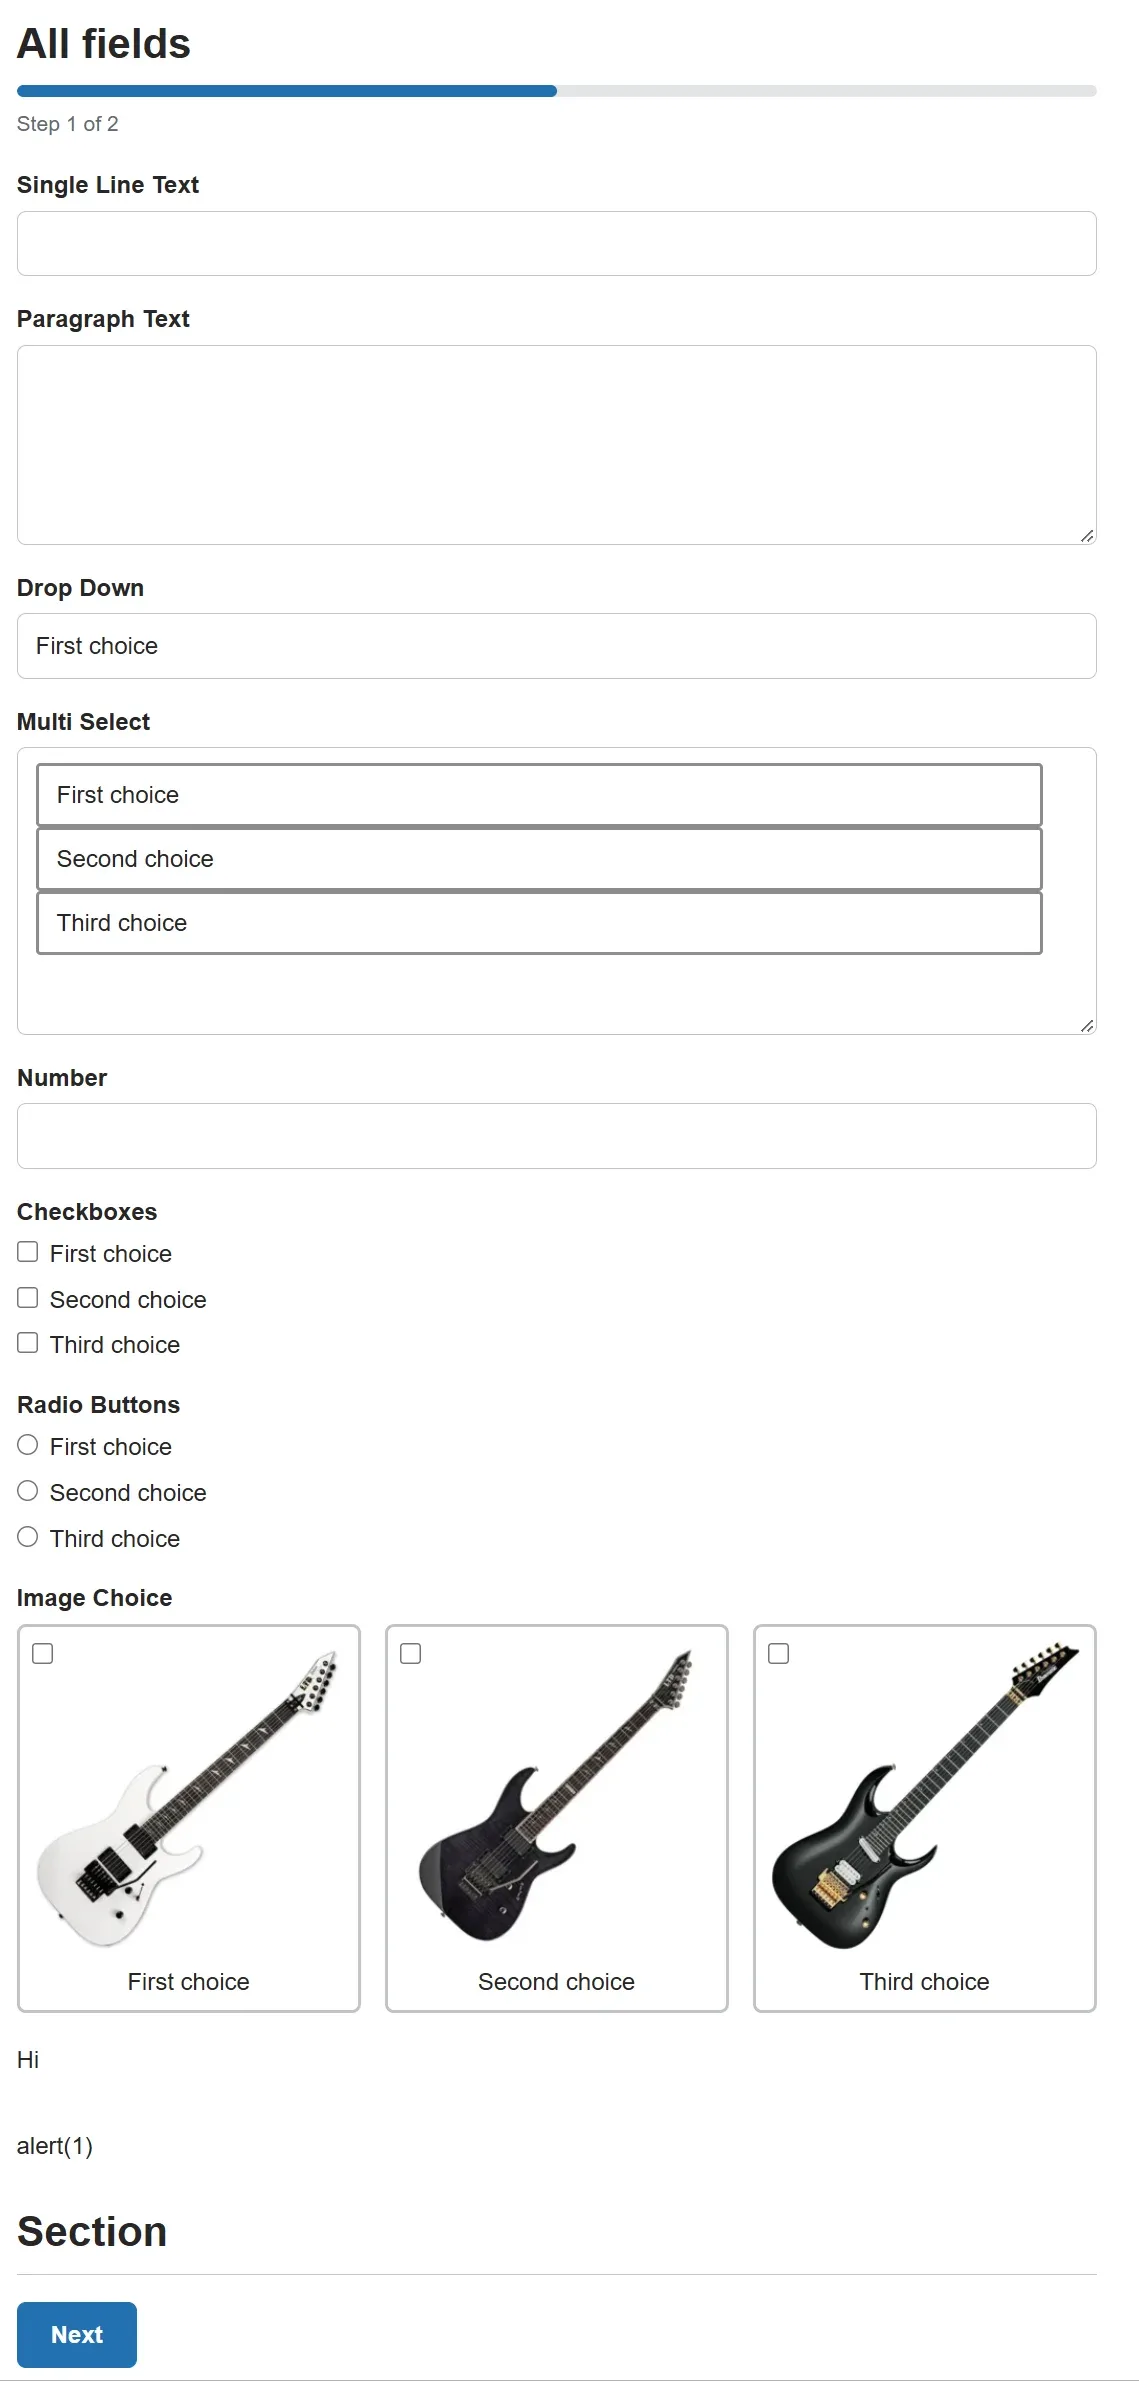
- Drop a Page Break wherever a new step should start. Its label is the title of the step that follows.
- In Settings → Multi-step choose a progress bar, numbered steps or none, and set the first step's title and the Next / Previous texts. A Page Break can override the button texts for its own step.
- Required fields are checked when the visitor presses Next; the full validation runs on the server on submit and jumps back to the first step that has an error.
- A step whose fields are all hidden by conditional logic is skipped automatically.
- With partial entries enabled, progress is saved at every step.

Conditional steps
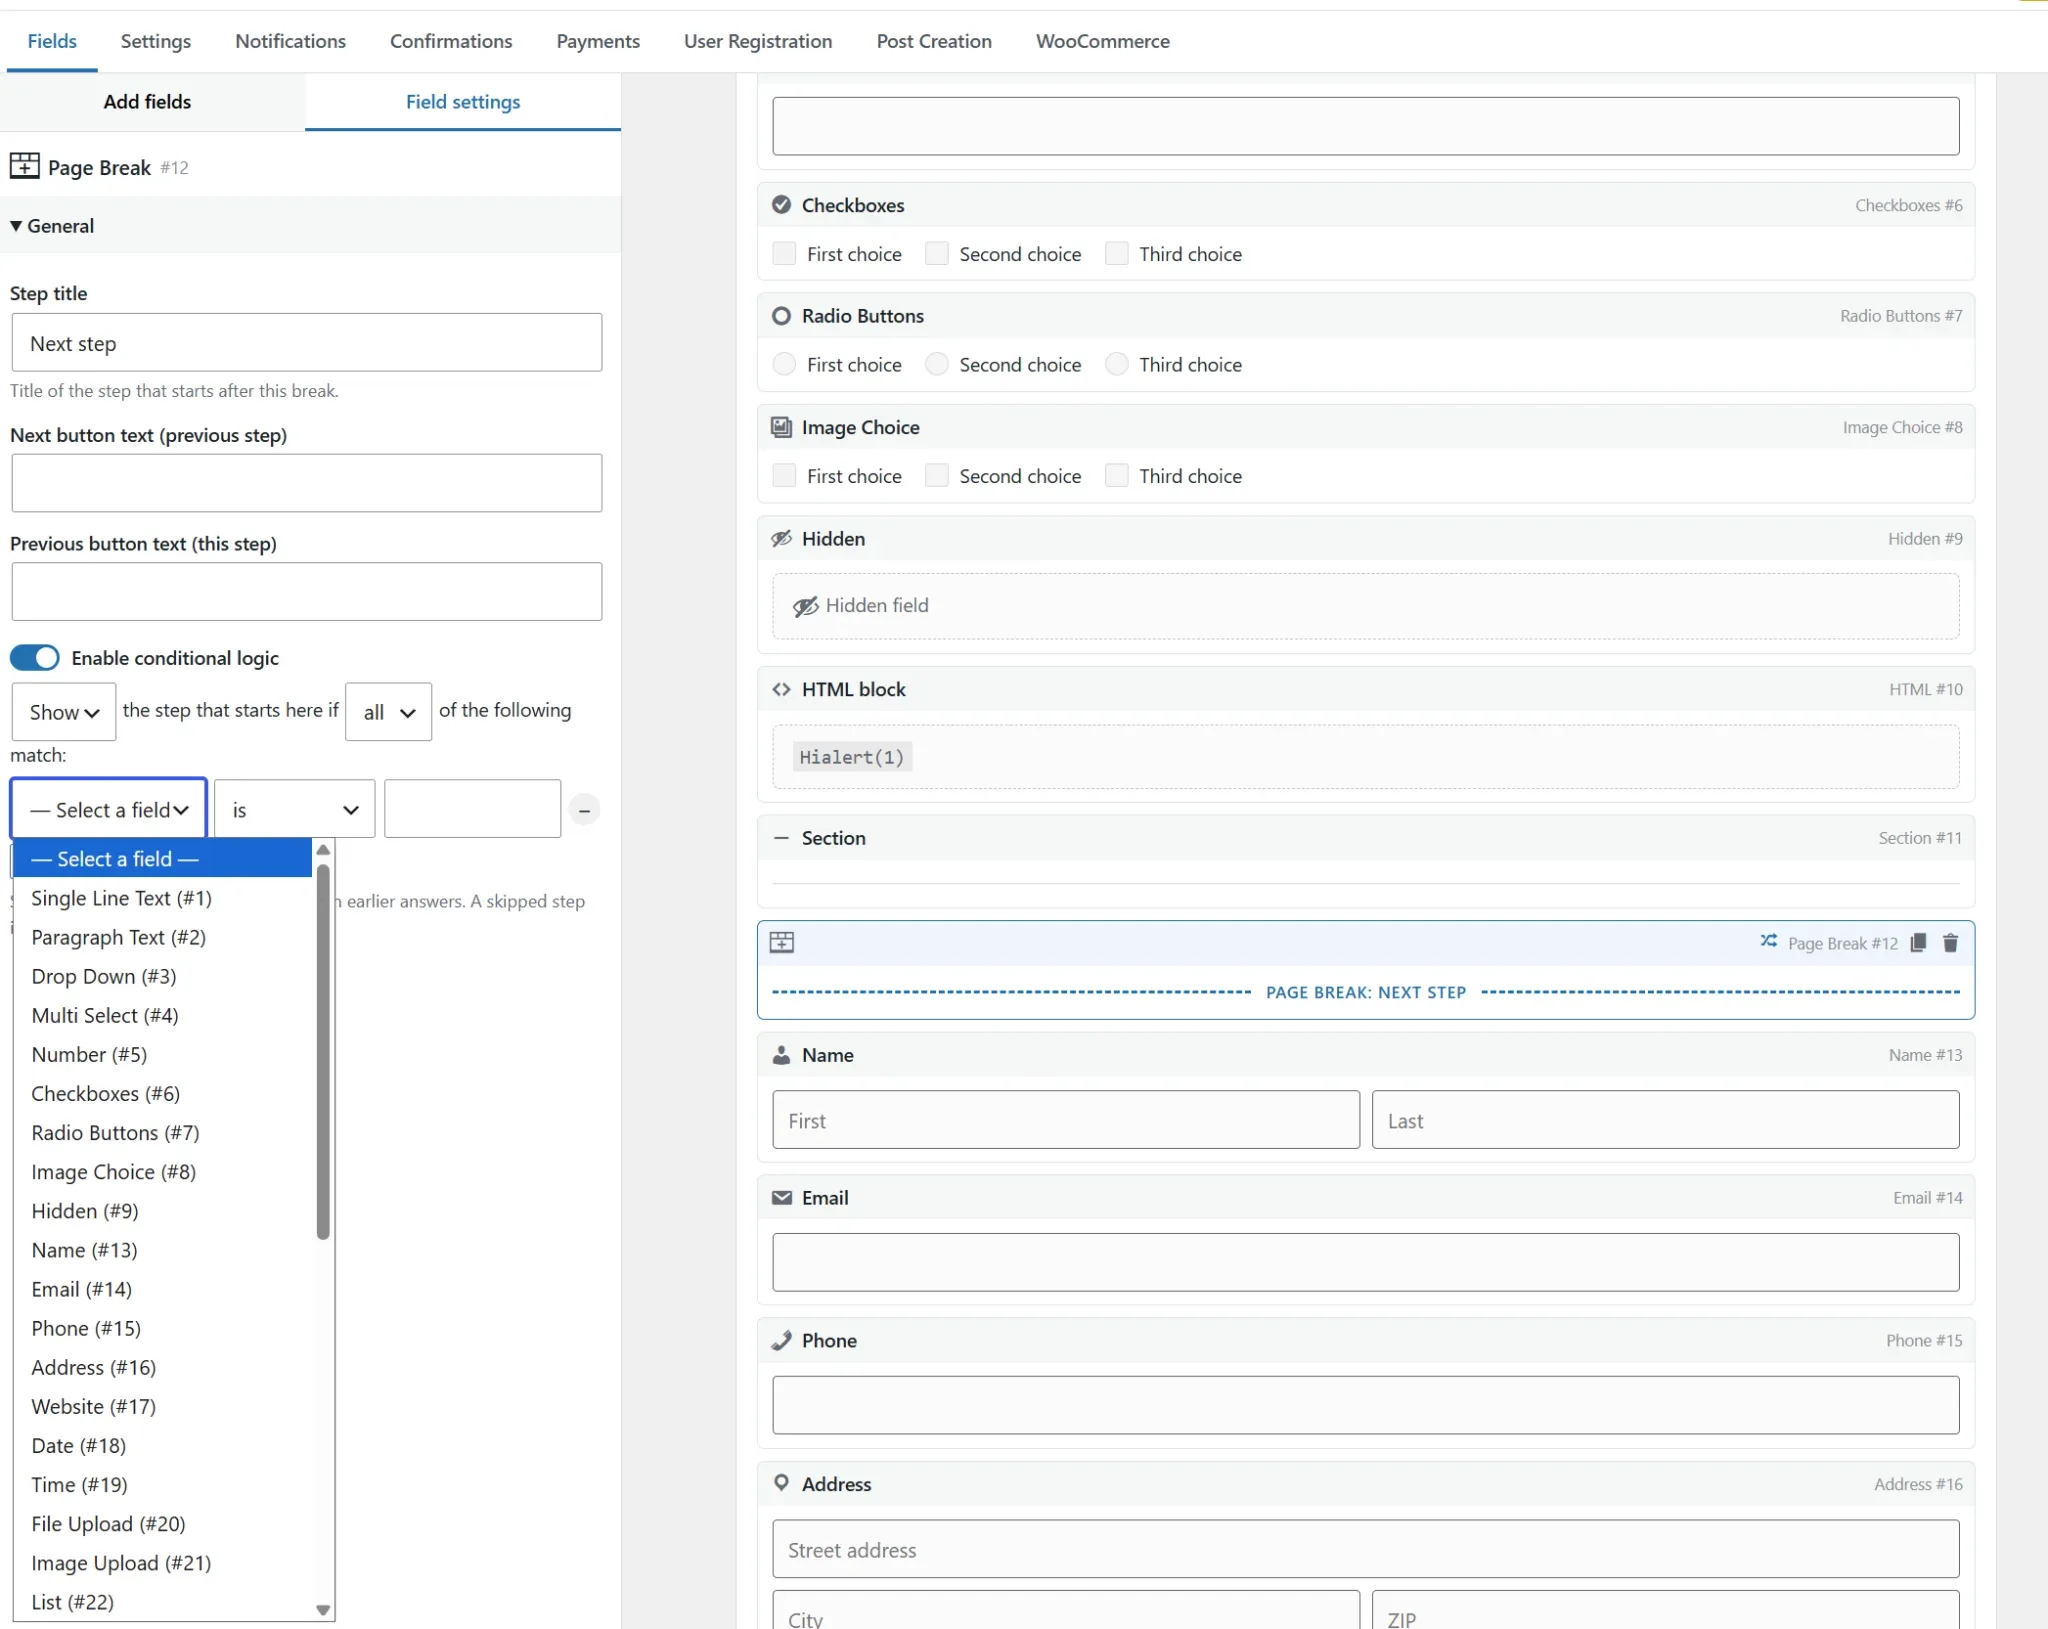
Select a Page Break and open Advanced → Conditional logic to show or skip the whole step that starts at that break — for example Show the step that starts here if "Customer type" is "Business", or Hide … if "Country" is not "Greece". Rules can use any field of an earlier step.
- A skipped step is jumped over by Next and Previous, and the progress indicator counts only the steps the visitor will actually see ("Step 2 of 2" instead of "Step 2 of 3").
- If the last step is skipped, the Submit button appears on the last visible step.
- Fields of a skipped step are not validated, stored, charged or included in notifications — the rule is checked again on the server, so a tampered request cannot fill a skipped step.
- The first step has no Page Break before it and is always shown. Field-level logic still works inside conditional steps.
File and image uploads
Both upload fields have a drag-and-drop zone (click or keyboard also work), upload each file immediately with a progress bar, and let the visitor remove or reorder files before submitting.
| Rule | Applies to | Description |
|---|---|---|
| Allowed file extensions | Both | Comma-separated allow-list. Executable and script types are always refused. |
| Maximum file size (MB) | Both | Per file; capped by the server's upload limit. |
| Maximum / minimum number of files | Both | How many files a visitor may (or must) add. |
| Maximum combined size (MB) | Both | Total for the field. |
| Resize to max width / height, quality | Image Upload | Images are downscaled in the browser before upload — faster for visitors on mobile data and lighter for your server. |
| Minimum width / height | Image Upload | Rejects images that are too small. |
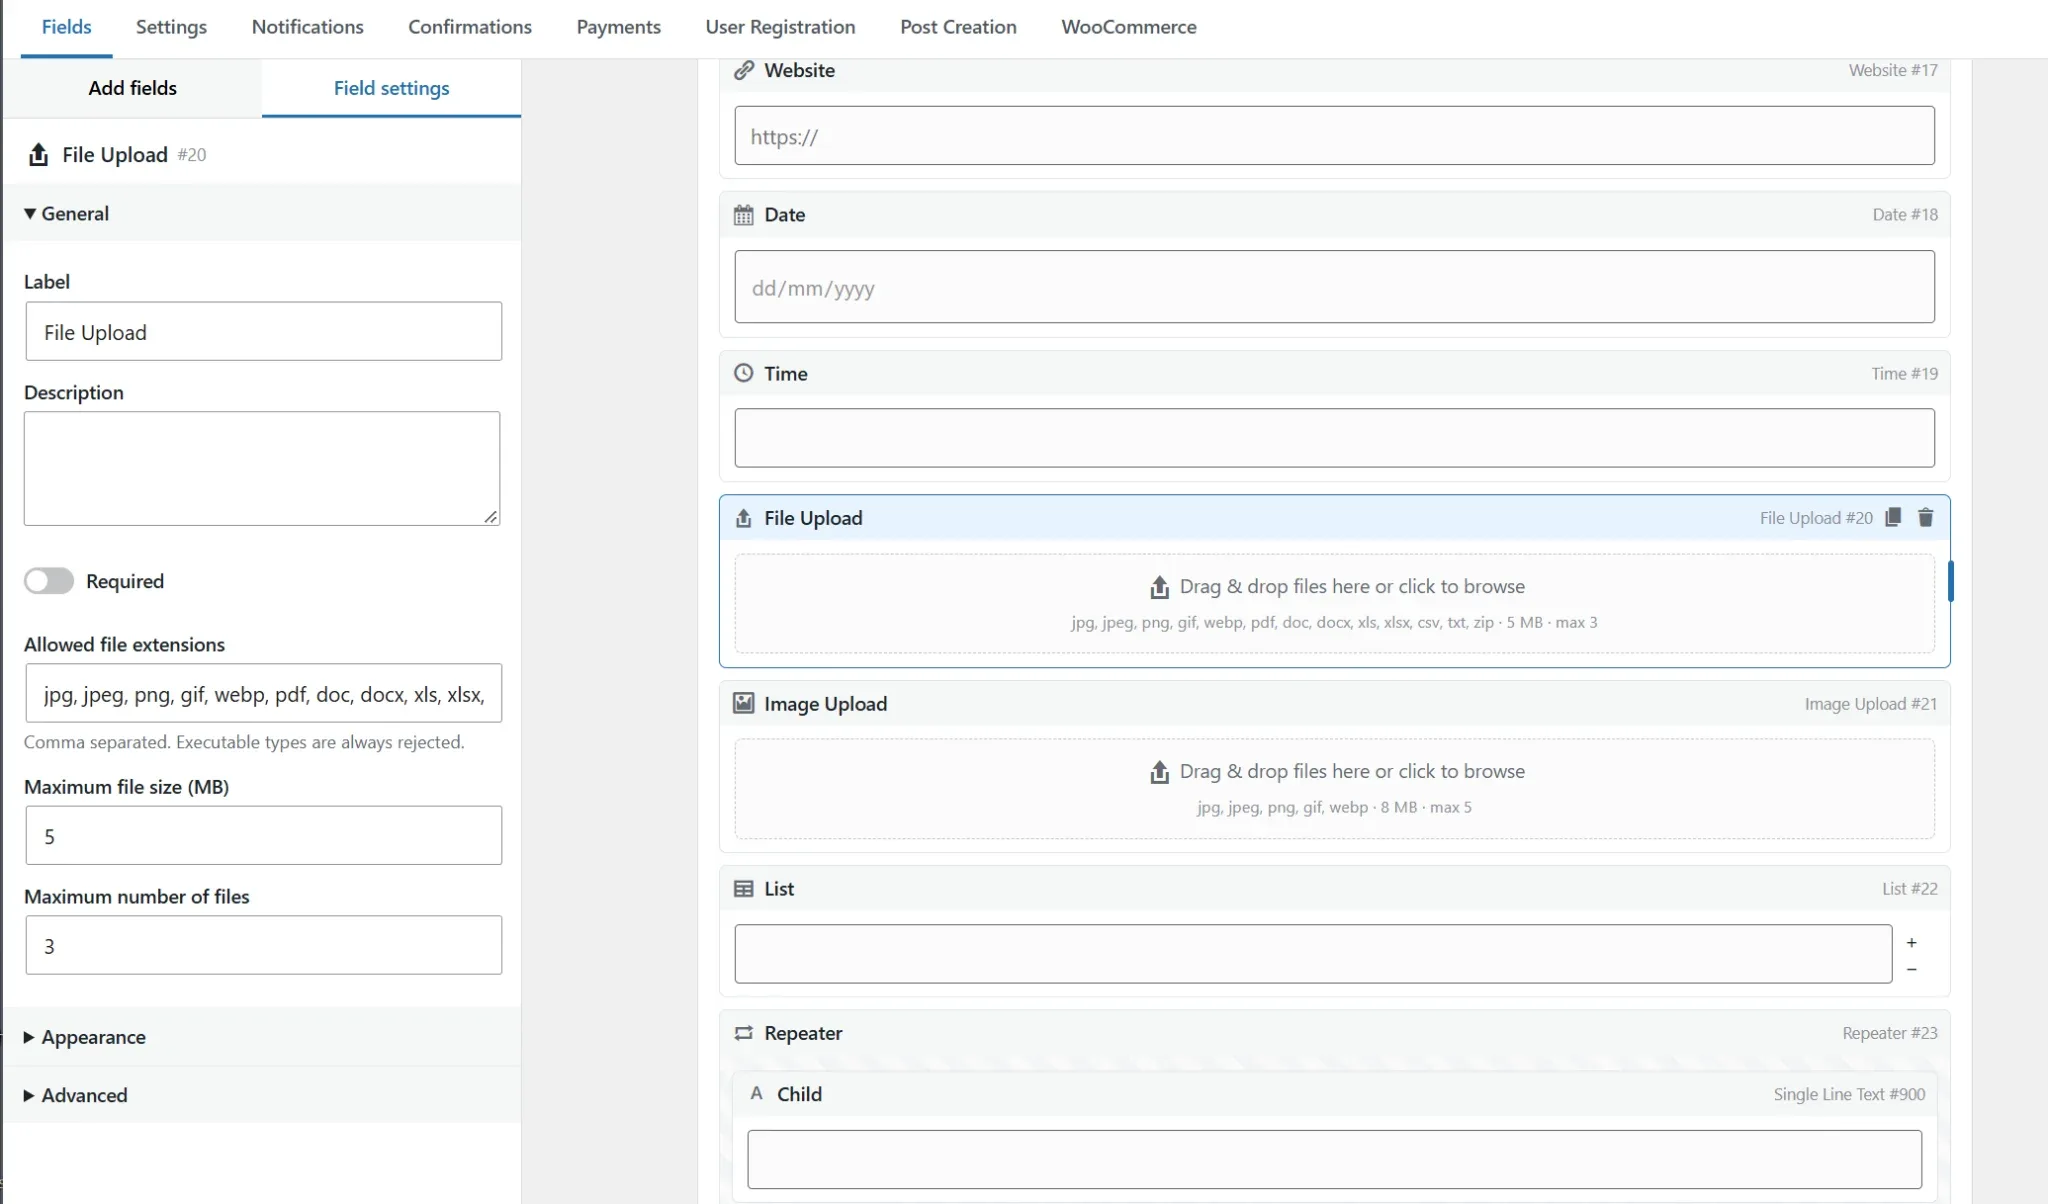
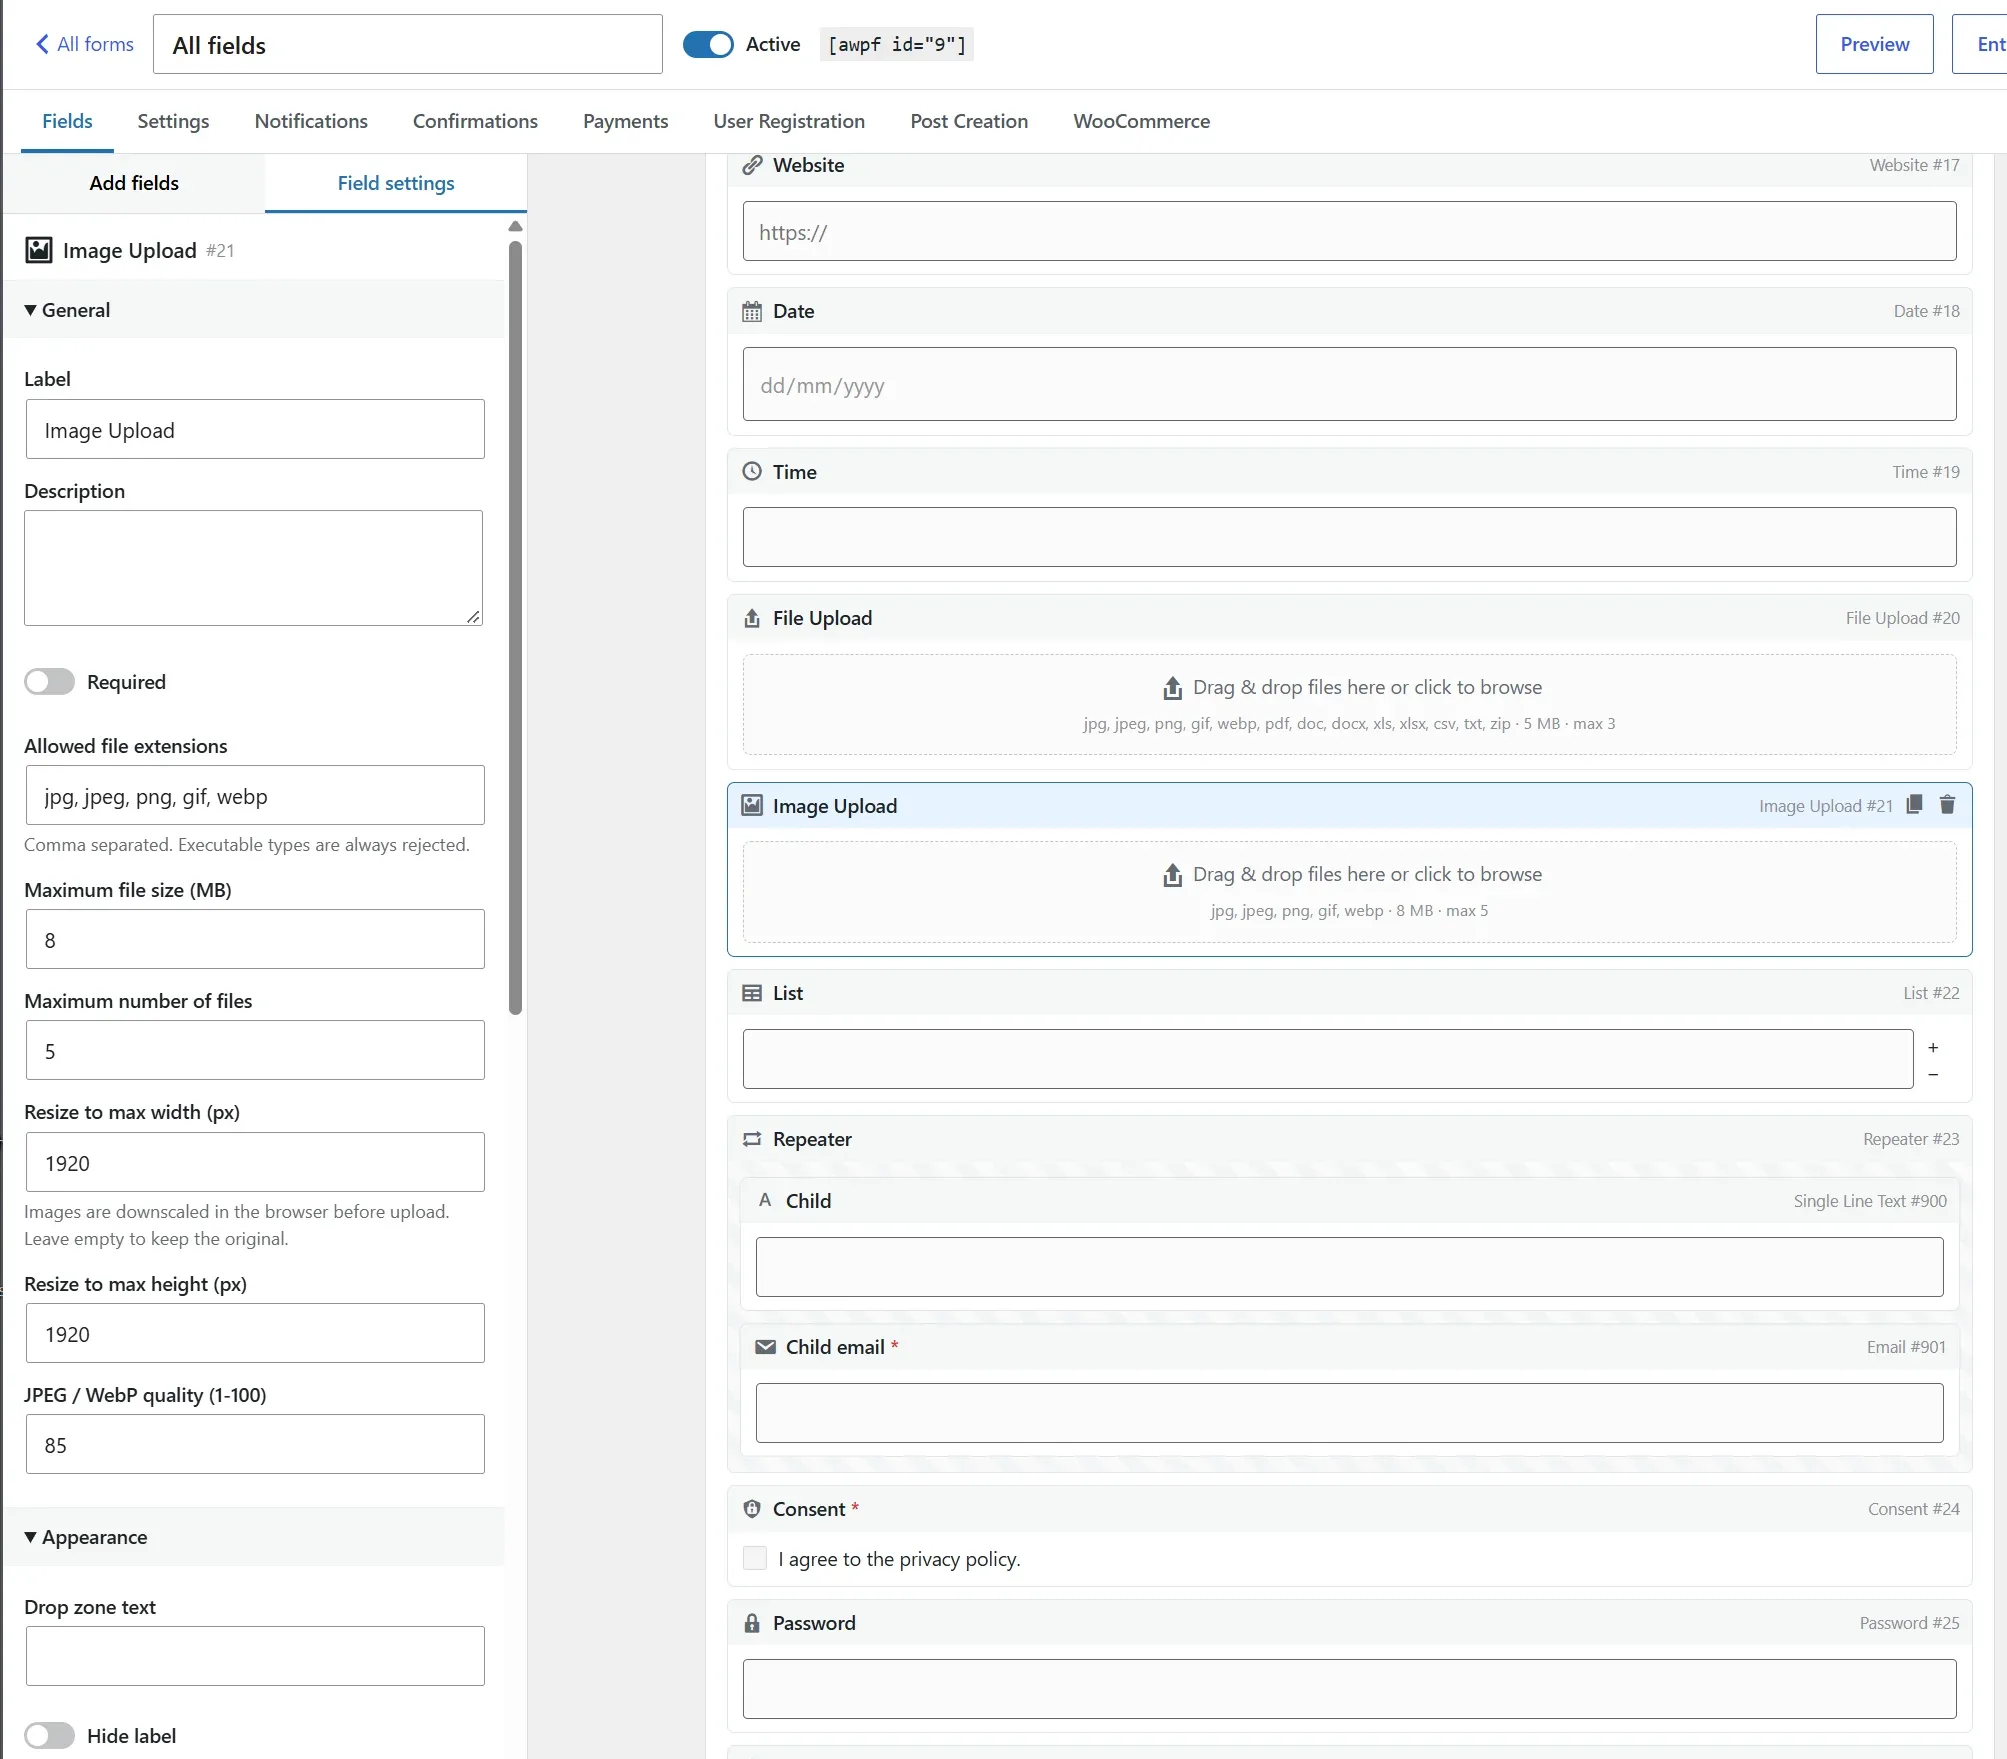
Image Upload shows thumbnail previews that can be dragged into order. Uploaded files can be attached to notifications (Attach uploaded files).
Where files live.
Files are stored under wp-content/uploads/awpf/<form id>/<year>/<month>/ with a random prefix. Unfinished uploads sit in a non-public temporary folder and are removed after 24 hours. See Security for the checks every file passes.
Repeaters and lists
Repeater: add it to the canvas, then drop fields into it. The visitor can add rows up to Maximum rows; Minimum rows are shown from the start. Set a Row title (e.g. "Position") to number the rows.
Fields allowed inside a repeater: text, paragraph, choices, number, hidden, name, email, phone, address, website, date, time, consent, rating and slider. Uploads, pricing, nested repeaters, page breaks and conditional logic on the child fields are not available inside a repeater.
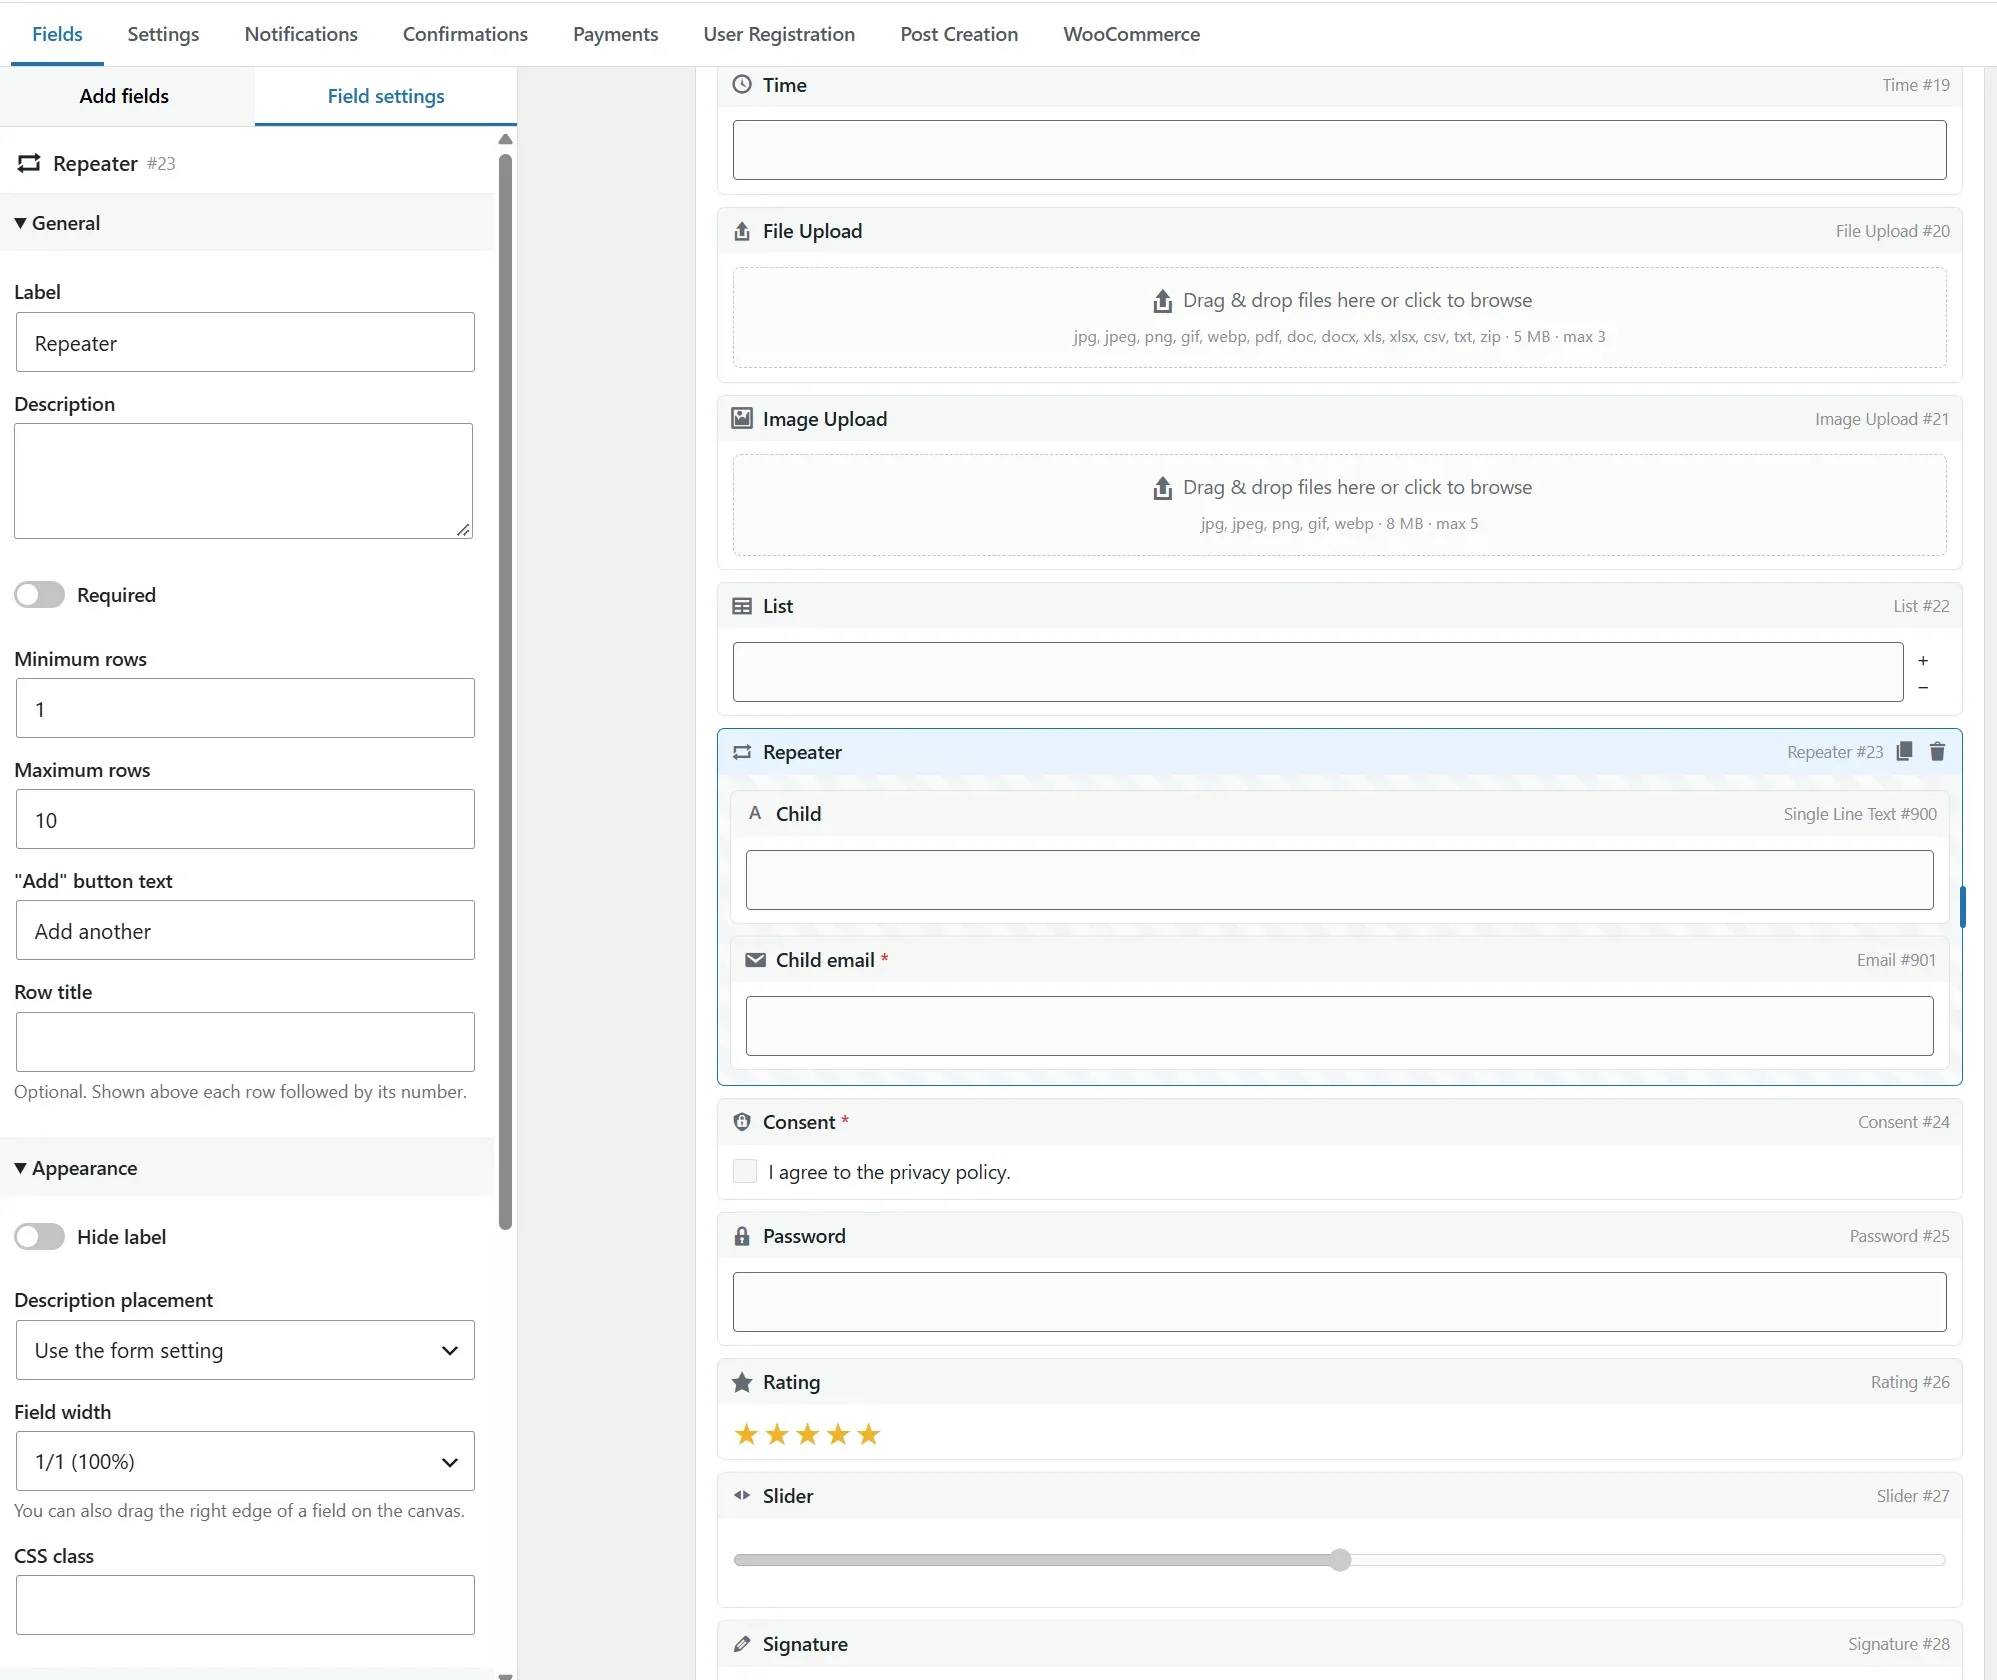
List: a lightweight alternative — plain text rows with one or more columns (one column title per line).
Partial entries and "save and continue later"
Partial entries
Settings → Save partial entries stores progress automatically: a few seconds after a change, at each step, and when the visitor leaves the page. Find them under Entries → Partial. When the form is finally submitted the partial entry becomes the real entry.
Save and continue later
Adds a link next to the buttons. The visitor gets a private resume link and can have it emailed. Opening the link restores everything entered so far.
- Passwords, uploads and signatures are never kept in partial entries.
- Partial entries older than 30 days are deleted automatically (configurable in Settings).
- Each saved entry can be emailed to one address only and the endpoint is rate limited, so it cannot be abused to send mail.
Notifications and email
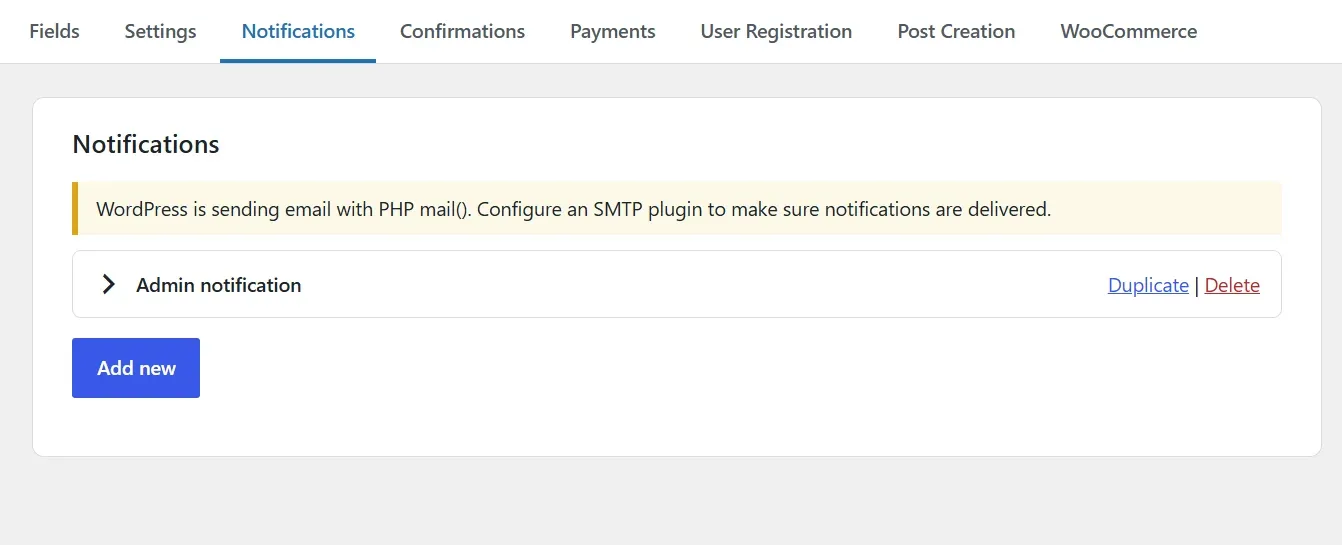
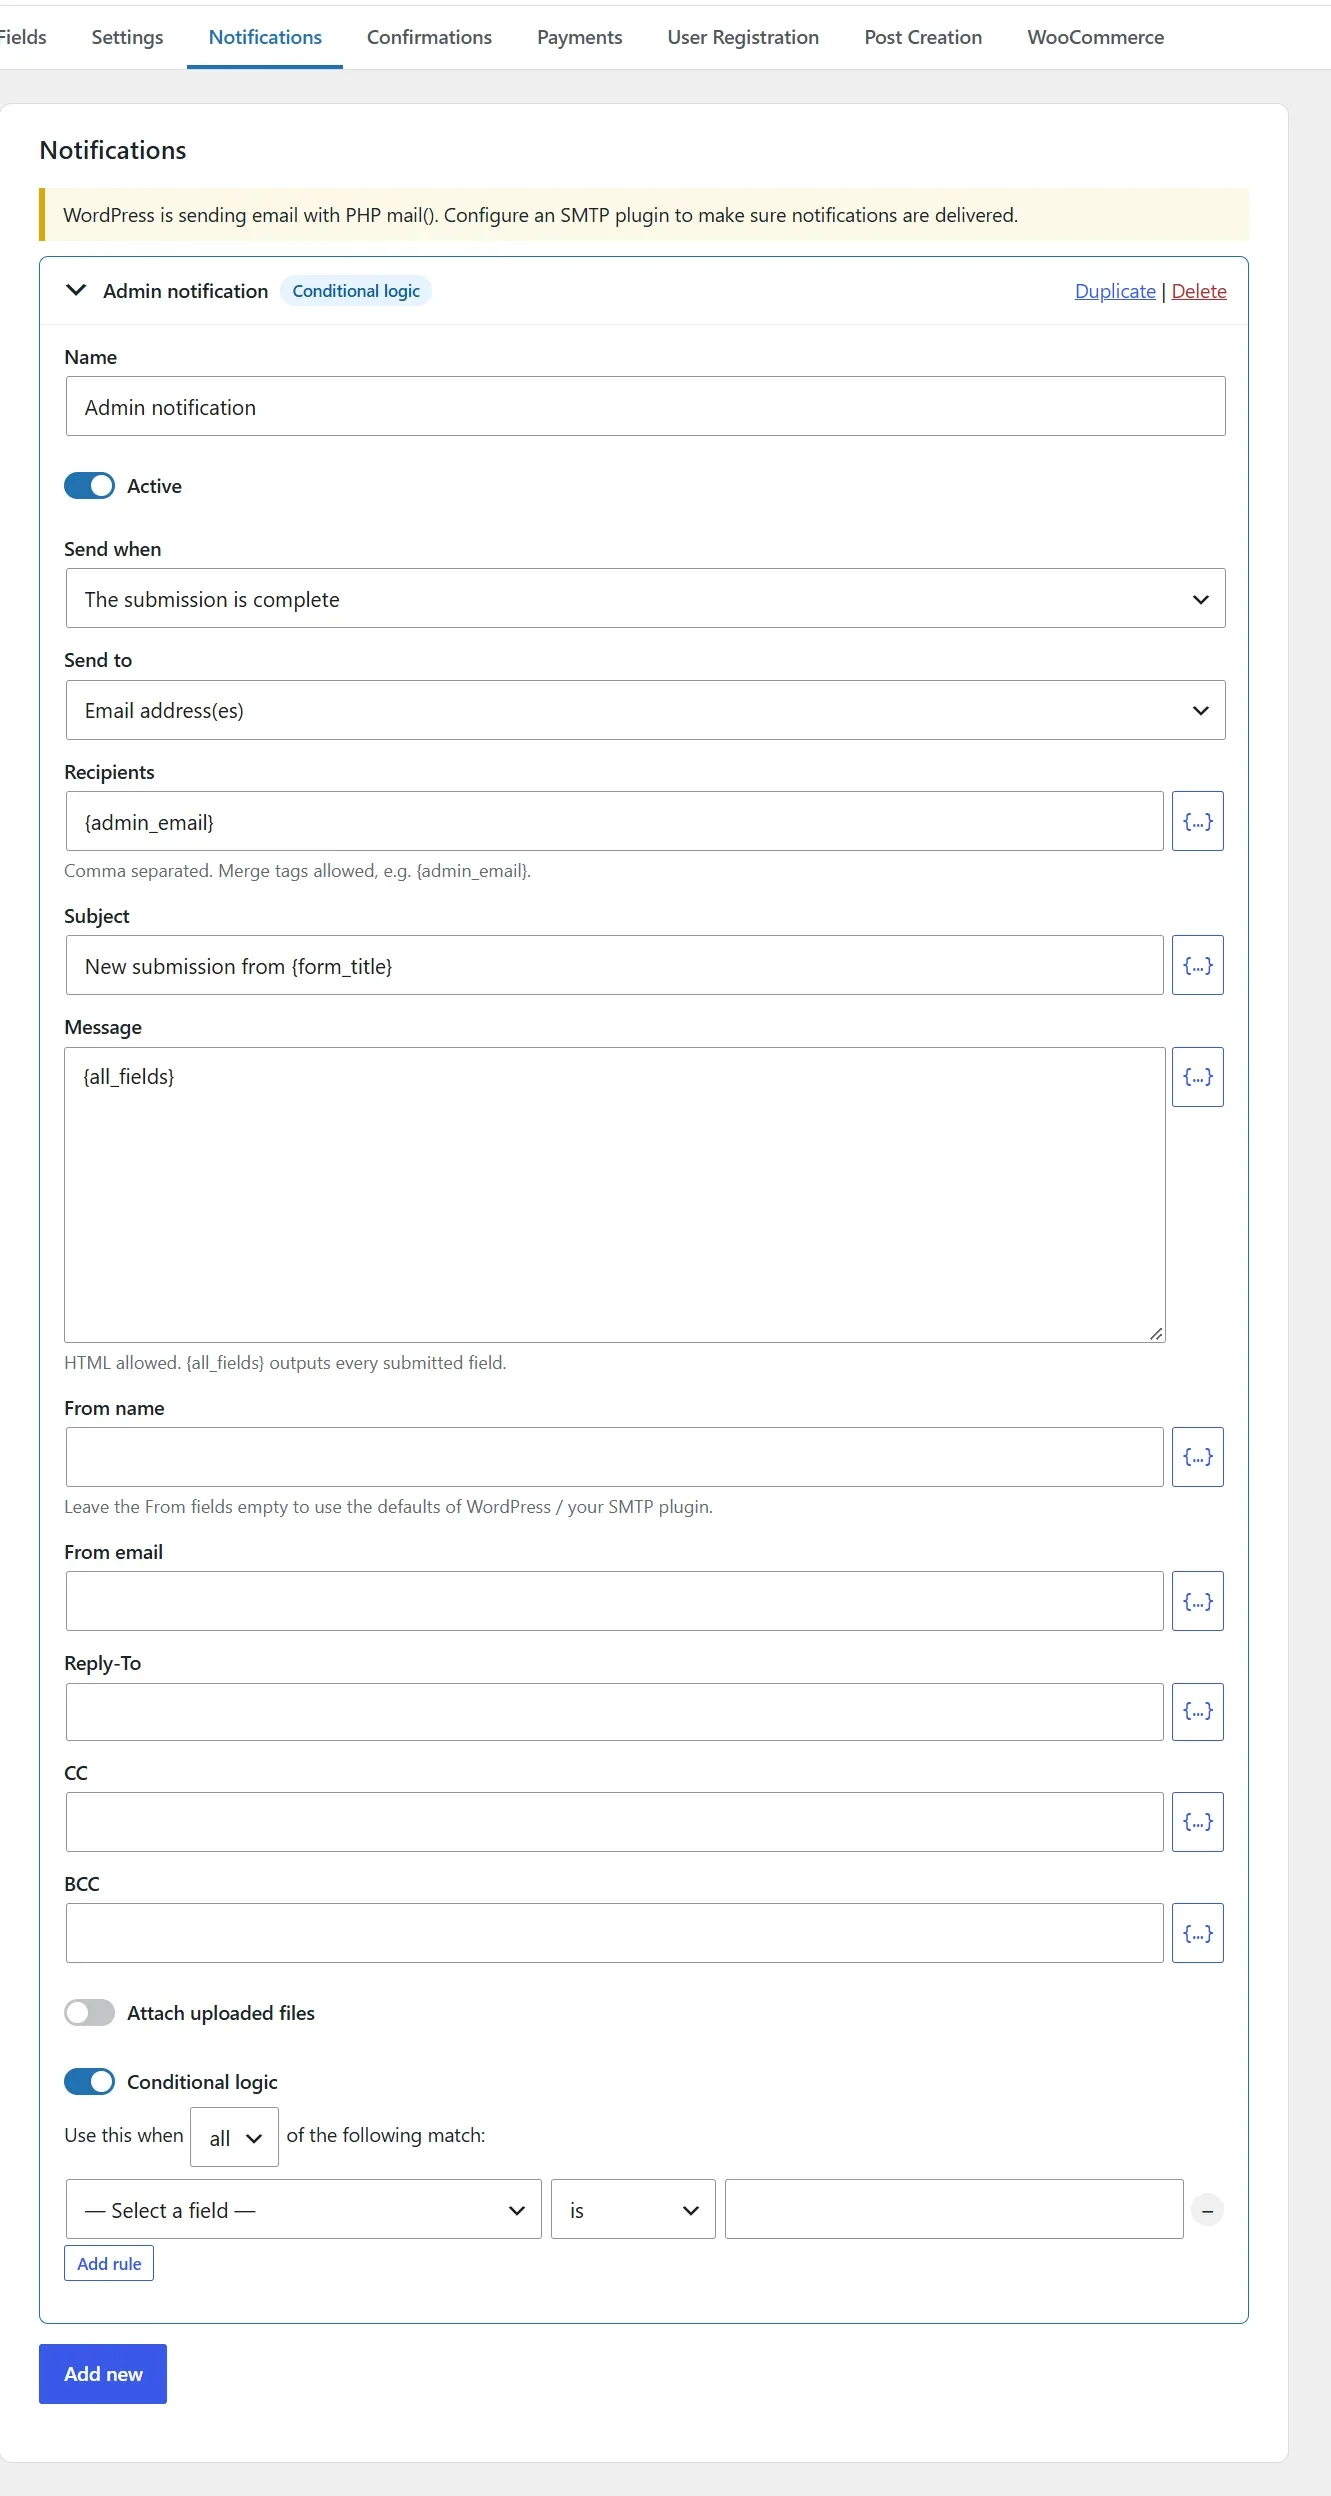
Add as many notifications as you need. Each has a name, an Active switch and:
- Send when: the submission is complete, or a payment is received.
- Send to: fixed address(es), an email field of the form (e.g. an autoresponder to the visitor), or routing rules — "send to sales@… if Department is Sales".
- Subject and message with merge tags;
{all_fields}prints a table of everything submitted. - From name / email, Reply-To, CC, BCC; optional attachments of uploaded files.
- Conditional logic: send only when the rules match.
How email is sent
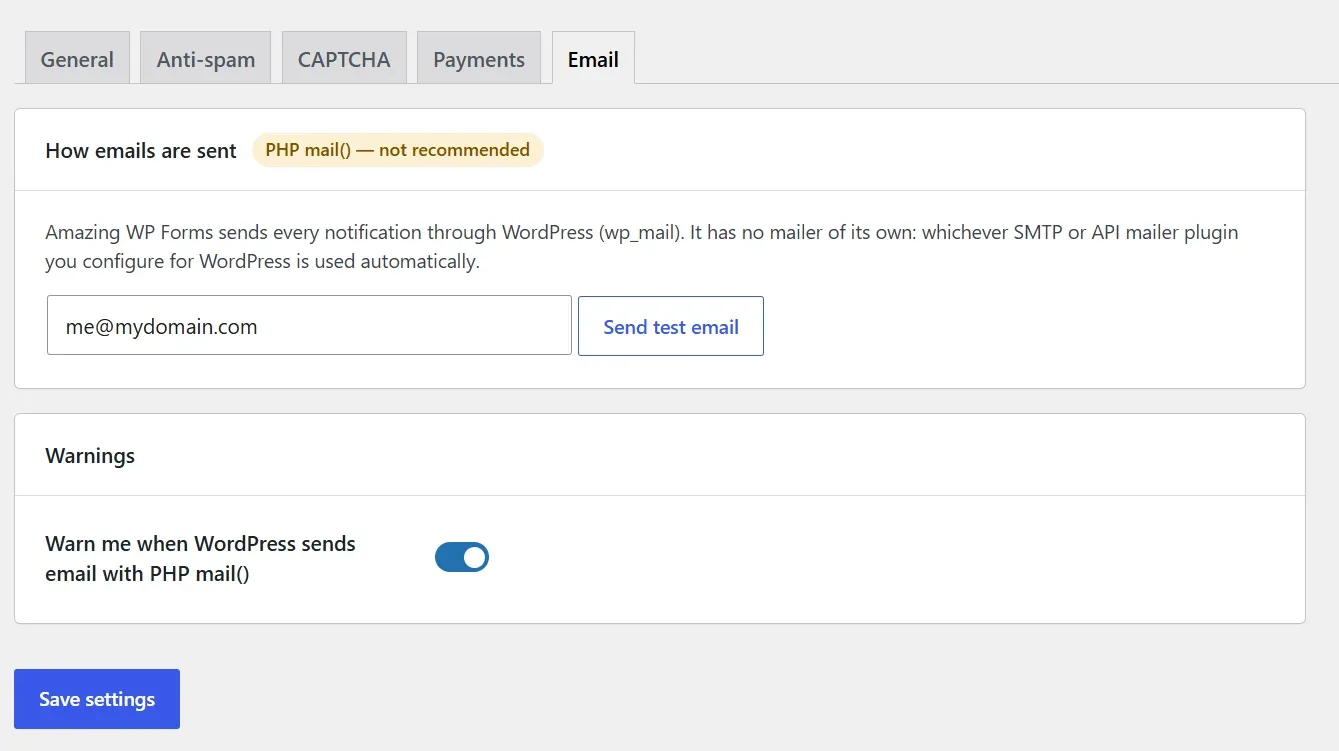
Every message goes through WordPress (wp_mail()). The plugin has no mail services of its own: whichever SMTP or API mailer plugin you use (WP Mail SMTP, FluentSMTP, Post SMTP, …) handles delivery automatically.
PHP mail() warning.
If WordPress is still sending with the basic PHP mail() function, the plugin shows a warning on its screens, because such mail often lands in spam. Configure an SMTP plugin, then use Settings → Email → Send test email. The warning can be switched off there.
Leave the From fields empty to use the sender configured in WordPress or your SMTP plugin — this is the safest choice for deliverability.
Confirmations
Every form has one default confirmation and any number of conditional confirmations, managed in the form's Confirmations tab.
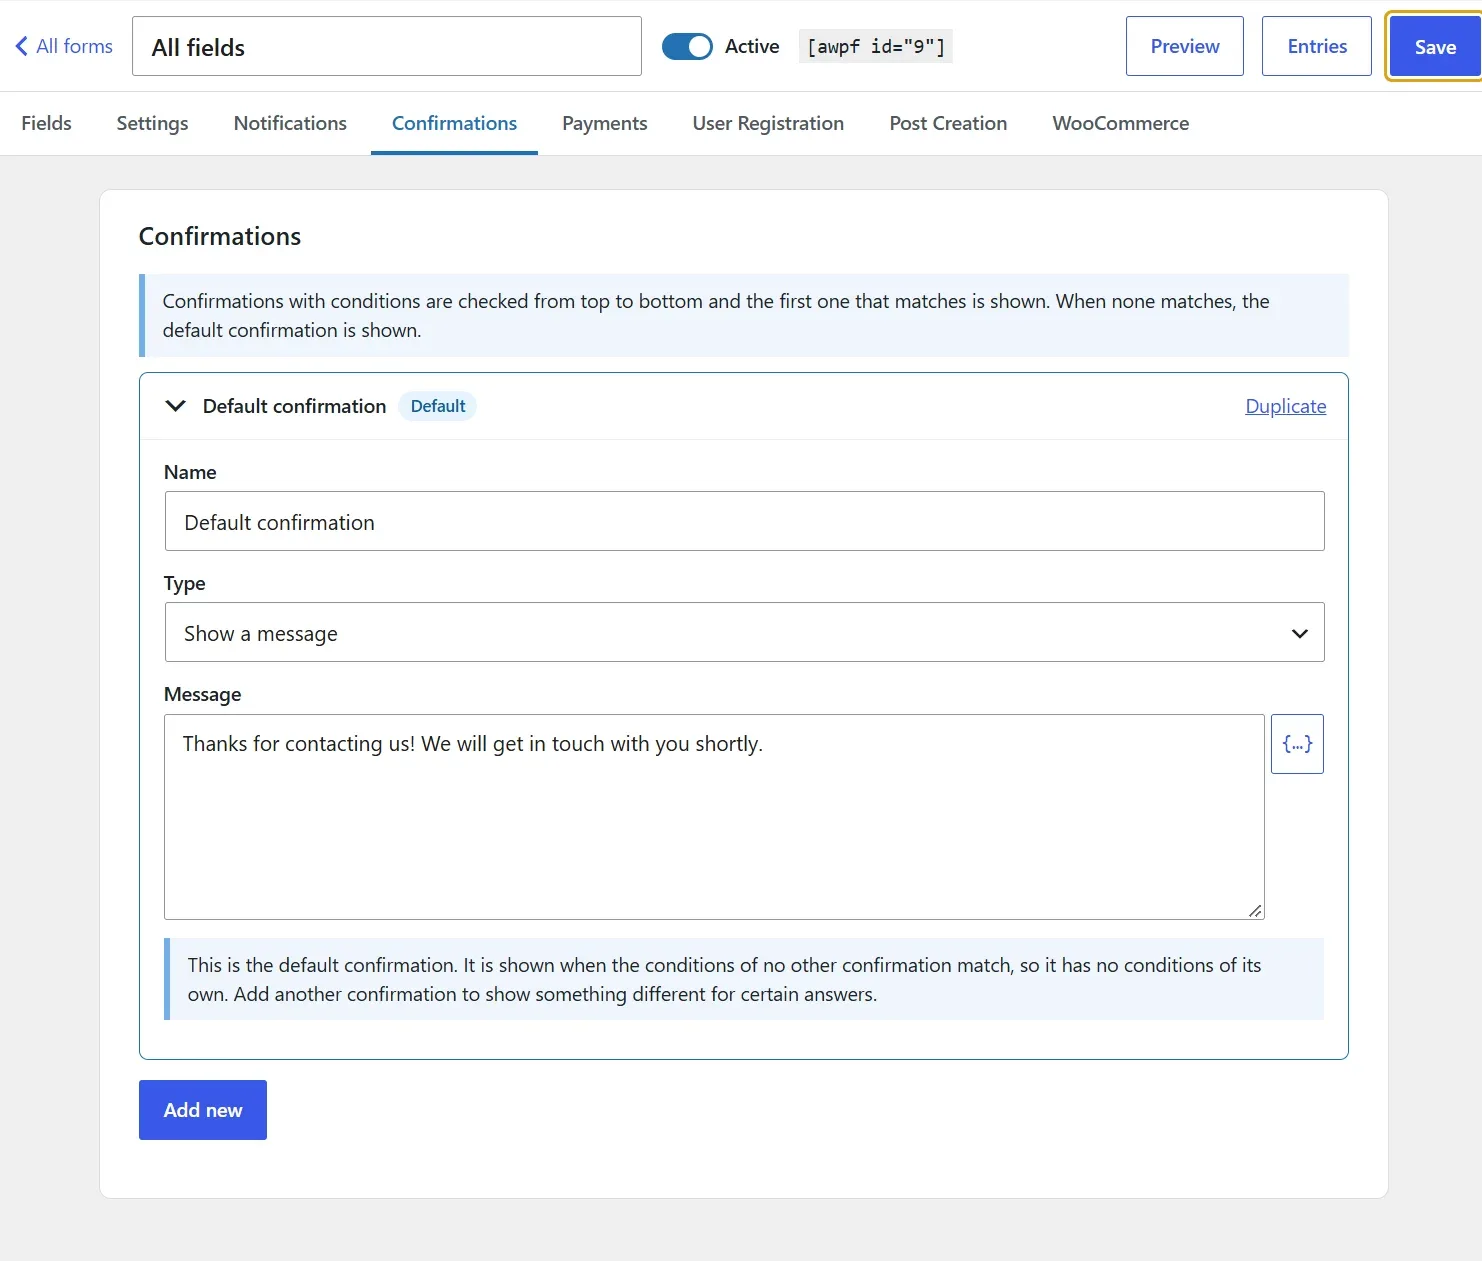
- Each confirmation you add has a When to show this confirmation box: Show this confirmation when all / any of the following match, followed by one or more conditions on the form's fields (is, is not, contains, greater than, is empty, …). Conditions are required — a confirmation without a complete condition is never shown, and its card says so.
- Confirmations are checked from top to bottom and the first one whose conditions match is shown. Use the arrows on a card to change the order.
- The default confirmation has no conditions: it is shown when no other confirmation matches.
- Each card shows a summary of its conditions, e.g. If Email contains vip.
Example: show a "We will call you today" message when Urgency is High, redirect to a pricing page when Budget is greater than 5000, and show the normal thank-you message to everyone else.
Message
Shown in place of the form without reloading the page. Merge tags and shortcodes are supported.
Page
Sends the visitor to a page of the site, with an optional query string.
Redirect
Any URL, e.g. https://example.com/thanks with query string name={field:1:first}&id={entry_id}.
Integrations
Send every entry to the services you already use. Integrations are added per form in the builder's Integrations tab; account keys are entered once in Forms → Settings → Integrations, where each service can also be switched off.
| Group | Services |
|---|---|
| Email marketing | Amazing WordPress Newsletters, MailPoet (both on your own site, no keys), Mailchimp, Klaviyo, Kit (ConvertKit), ActiveCampaign, MailerLite, Brevo, GetResponse, Campaign Monitor, Moosend, SendFox, Omnisend, Drip, EmailOctopus, Mailjet, Sendy |
| CRM | HubSpot (private app token; existing contacts are updated), Pipedrive (person, with an optional note or lead) |
| Chat | Slack, Discord, Microsoft Teams (Workflows), Telegram |
| SMS | Twilio, Vonage, Clickatell, SMSGlobal |
| Spreadsheets & databases | Google Sheets, Airtable, Notion |
| Automation | Webhooks, Zapier, Make, n8n, Pabbly Connect — and through them, any other app (Salesforce, Zoho, Constant Contact, AWeber, …) |
Adding an integration
- Open the form, go to Integrations and click Add.
- Pick the service. Lists, audiences, tags, spreadsheets or channels load from your account; you can also type an ID.
- Map the email, name, phone and any other fields. Fields can use merge tags.
- Choose When: after the form is submitted, or after the payment is completed (payment forms).
- Optionally turn on conditional logic: the integration runs only when its conditions match (for example only when Subscribe is ticked).
- Click Send a test to try it with sample data before you save.
How integrations run
- Integrations run after the visitor already sees the confirmation, so a slow service never slows down the form.
- Failures caused by the network, rate limits or a server error at the service are retried after 5 and 30 minutes.
- The entry screen has an Integrations box with the result of each one and a Run again button; failures are also written to Forms → Logs.
- Newsletter integrations can ask for a consent field: when it is set, the visitor is only subscribed when it is ticked. Double opt-in is used where the service supports it.
Webhooks
Method (POST, PUT, PATCH, GET, DELETE), JSON or form body, all fields or only the keys you choose (dotted keys such as contact.email build nested JSON), custom headers, and an optional secret. With a secret, every request carries X-AWPF-Signature: sha256=<HMAC of the body>. Header values can read a PHP constant with constant:MY_TOKEN, so tokens can stay in wp-config.php. Requests to private or local addresses are blocked unless the awpf_webhook_allow_local filter allows them.
Google Sheets
Paste the JSON key of a Google Cloud service account in Settings → Integrations, then share the spreadsheet with the service account's email (shown after you save the key) as Editor. Each entry becomes a row; columns are matched by their header and missing headers are added. Values are written as plain text, so a submitted =formula is never run.
SMS
Enter the recipients (merge tags such as the phone field work) and the message. Numbers without a country code use the Default country code from Settings → Integrations.
Security.
API keys are stored in a separate option that is never loaded on normal pages, are never printed back into the settings page, and are only sent to the service they belong to.
Form views & conversion
The Forms screen shows how many times each form was viewed and its conversion rate (entries ÷ views). Hover the numbers to see since when views are counted and how many visitors started filling in the form.
- A view is counted once per form per browser session, by the browser, so pages served from a page cache are counted too.
- Bots, users who can manage forms and builder previews are not counted.
- Only daily totals are stored: no cookies, no IP addresses, no personal data.
- Only entries submitted since views are counted are used for the rate. Reset views in a form's row actions starts over.
- Turn counting off in Settings → General → Count form views, or for one form in its settings.
Google Analytics & Tag Manager
When gtag.js or a Tag Manager dataLayer is already on the page, the forms send awpf_form_view, awpf_form_start and awpf_form_submit events with form_id and form_title. The plugin loads no tracking code itself. Switch it off in Settings → General.
Per-form settings & entry limits
Override global settings
In a form's Settings tab, Override global settings changes these options for that form only. Each one starts at Global setting, which shows the current global value.
Currency, submissions allowed per IP, CAPTCHA provider, store / anonymize the IP address, entry and partial-entry retention, deleting uploaded files with their entry, notifications when an entry is marked as not spam, and counting views.
Entry limits
- Limit the number of entries: the maximum, the period (in total, per day, week, month or year — periods start at midnight in the site's time zone) and the message shown when the limit is reached.
- Count: all entries together, per visitor (each logged-in user; guests by IP address) or per IP address. For example Maximum 1, in total, per visitor allows one entry per person.
- Per-visitor limits for guests need IP addresses to be stored (globally or for this form).
Translating forms (WPML, Polylang)
With WPML (with String Translation) or Polylang, every text of a form can be translated: the form title, field labels, descriptions, placeholders, default values, error messages, choice labels, the small labels under Name, Email confirmation and Address inputs (First, Last, Enter, Confirm, City…), HTML blocks, consent texts, buttons, step titles, limit and schedule messages, confirmations and notification emails.
- Save the form (forms saved before you installed WPML or Polylang are registered when you open the translation screen).
- WPML: go to WPML → String Translation and choose the domain amazing-wp-forms-<form ID>. Polylang: go to Languages → Translations and pick the group Amazing WP Forms #<form ID>.
- Translate the strings. Use the same form (same shortcode or block) on the pages of every language.
- The labels under the inputs of Name, Address and Email / Password confirmation fields can also be changed per field, in the field's Appearance tab. Either way they appear in the translation screen.
- Choice values are not translated: entries, conditional logic, calculations and reports keep the original values in every language.
- The submission, its validation messages and the emails use the language the form was shown in.
- Importing a Gravity Form that was translated with WPML (Gravity Forms Multilingual) copies its translations to the new form.
- Deleting a form removes its strings from WPML String Translation.
- The plugin's own texts that visitors see (validation messages, "Drag & drop files here…", the file size hint, "Remove", payment messages…) are in one more group: amazing-wp-forms-texts in WPML, Amazing WP Forms – texts in Polylang. Translate them once and every form uses them. Language files and Loco Translate keep working too; a translation made in WPML / Polylang wins.
- Country names in Address fields are shown in the language of the page automatically (from PHP's intl extension, or WooCommerce's translated country list).
Spam protection and CAPTCHA
Honeypot
An invisible field that only bots fill in. Submissions that fill it are dropped silently.
JavaScript challenge
Before sending, the browser silently solves a small puzzle tied to the form's signed token. Invisible to visitors, no third-party service, and it stops bots that post to the form without running the page.
Time trap
Rejects submissions sent faster than a human could fill in the form. The minimum number of seconds is set per form (default 2).
Keywords and links
Optionally check submissions against the WordPress Disallowed Comment Keys list (Settings → Discussion) and limit the number of links allowed in text fields.
Akismet
When the Akismet plugin is active and has an API key, submissions are checked by Akismet.
Antispam Bee
When the free Antispam Bee plugin is active, submissions are checked with the rules enabled there (local spam database, regular expressions, BBCode, country and language). No data leaves the site.
Rate limiting
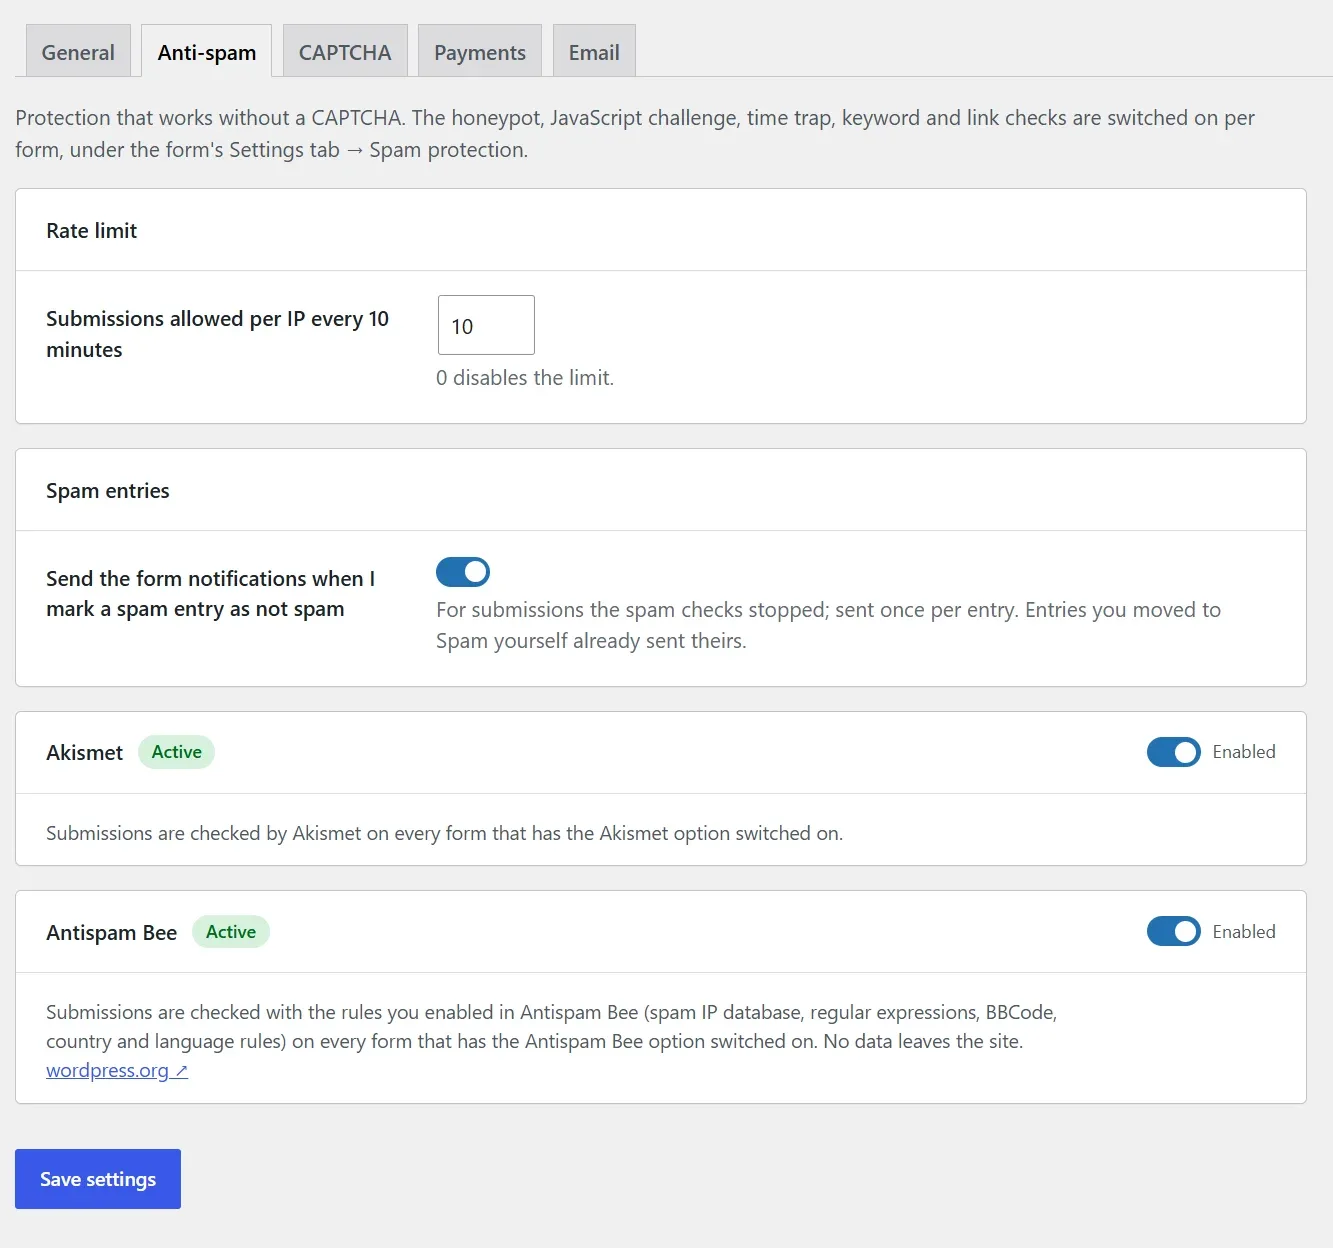
Submissions per IP address are limited (default 10 per 10 minutes); uploads and partial saves have their own limits.
CAPTCHA field
Google reCAPTCHA (v2 checkbox or v3), Cloudflare Turnstile or hCaptcha. Switch a provider on and add its keys under Settings → CAPTCHA, then add the CAPTCHA field to the form.
All of the invisible checks are options of each form: open the form's Settings tab → Spam protection. Honeypot, JavaScript challenge, time trap, Akismet and Antispam Bee are on by default, so a form is protected without a CAPTCHA. Akismet and Antispam Bee can also be switched off for the whole site under Forms → Settings → Anti-spam, which shows whether each plugin was detected.
Submissions flagged by the keyword, link, Akismet or Antispam Bee checks are stored under Entries → Spam (with the check that flagged them) instead of being emailed, so a false positive can be restored.
Each CAPTCHA provider has its own on/off switch under Settings → CAPTCHA. The provider's script is requested only when a visitor starts interacting with a form that contains a CAPTCHA — never on page load, and never on pages without such a form.
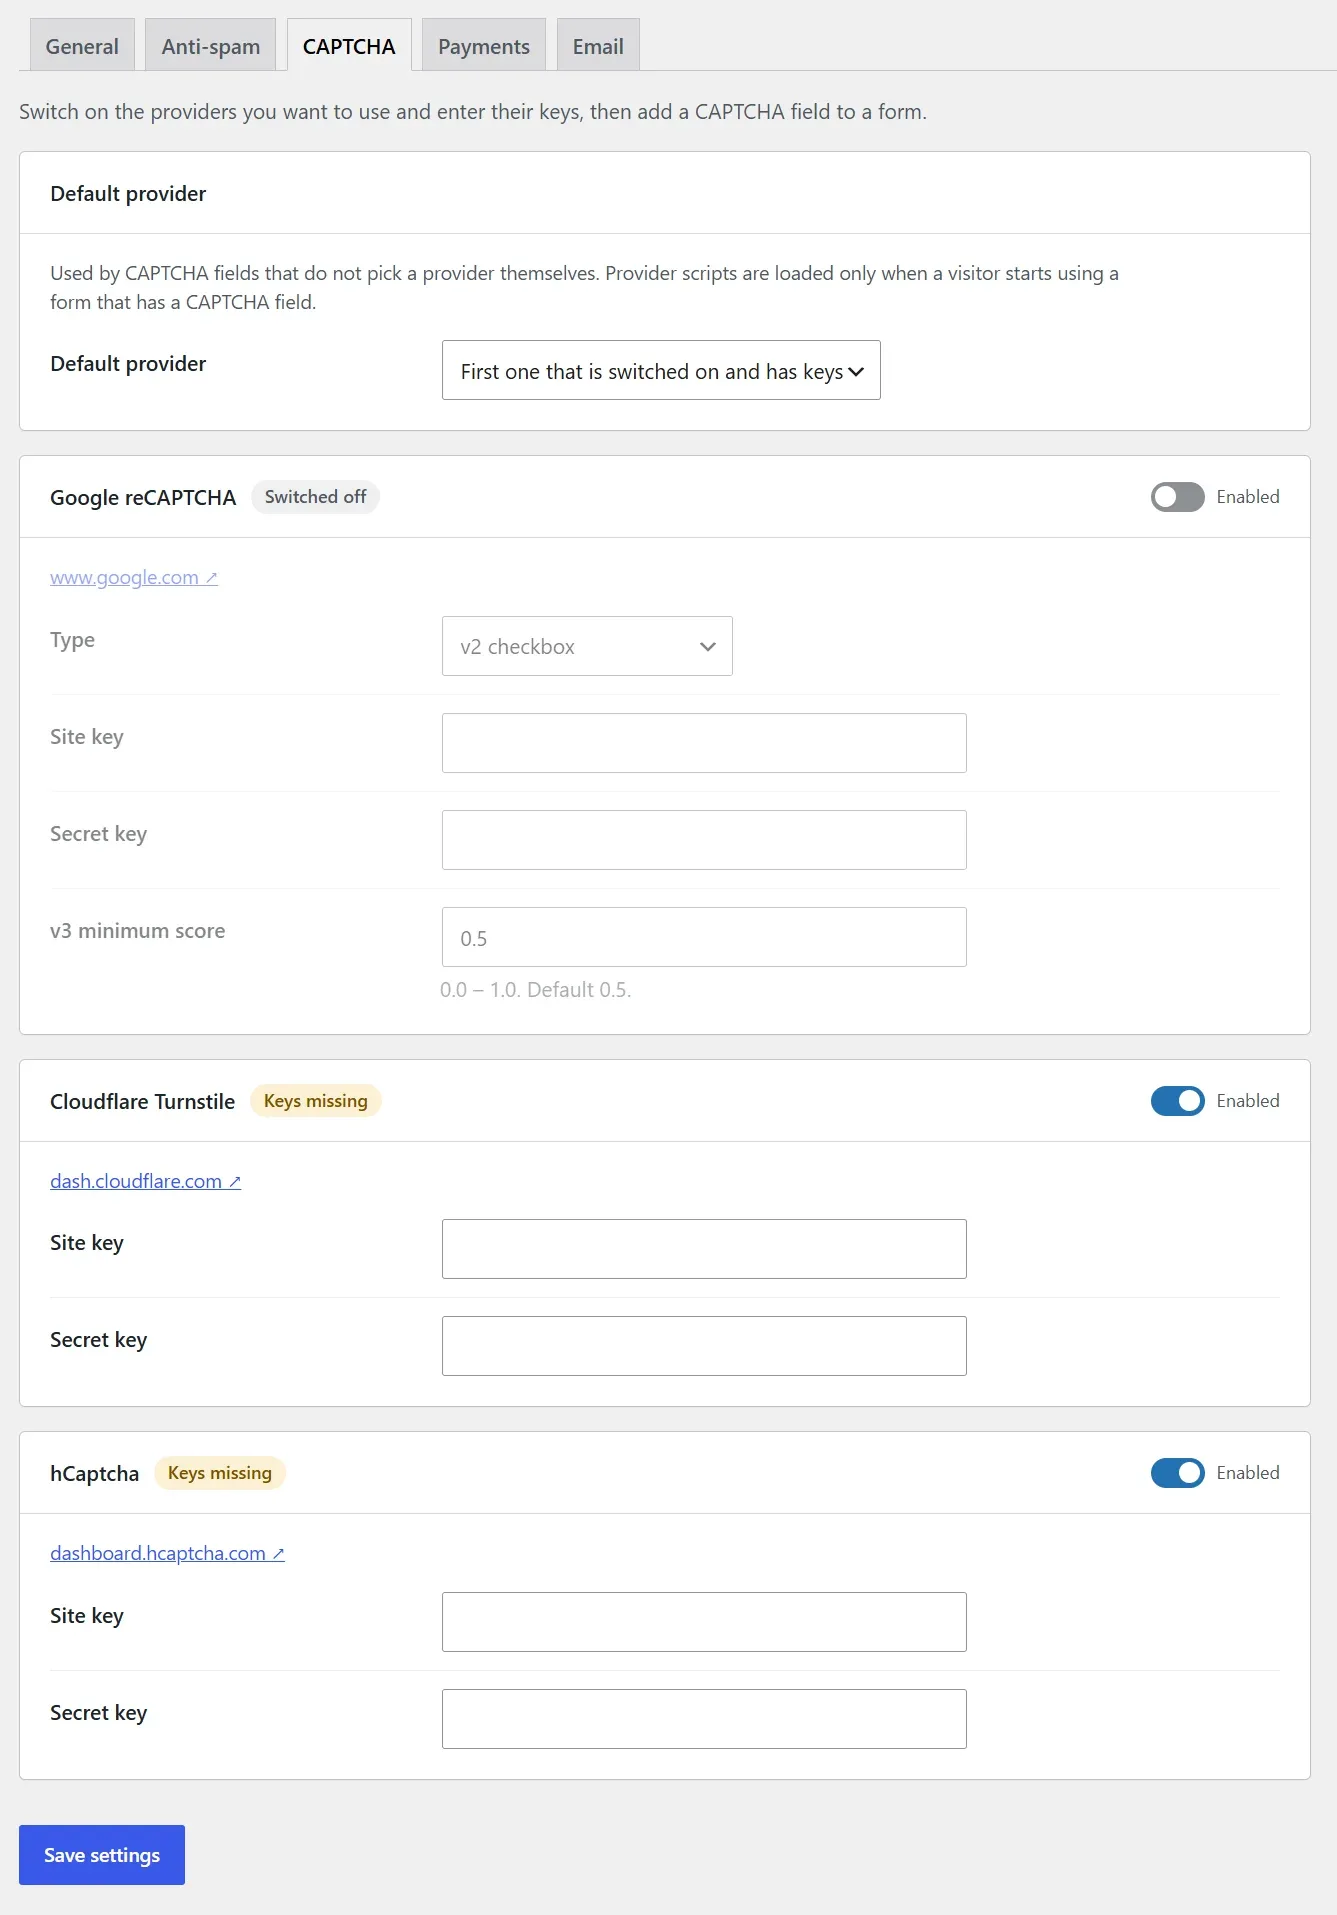
Adding a CAPTCHA provider
Register the provider with the awpf_captcha_providers filter. It then appears under Settings → CAPTCHA with its own switch and key fields, and in the provider list of the CAPTCHA field. Keys are stored as {id}_site and {id}_secret.
add_filter( 'awpf_captcha_providers', function ( $providers ) {
	$providers['mycaptcha'] = array(
		'label'  => 'My CAPTCHA',
		// {onload} and {sitekey} are replaced. "api" is the global object that exposes
		// render( element, { sitekey } ), getResponse( id ) and reset( id ), like reCAPTCHA.
		'script' => 'https://example.com/api.js?onload={onload}&render=explicit',
		'api'    => 'mycaptcha',
		'verify' => 'https://example.com/siteverify', // POST secret, response, remoteip → { "success": true }
		'fields' => array(
			'mycaptcha_site'   => array( 'text', 'Site key' ),
			'mycaptcha_secret' => array( 'secret', 'Secret key' ),
		),
	);
	return $providers;
} );
For a service with a different verification API use 'verify_callback' => function ( $response, $field ) { return true or false; } instead of verify. For a widget that does not follow the reCAPTCHA JavaScript API, register an adapter: window.awpfCaptcha.mycaptcha = { render( box, sitekey, form ), token( form ), reset( form ) } (render and token may return promises).
Payments (Stripe and PayPal)
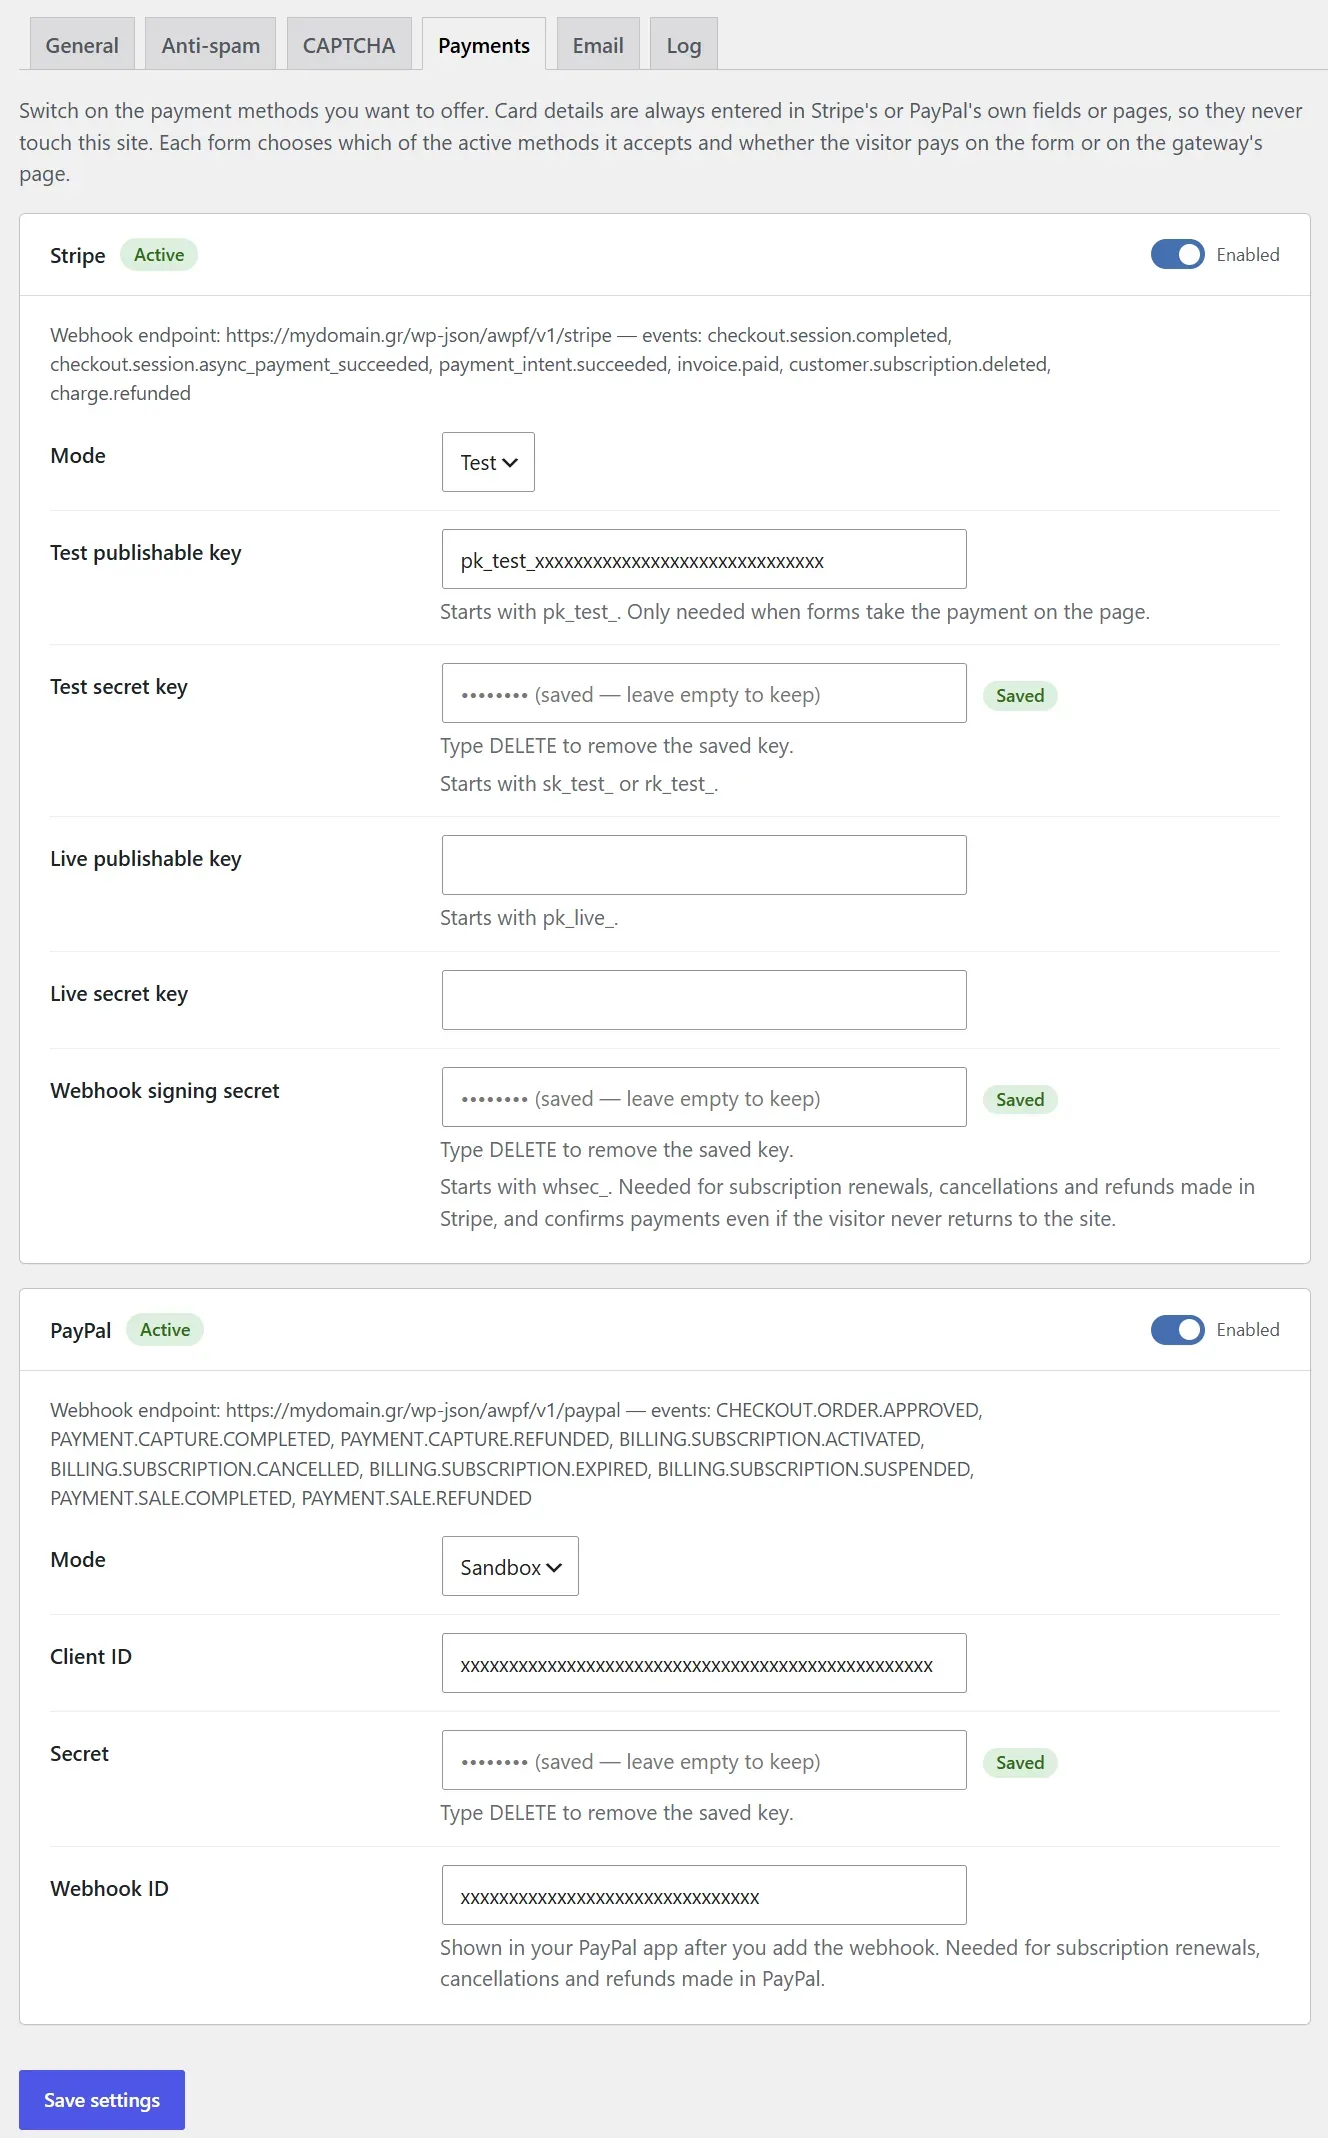
- Under Forms → Settings → Payments switch on the payment methods you want to offer and enter their keys. A method that is switched off is not offered on any form.
- Add pricing fields to the form: at least one Product; optionally Option, Quantity, Shipping and a Total.
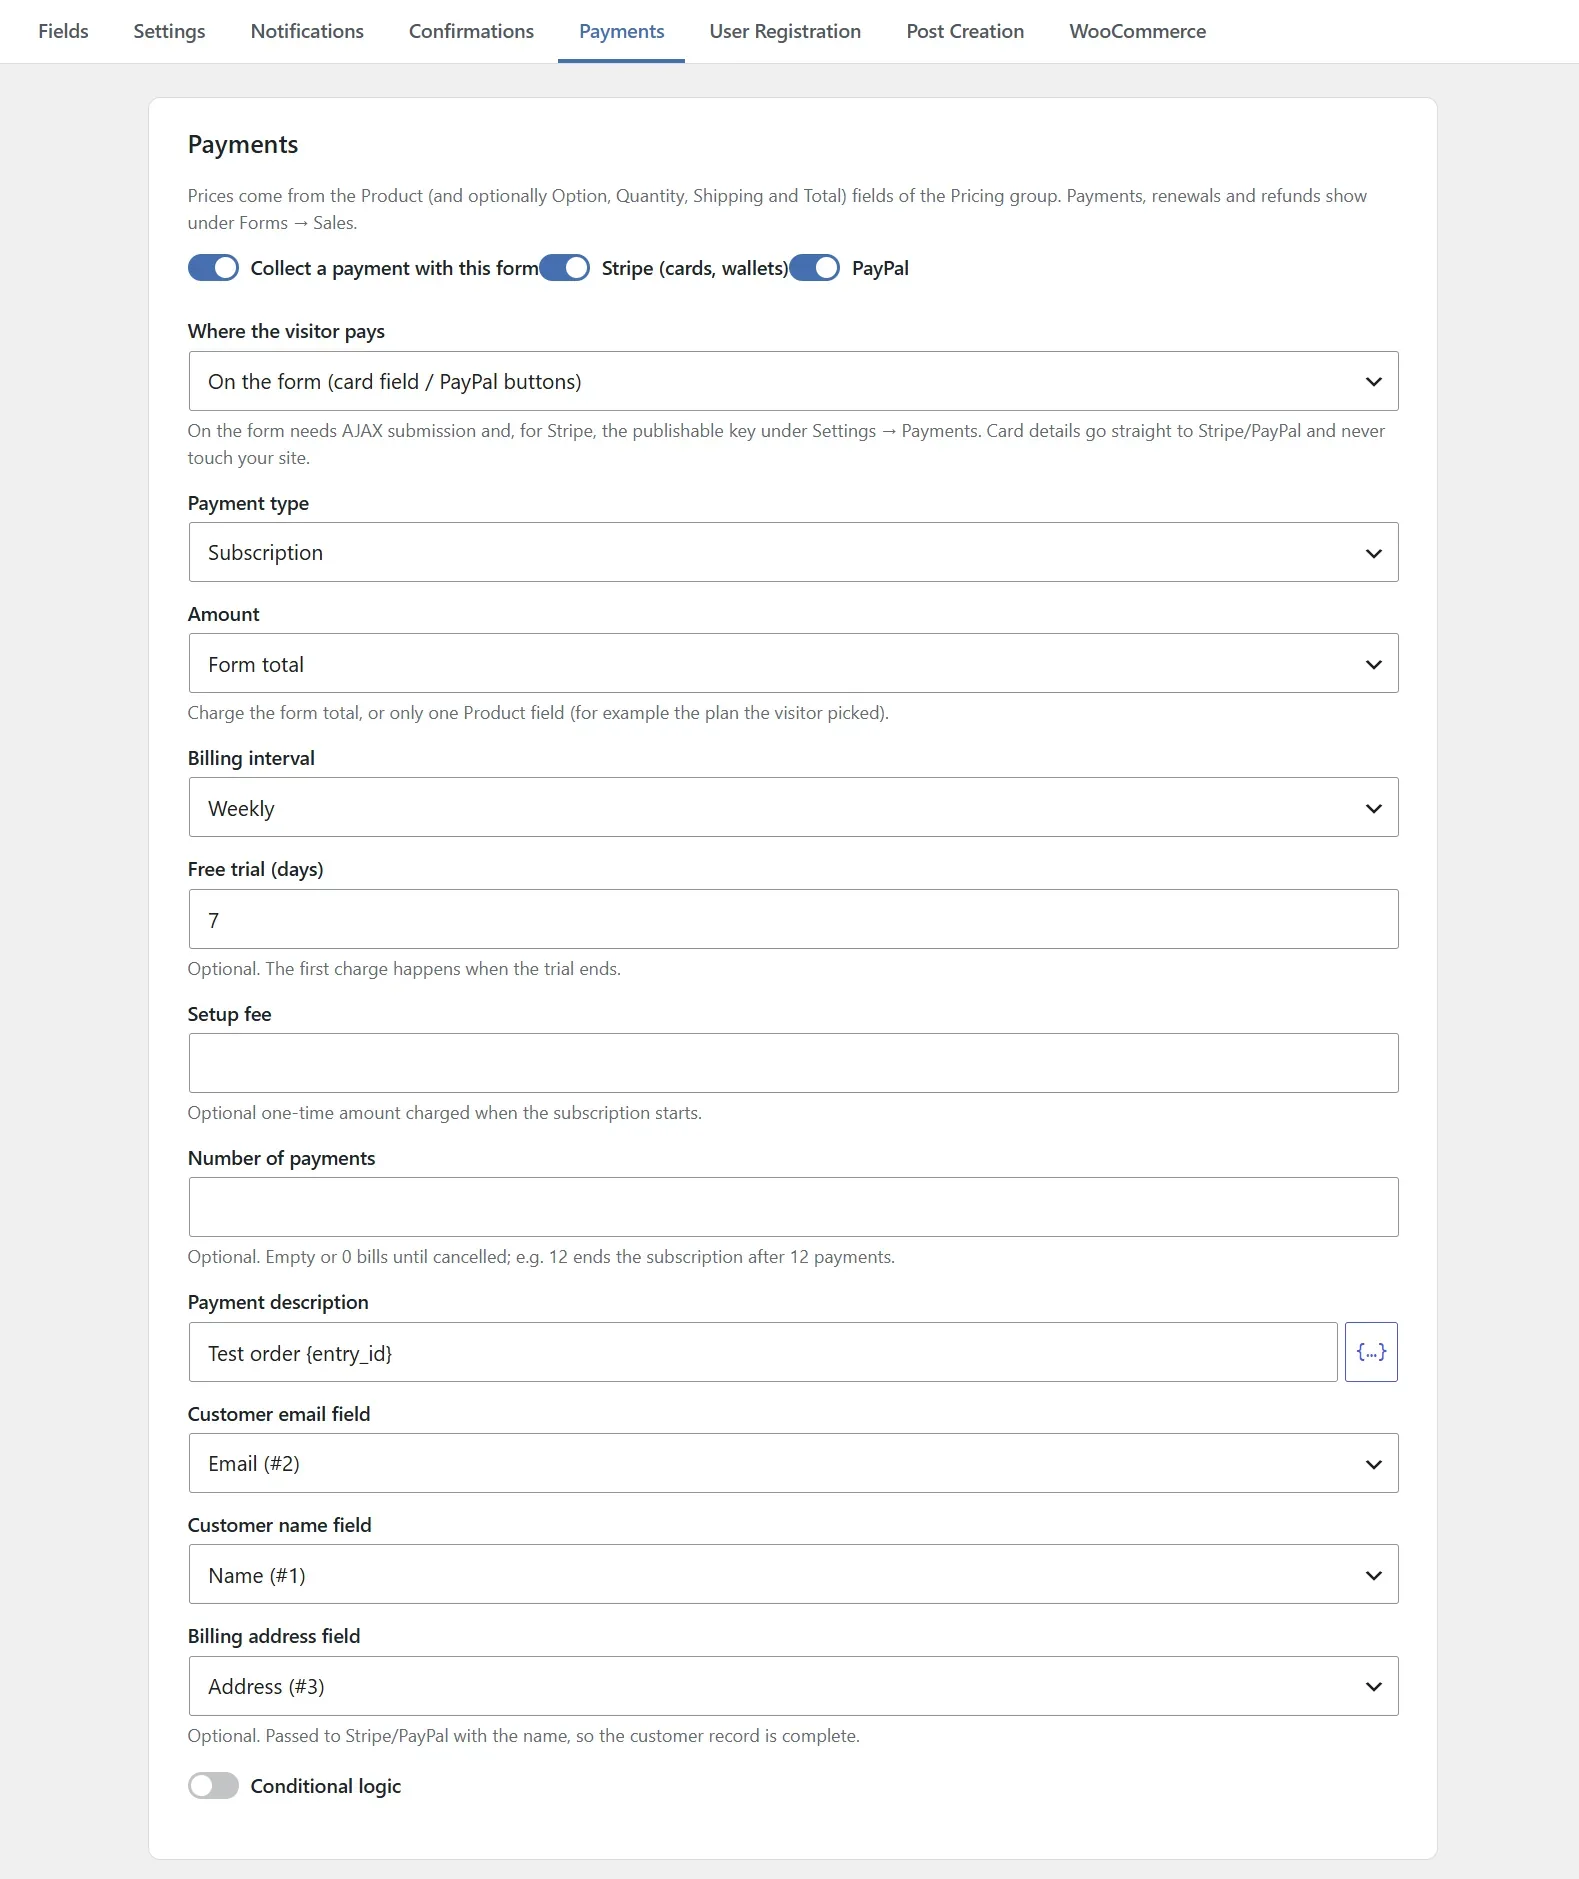
- In the form's Payments tab switch on Collect a payment and enable Stripe and/or PayPal. With both enabled the visitor chooses the method.
Where the visitor pays
- On the form: a Stripe payment field (cards, Apple Pay / Google Pay and the other methods enabled in your Stripe account, with 3-D Secure) or the PayPal buttons appear on the form. The visitor never leaves the page; the confirmation is shown as soon as the payment succeeds. Needs AJAX submission (the default) and, for Stripe, the publishable key. With PayPal selected, the PayPal buttons replace the submit button.
- On the gateway's payment page: after submitting, the visitor is sent to Stripe Checkout or PayPal and returned to your site, where the confirmation is shown.
Either way, card details are entered in Stripe's or PayPal's own fields and never touch your server.
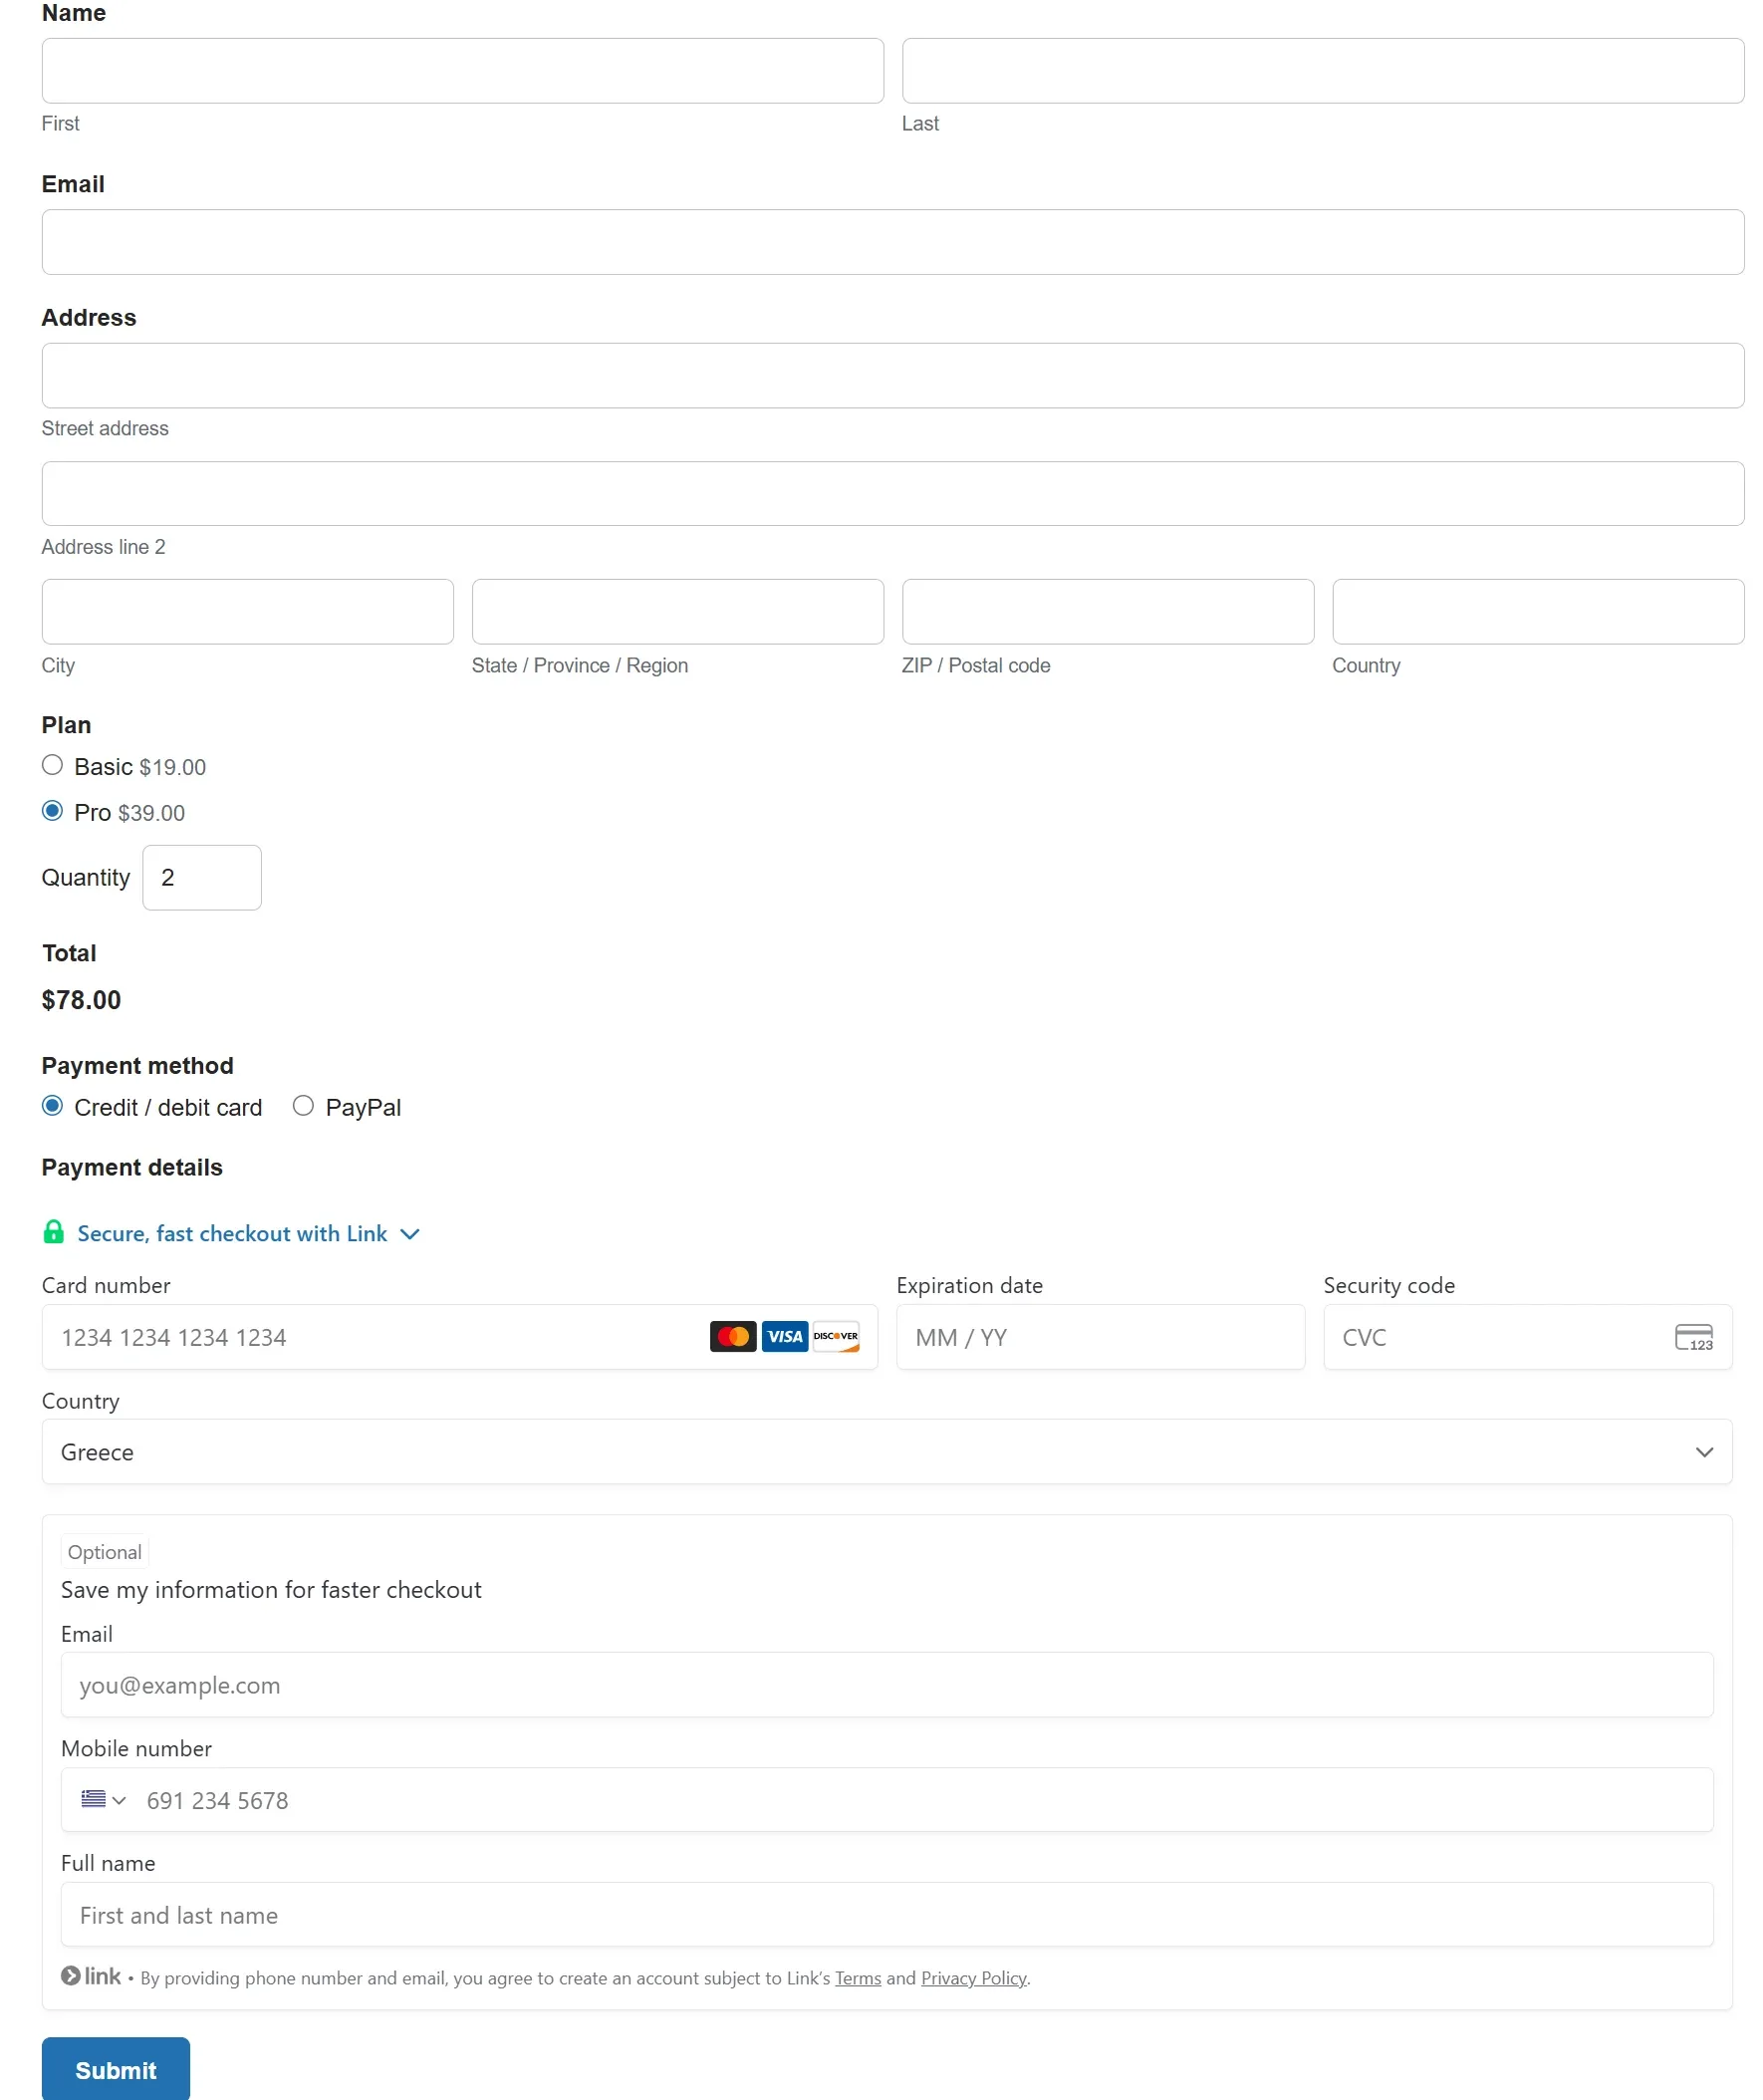
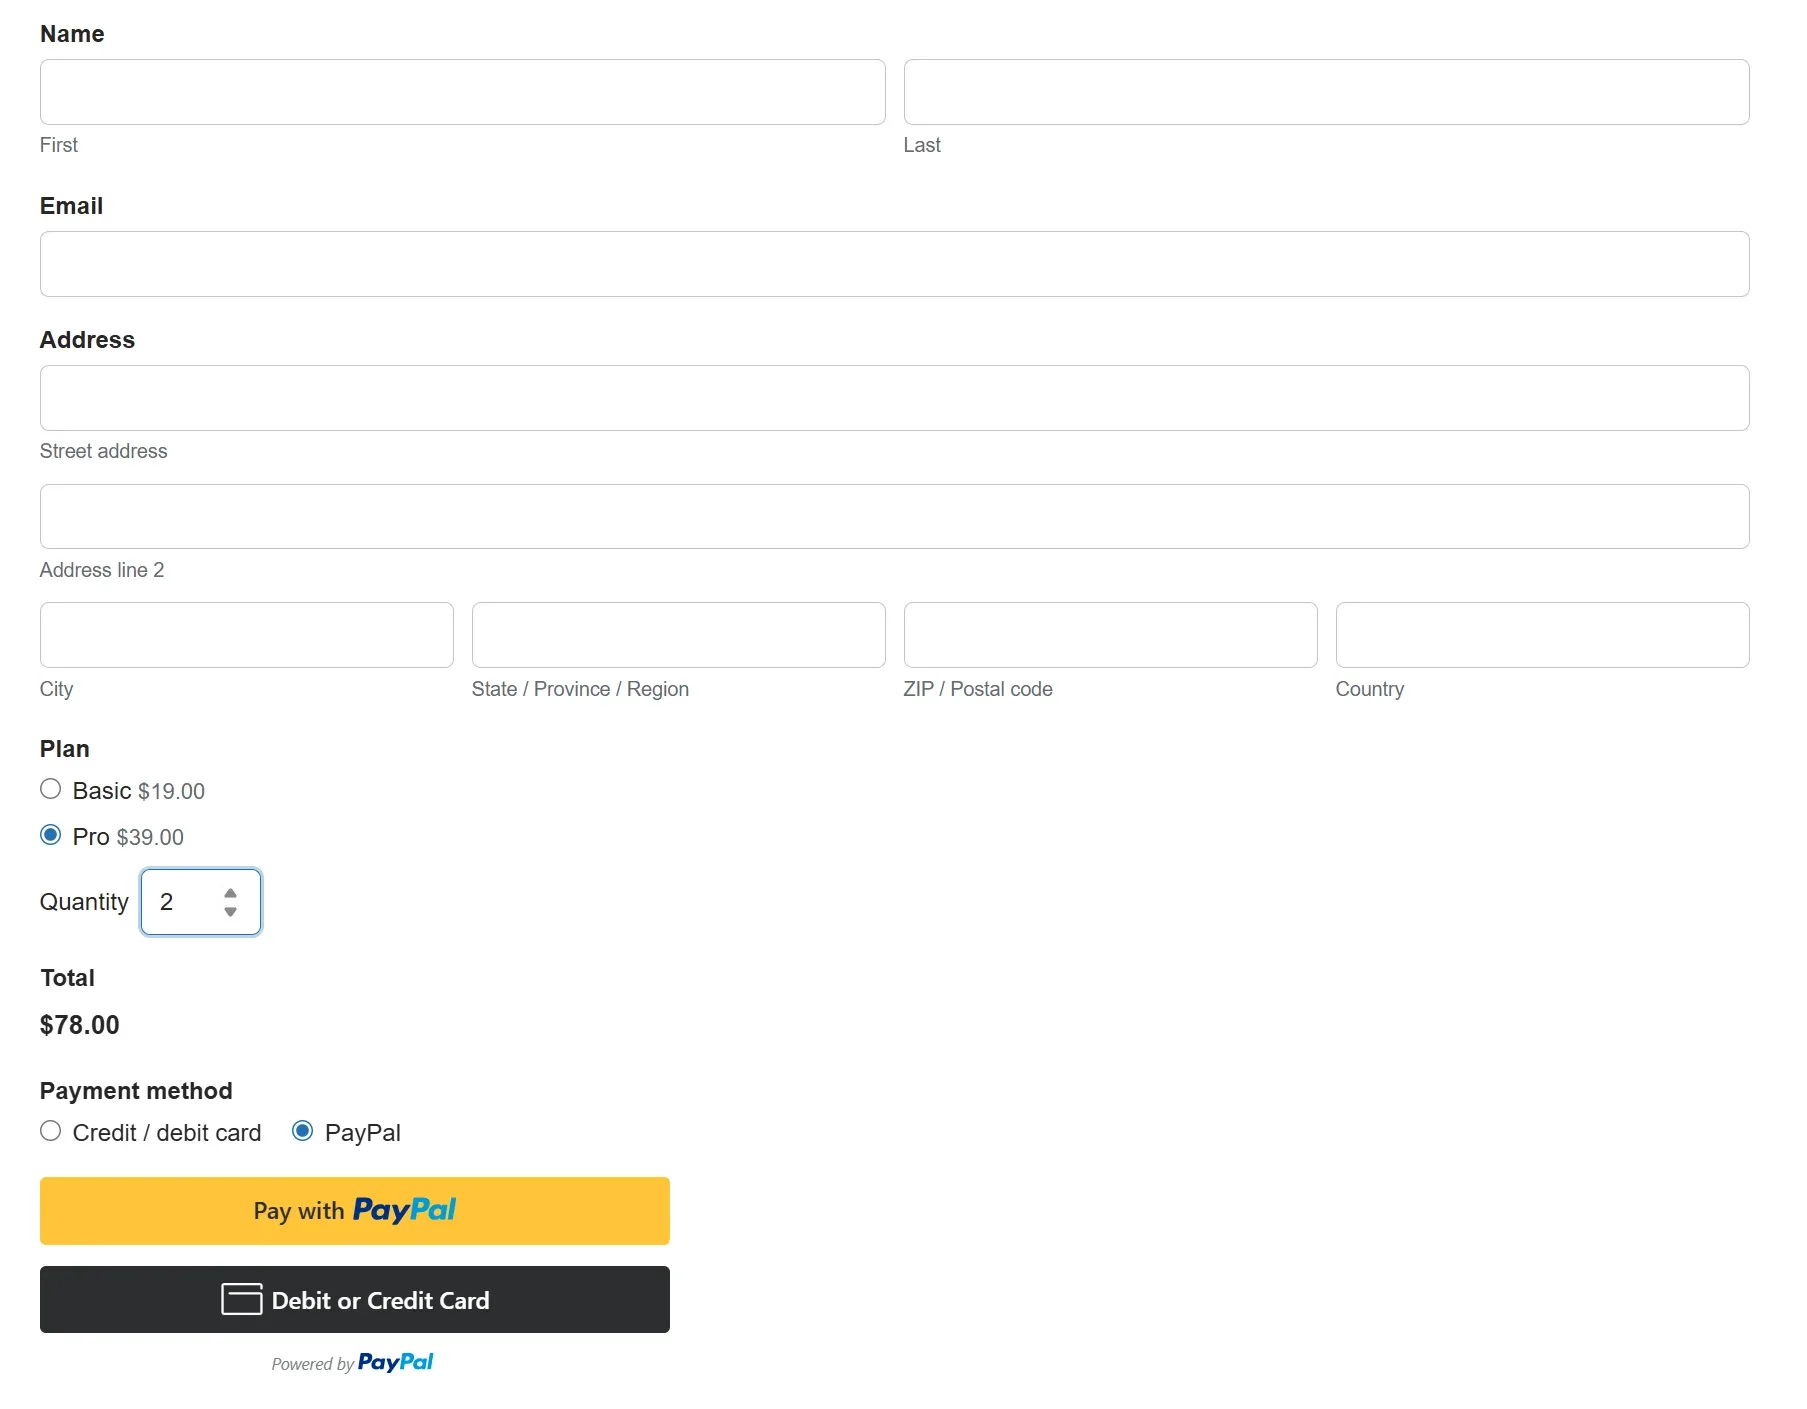
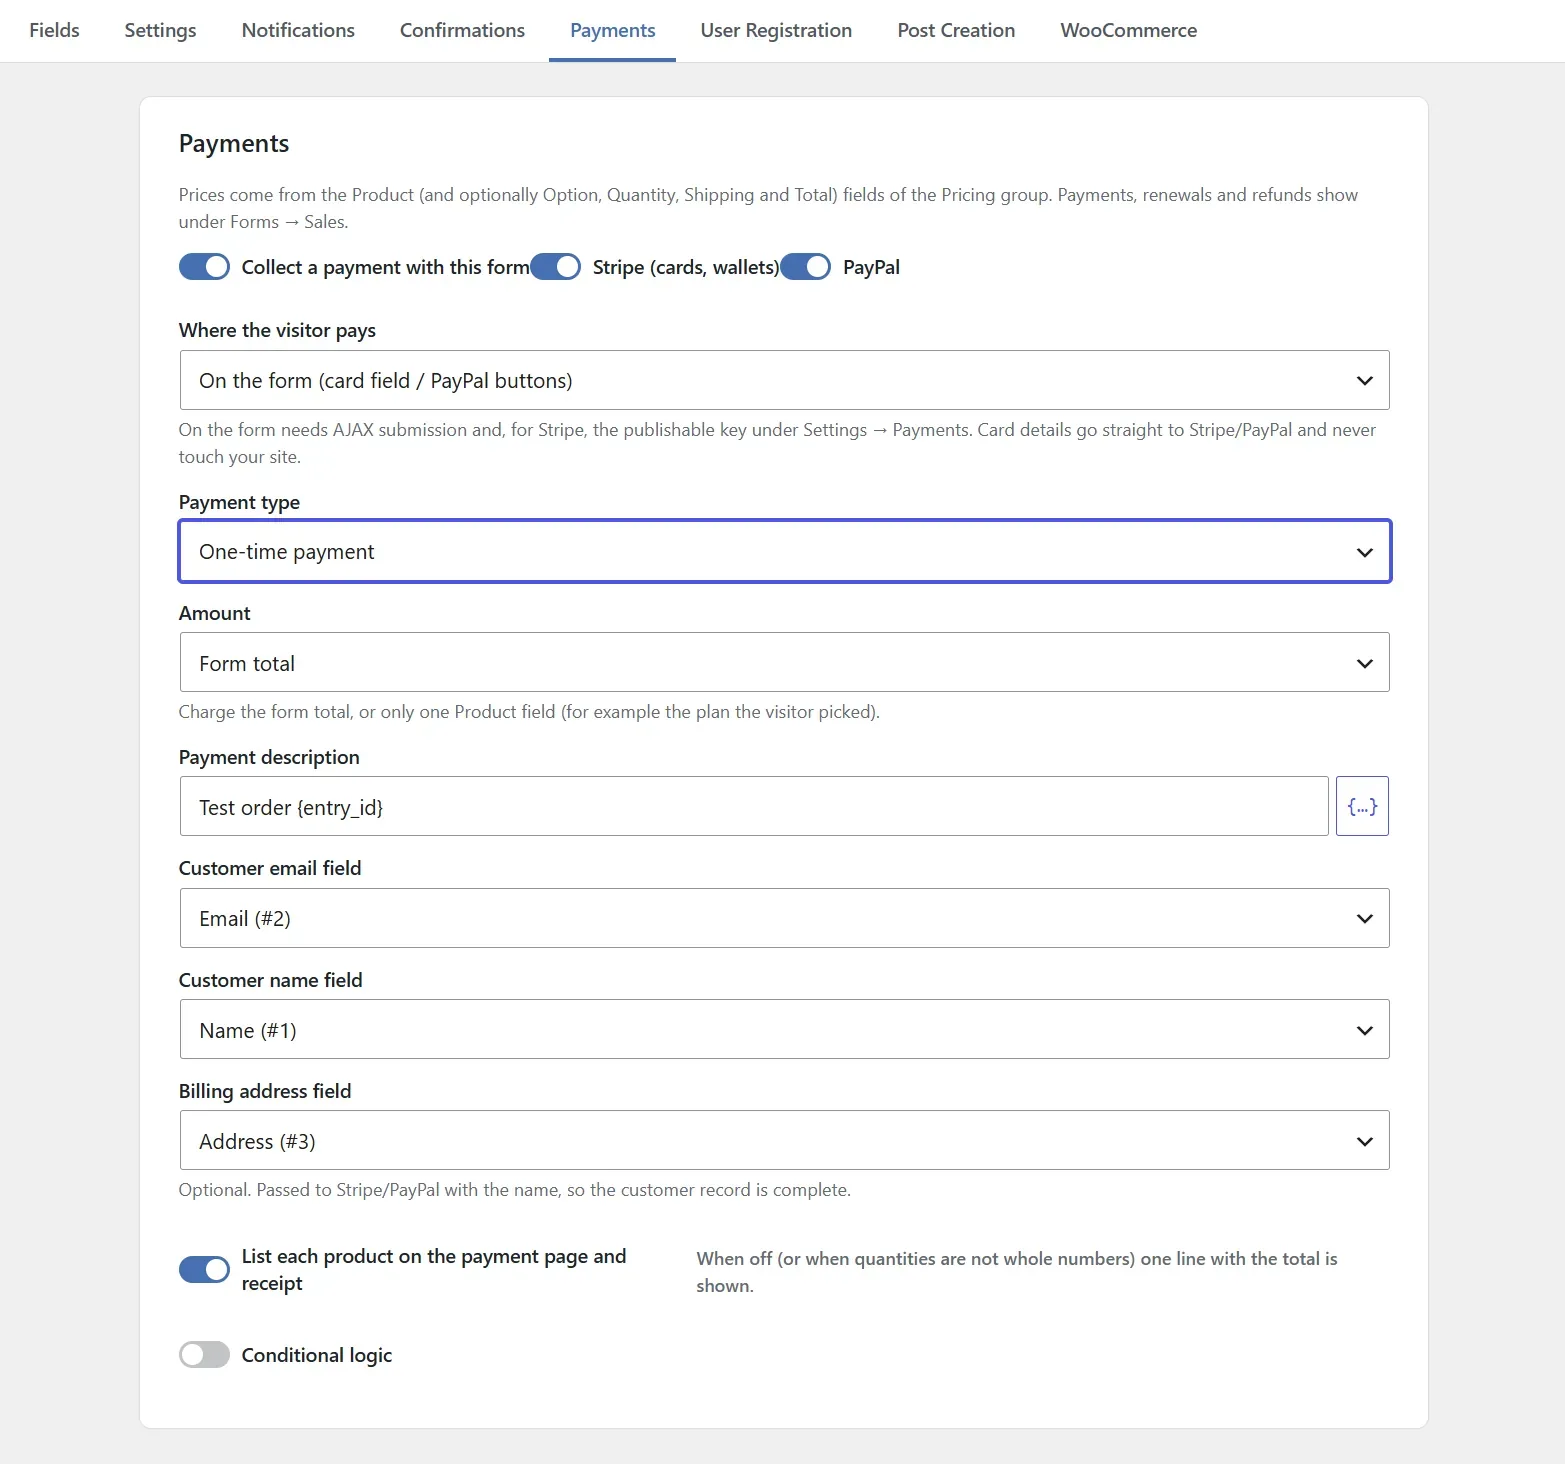
Payments tab settings
| Setting | What it does |
|---|---|
| Payment type | One-time payment or subscription (daily, weekly, monthly, yearly) — with both gateways. |
| Amount | The form total, or a single Product field (for example the plan the visitor picked; other products are then ignored). |
| Free trial (days) | Subscriptions: the first charge happens when the trial ends. On the form, Stripe saves the card without charging it. |
| Setup fee | Subscriptions: a one-time amount charged when the subscription starts. |
| Number of payments | Subscriptions: ends the subscription after this many payments (empty = until cancelled). |
| Customer email / name / billing address field | Passed to Stripe (customer record, receipt email) and PayPal (pre-filled buyer details). |
| Billing / shipping address | Stripe payment page: ask for the billing address; ask for a shipping address (list the two-letter country codes you ship to). PayPal uses the buyer's PayPal address when shipping is asked. |
| List each product | Shows every product as its own line on the payment page and receipt (one line with the total when quantities are not whole numbers). |
Gateway settings
| Stripe | PayPal | |
|---|---|---|
| Keys | Secret key (test / live); publishable key (test / live) for payments on the form. | Client ID and secret (sandbox / live) of a REST app. |
| Webhook | Add the endpoint shown on the settings page with the listed events and paste the signing secret. Needed for renewals, cancellations and refunds made in the Stripe dashboard; it also completes payments when the visitor closes the browser before returning. | Add the endpoint shown on the settings page to your PayPal app with the listed events and paste its Webhook ID. Needed for subscription renewals, cancellations and refunds made in PayPal. |
Managing payments
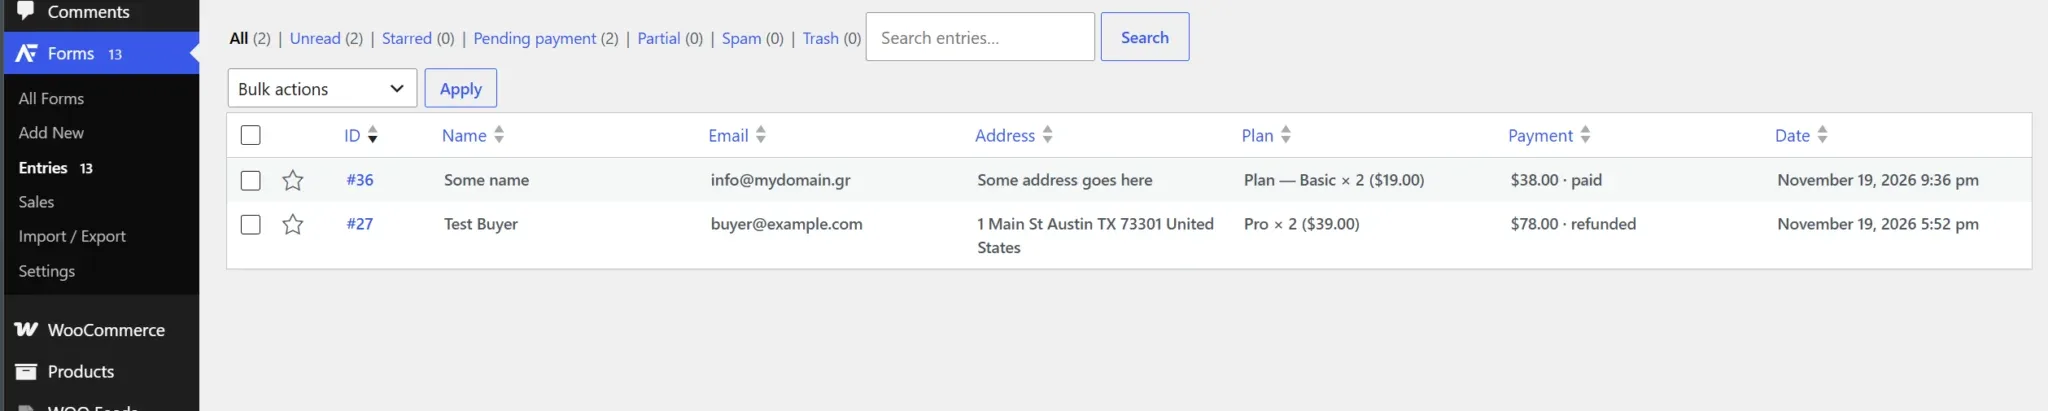
- The entry is saved as Pending payment and becomes active only when the gateway confirms the amount and currency. Notifications, registration, post creation and the confirmation run at that moment — exactly once, even if the webhook and the visitor's return arrive together.
- The entry screen shows the payment, the subscription terms and every charge, renewal and refund. Refund (full or partial) and Cancel subscription are available to users who can manage settings.
- Use Send when: A payment is received for receipts.
- Conditional logic on the Payments tab lets a form charge only in some cases.
- The currency is set under Settings → General.
Troubleshooting: the debug log
Switch on Forms → Settings → Log → Enable the debug log, reproduce the problem, then open the same tab. It lists gateway errors with Stripe's or PayPal's answer, webhooks received or rejected (with the reason, e.g. a wrong signing secret or Webhook ID), payments, renewals, refunds and cancellations, failed emails, and payment-field errors seen in visitors' browsers. Secret keys are masked, entries are deleted after 30 days, and you can download or clear the log. Switch it off when you are done: it can contain names and email addresses.
Sales report
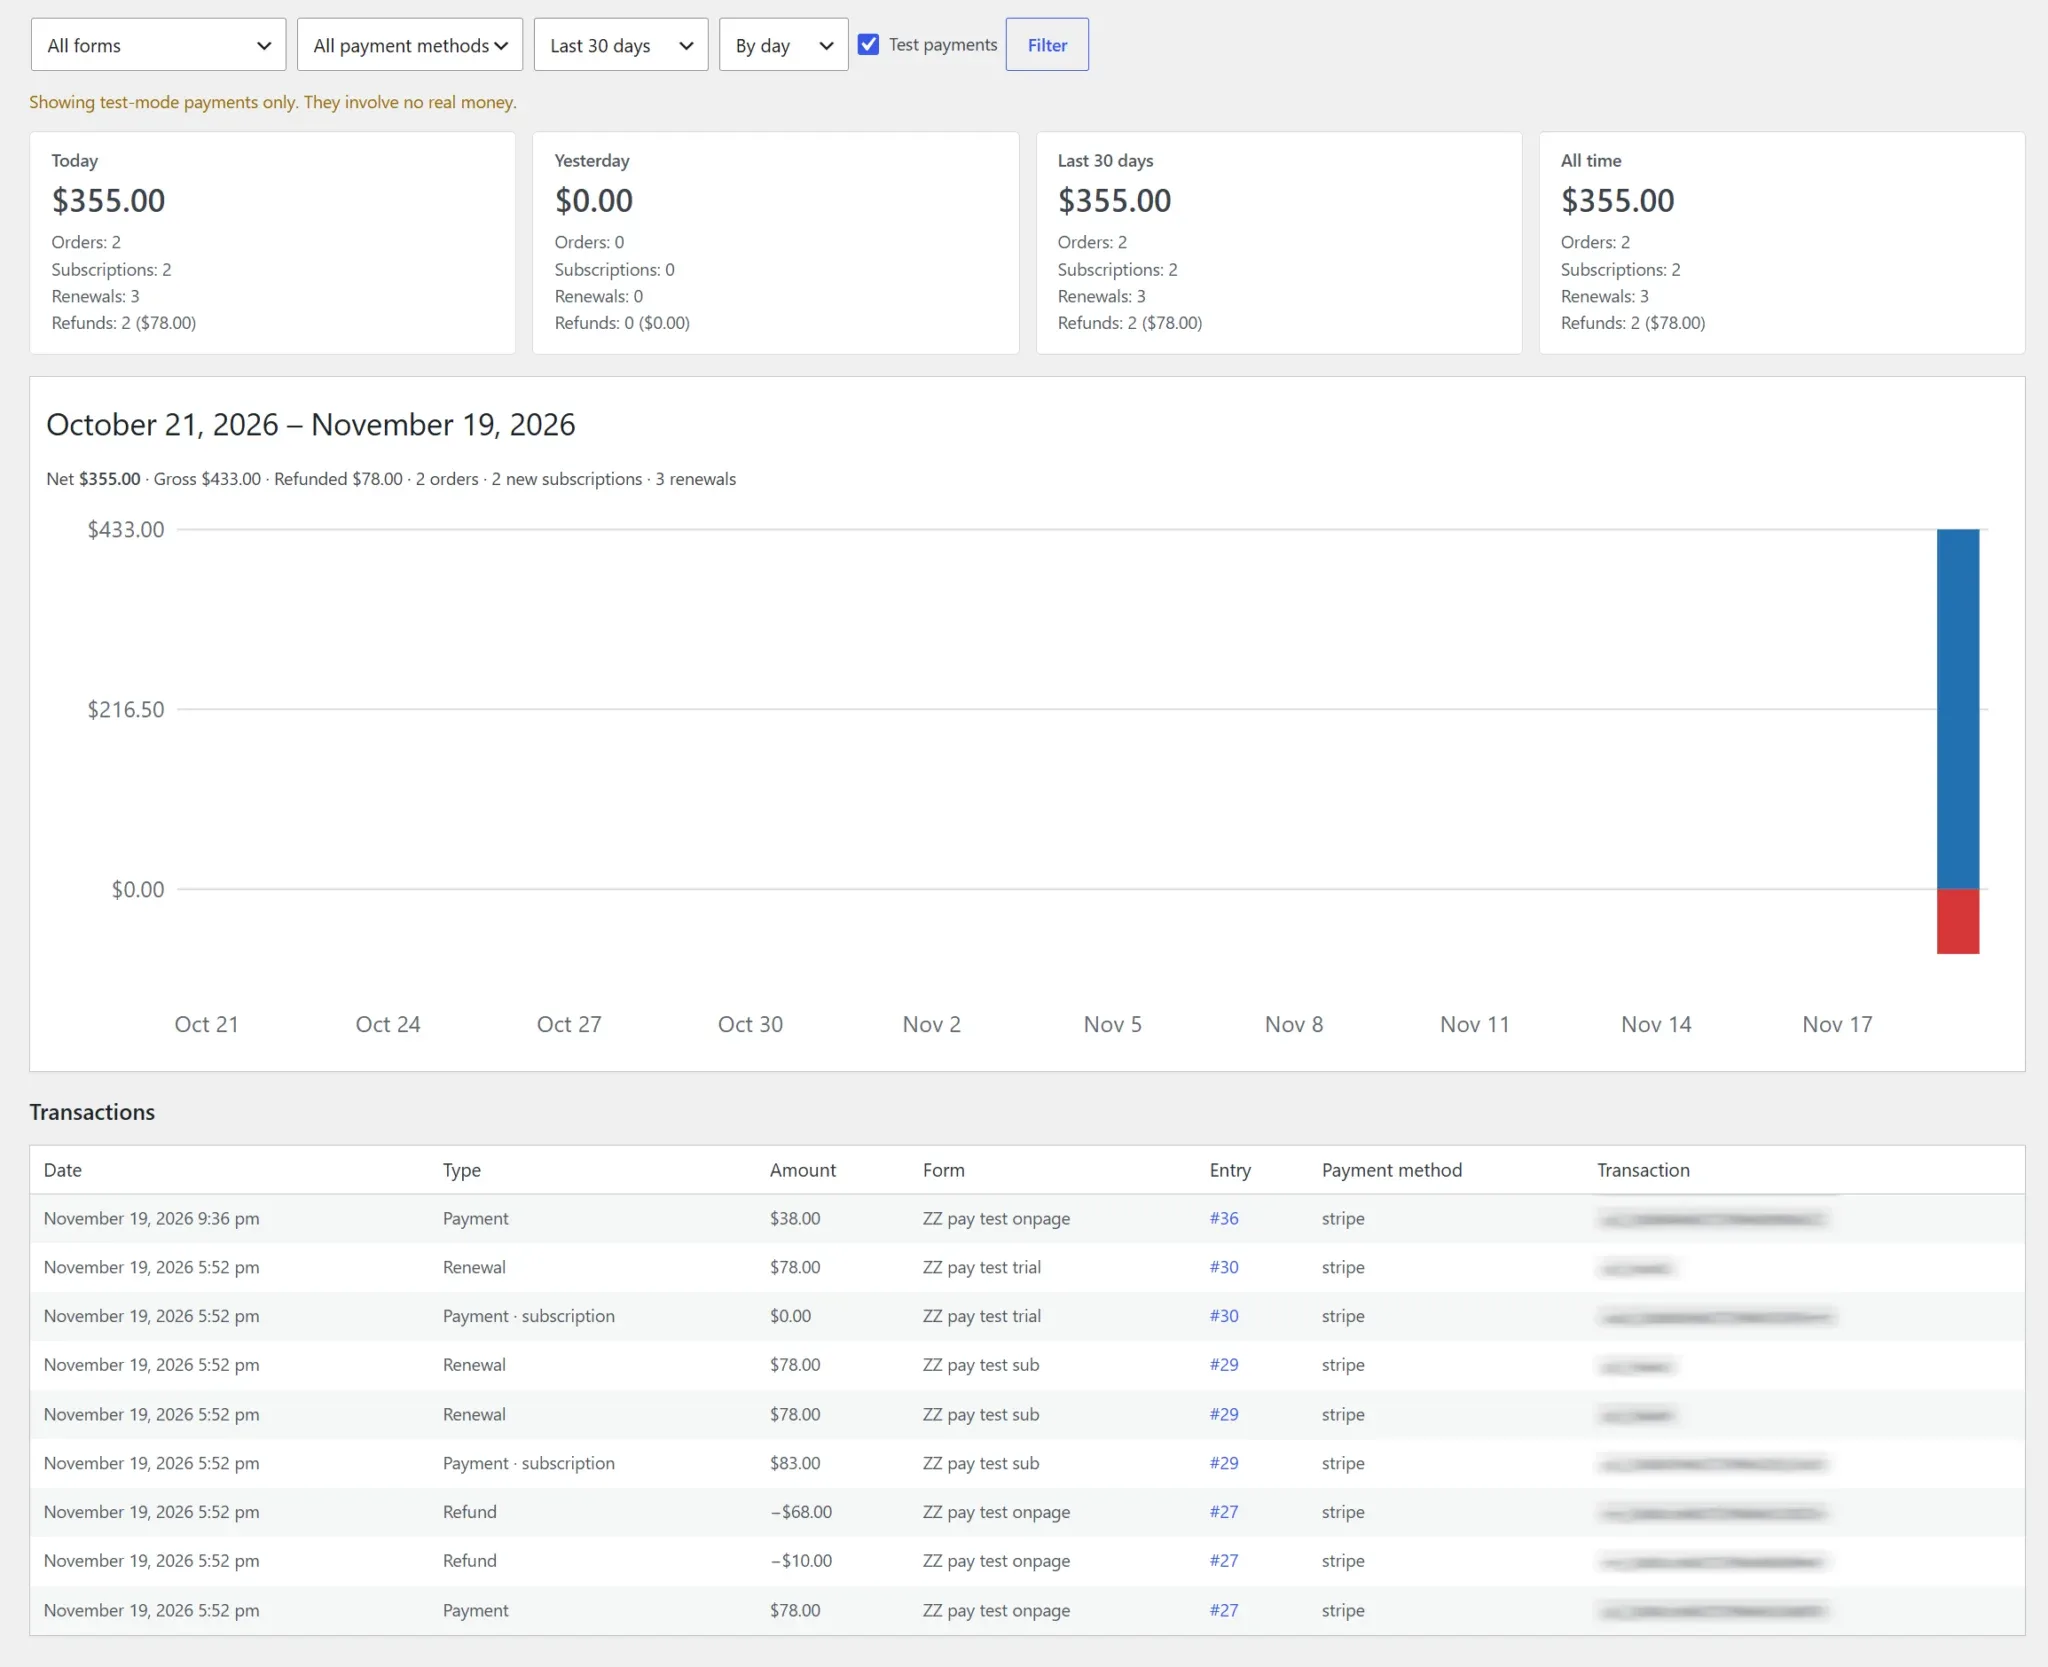
Forms → Sales shows net revenue, orders, new subscriptions, renewals and refunds for today, yesterday, the last 30 days and all time, a chart by day, week or month, and the latest transactions. Filter by form, payment method, period and currency; tick Test payments to see test-mode / sandbox payments (they are never mixed with real ones). Export CSV downloads every transaction in the selected period.
WooCommerce
Product forms (add-ons)
Edit a product and choose a form under Product data → General → Amazing WP Form. The form's fields appear above the Add to cart button.
- Fields are validated when the product is added to the cart; answers are shown in the cart, at checkout, on the order and in emails.
- Pricing fields in the form are added to the product price.
- An entry linked to the order is created when the order is placed (classic and block checkout).
- On shop pages the product's button becomes "Select options" so the form cannot be skipped.
Page breaks are ignored in product forms; uploads, conditional logic and calculations work as usual.
Add products to the cart from a form
In the form's WooCommerce tab enable the feed, optionally list product IDs that are always added, and choose where to send the visitor (checkout, cart, or the form's confirmation). Products the visitor selects in a WooCommerce Products field are added as well. Payment is then handled by WooCommerce.
User registration
In the User Registration tab map the Email field (required), and optionally Username, Password and Name fields; choose the role and add user-meta mappings.
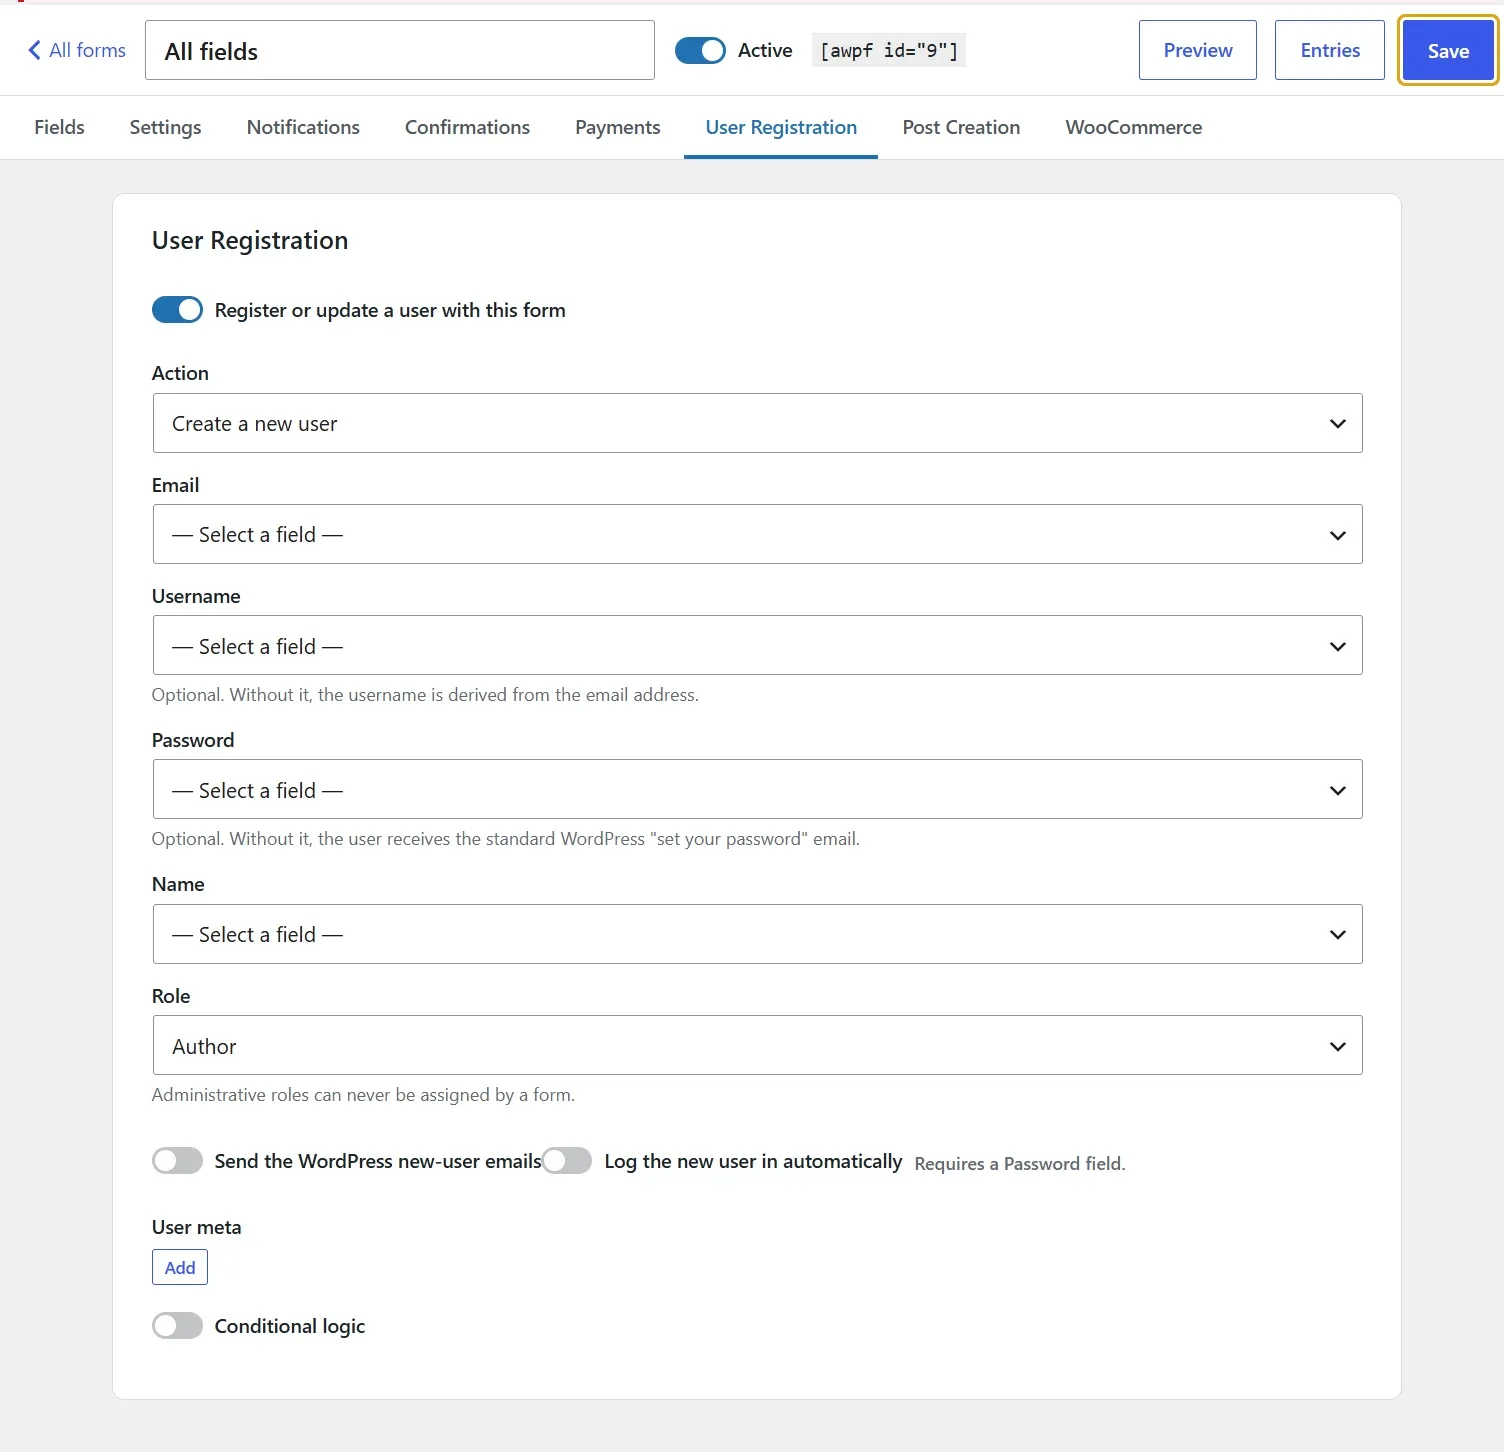
- Without a Password field, WordPress emails the new user a "set your password" link.
- Log the new user in automatically works when the form has a Password field.
- Existing email addresses and usernames are reported as field errors before anything is saved.
- Update the logged-in user writes the name and meta mappings to the current user instead.
- On payment forms the account is created after the payment succeeds.
Roles are restricted on purpose.
A form can never assign a role that can manage the site, edit users, install plugins or post unfiltered HTML (Administrator, Editor, Shop manager …), and can never write capability or session meta. Use the awpf_registration_roles filter only if you fully understand the risk.
Post creation
Enable the feed in the Post Creation tab, choose the post type and status (Pending review by default), and add Post fields to the form. The Guest post submission template is a ready-made example.
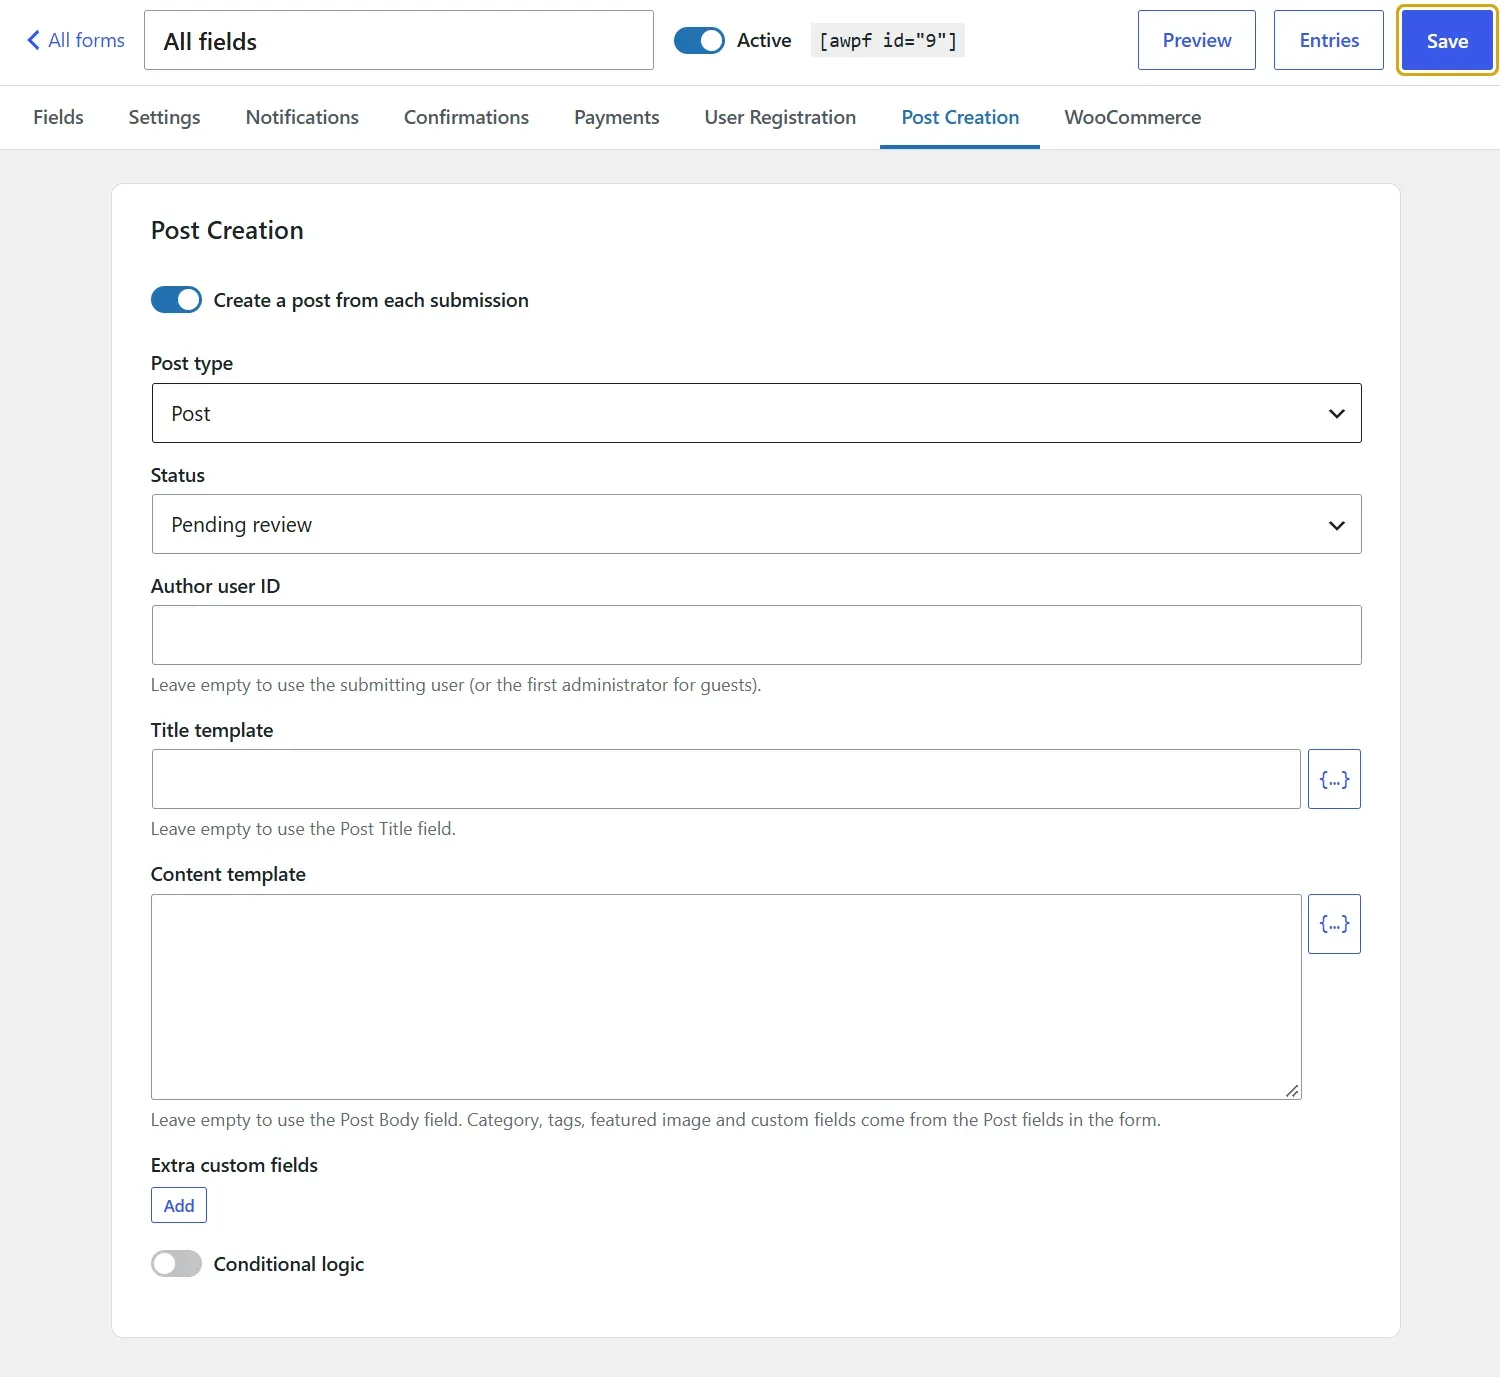
- Title and content come from the Post Title / Post Body fields, or from templates with merge tags.
- Post Category assigns a term of the chosen taxonomy; Post Tags accepts a comma-separated list; Post Image becomes the featured image (copied into the Media Library); Post Custom Field saves to its meta key.
- The author is the submitting user, a fixed user ID, or the first administrator for guests.
- Visitor content is always filtered to safe HTML, and protected (underscore-prefixed) meta keys are refused.
Entries
Forms → Entries lists the entries of one form at a time, with tabs for All, Unread, Starred, Pending payment, Partial, Spam and Trash, a search box and bulk actions.
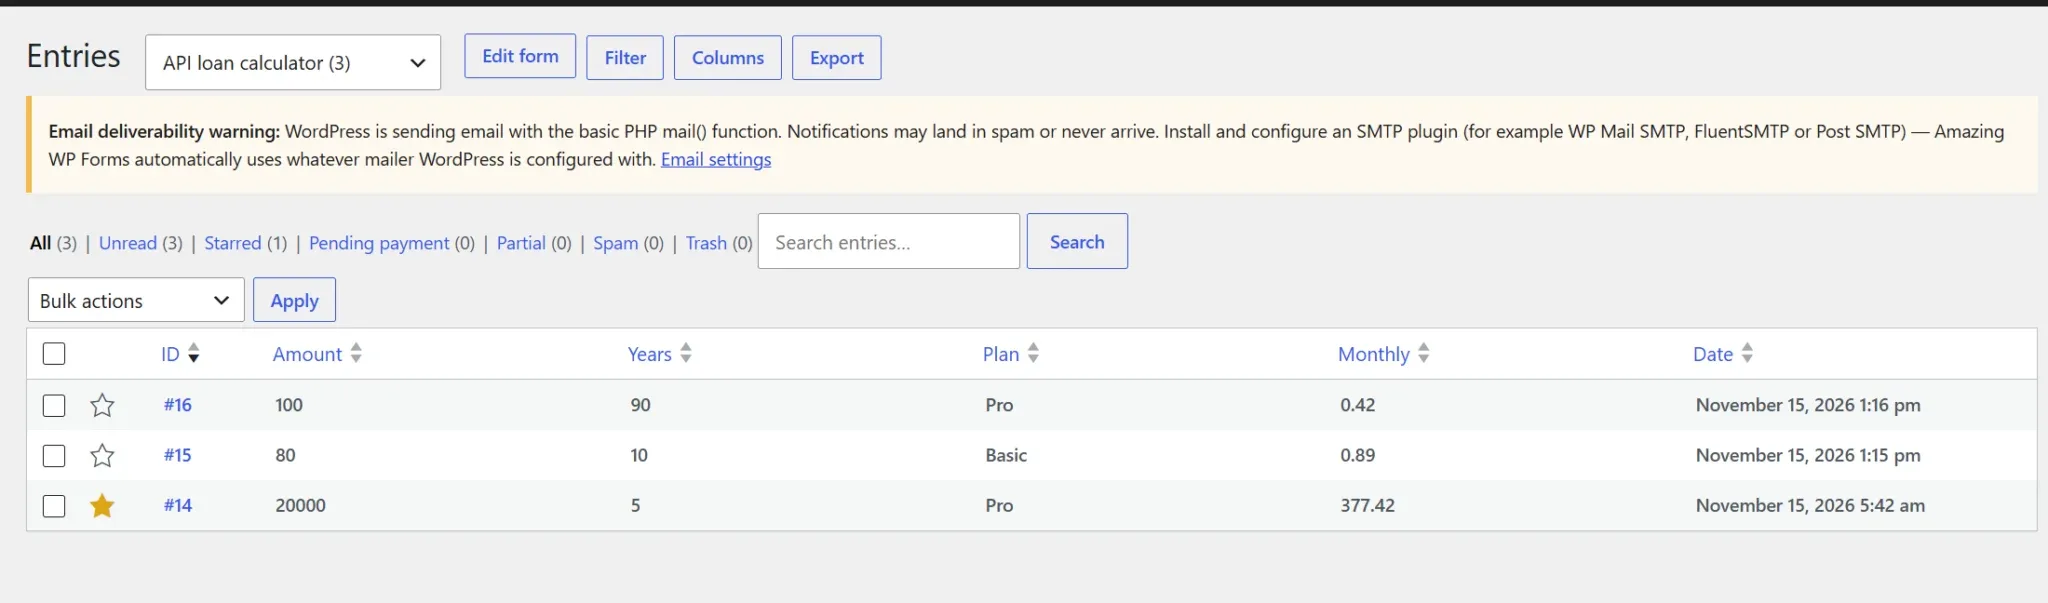
- Open an entry to see every value, the order summary, payment details, links to the created post / user / order, and to resend notifications.
- Not spam: restoring a submission the spam checks stopped sends the form's notifications it held back, once per entry. Entries you moved to Spam yourself (their notifications already went out) and imported spam don't send anything. Uploaded files are not kept for spam submissions, so the email has no attachments. Switch this off under Settings → Anti-spam → Spam entries.
- The form selector shows the number of entries of each form.
- Sorting: click a column heading to sort by it; click again to switch between ascending and descending. Entries without a value in that column come last, and number fields sort numerically.
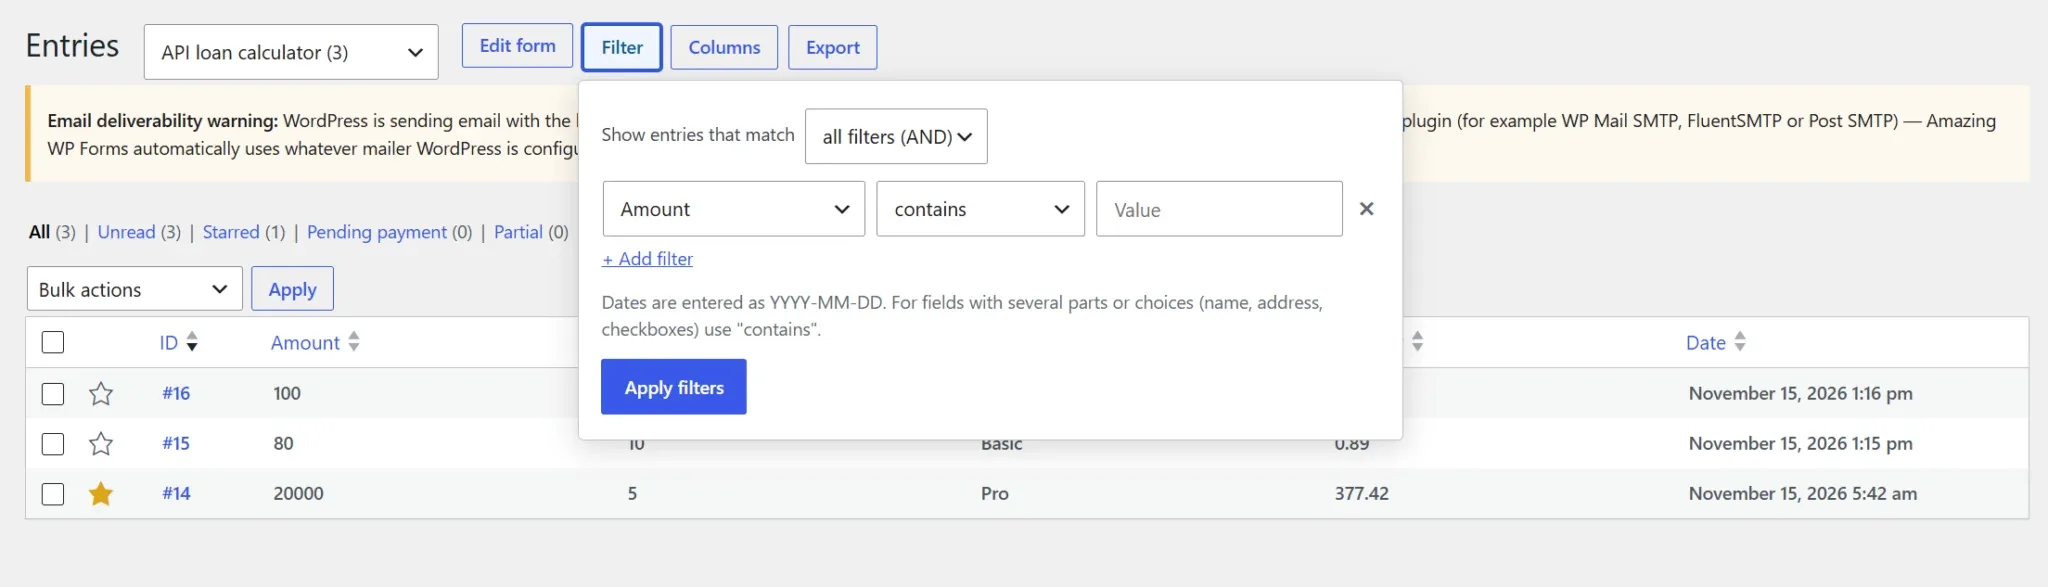
- Filter narrows the list by column or field value. Add as many filters as you need and choose whether an entry must match all of them (AND) or any of them (OR). Conditions: contains, does not contain, is, is not, starts with, ends with, greater than / after, less than / before, is empty, is not empty. Dates are entered as YYYY-MM-DD. Filters combine with the search box and the sorting, and they are applied to exports.
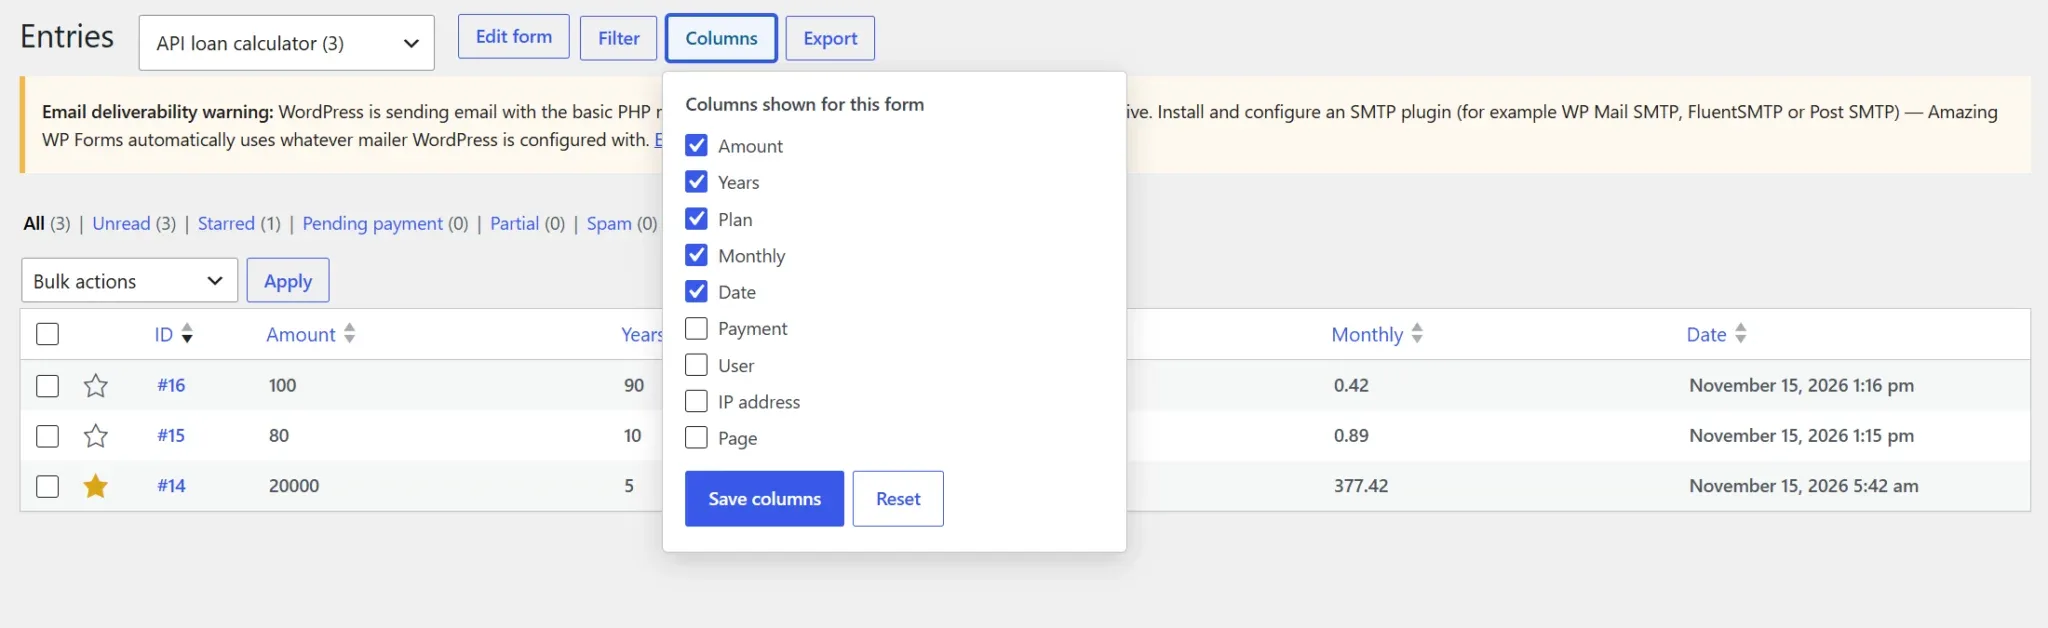
- Columns chooses which fields and entry details (date, payment, user, IP address, page) the table shows. The choice is saved per form; Reset returns to the default (the first four fields and the date).
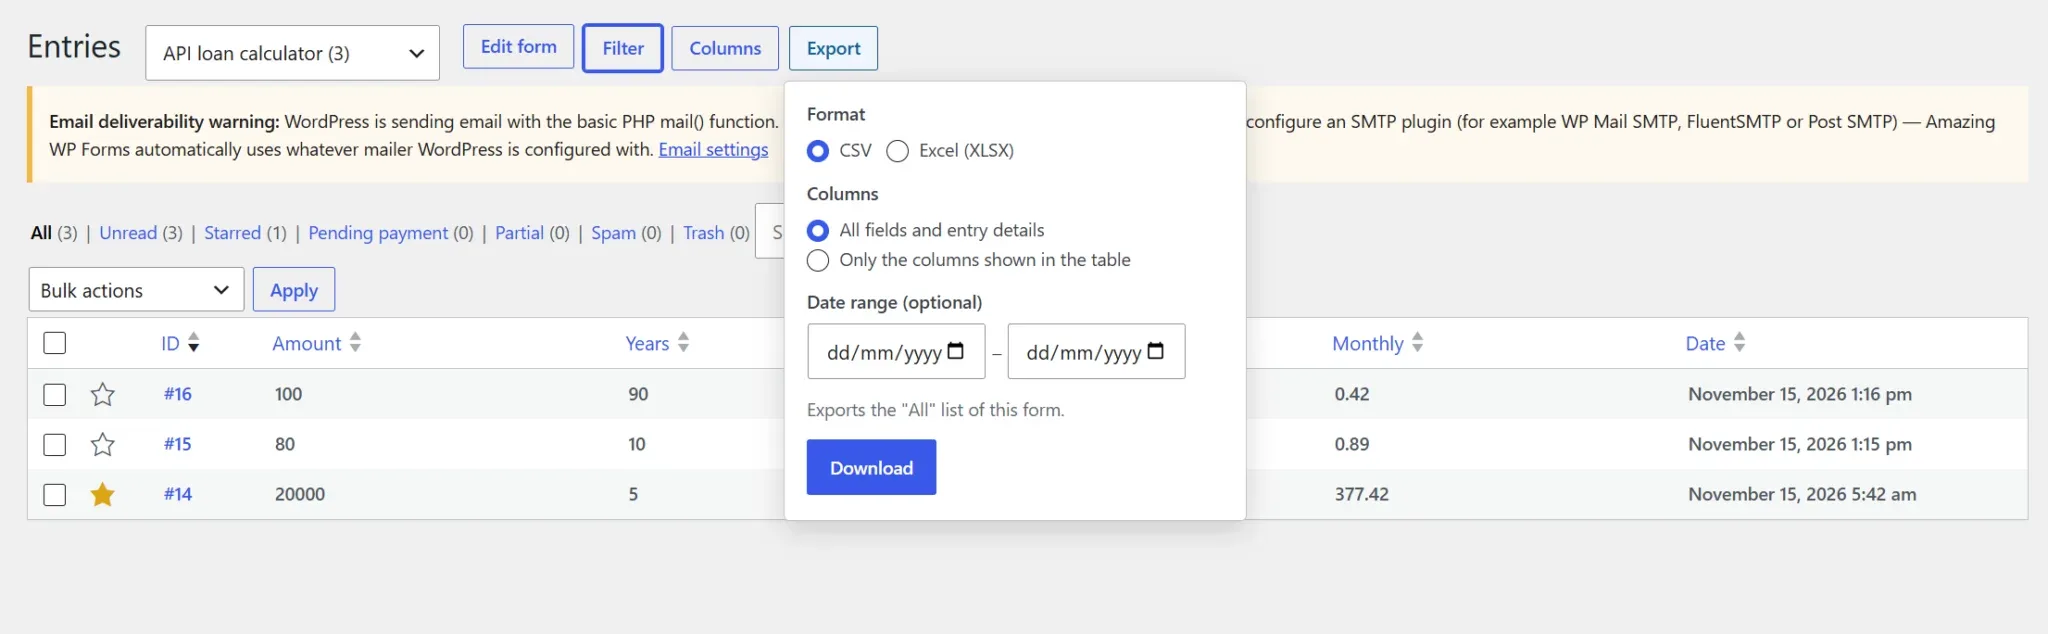
- Export downloads the current tab as CSV or Excel (XLSX), with all fields or only the table's columns, optionally limited to a date range. In CSV files, values that could be read as spreadsheet formulas are neutralised; XLSX needs the PHP zip extension.
- Print gives a clean printout of a single entry.
- Trashed entries are removed after 30 days; an optional retention period deletes all entries automatically.
- Turn off Store entries in the database on a form to only send notifications.
- To list entries on the site, see Showing entries on the site.
Showing entries on the site
Entries can be listed on any page — a guest book, a list of registrations, testimonials, a "who is coming" list, or a "my submissions" page for logged-in users. Entries hold personal data, so this works in two steps: the form decides what may ever be public, and the list on the page only chooses how to show it.
1. Allow it on the form
Open the form → Settings → Show entries on the site:
- Allow the entries of this form to be shown on the site — nothing is listed until this is on.
- Fields that may be shown — tick the fields. Unticked fields never appear on the site and cannot be searched there. Passwords can never be shown. Leave email addresses and phone numbers unticked unless the people who filled in the form agreed to have them published.
- Who can see the entries — only users who can view entries in the admin (default), logged-in users each seeing only their own entries, all logged-in users, or everyone including visitors.
Why the form decides.
Anyone who can write a post can type a shortcode. Because the fields and the audience are set on the form, an author cannot publish fields or entries that the form's owner did not allow: list settings can only narrow the fields down, never add to them.
2. Place the list
| Where | How |
|---|---|
| Block editor | Block Form Entries (fields as checkboxes, live preview). |
| Elementor, Beaver Builder, Bricks, Divi | Widget / module / element Form Entries. |
| WPBakery, Avada | Element Form Entries. |
| Widget areas, SiteOrigin Page Builder | Widget Form Entries. |
| Classic Editor | Add form button → A list of its entries. |
| Anywhere else | Shortcode [awpf_entries id="1"]. |
Only forms that allow it are offered in the element settings. In a page builder's editor the element explains what is missing (no form chosen, showing entries not switched on, no fields ticked) and says who will see the list.
Options
| Shortcode attribute | Default | Meaning |
|---|---|---|
id | — | Form ID. |
fields | all allowed | Field IDs to show, in this order, e.g. fields="1,4". Fields not allowed on the form are ignored. |
layout | table | table, list or cards. Tables stack into label / value rows on phones. |
per_page | 10 | Entries per page (1–100). Paging links appear below the list. |
limit | 0 | Show at most this many entries in total (0 = no limit). |
search | false | Show a search box. It searches only the fields shown. |
sort | date | date, id, or the ID of a shown field (number fields sort numerically). |
order | desc | desc (newest first) or asc. |
date | true | Show the submission date. |
number | false | Number the entries. |
empty | "There are no entries yet." | Text when there is nothing to show. |
[awpf_entries id="3" fields="1,5" layout="cards" per_page="12" search="true"]- Only active entries are listed — never spam, trash, partial entries or entries waiting for payment.
- Several lists on one page page and search independently, and their links keep working when other lists or widgets are added to the page.
- Visitors who may not see the list see nothing. Administrators see a short note explaining why a list is empty.
- With a page cache, exclude pages whose list is limited to logged-in users or to each user's own entries (most caching plugins already skip logged-in users).
For developers
Filters: awpf_public_entry_fields (fields that may be shown), awpf_public_entries_audience (return a user ID to restrict, 0 for everyone, false to deny), awpf_public_entries_query, awpf_public_entry_value (HTML of one value), awpf_public_entries_html, awpf_public_entries_denied (output for people who may not see the list). PHP: AWPF_Entries_View::render( $form_id, $args ).
Importing from other plugins
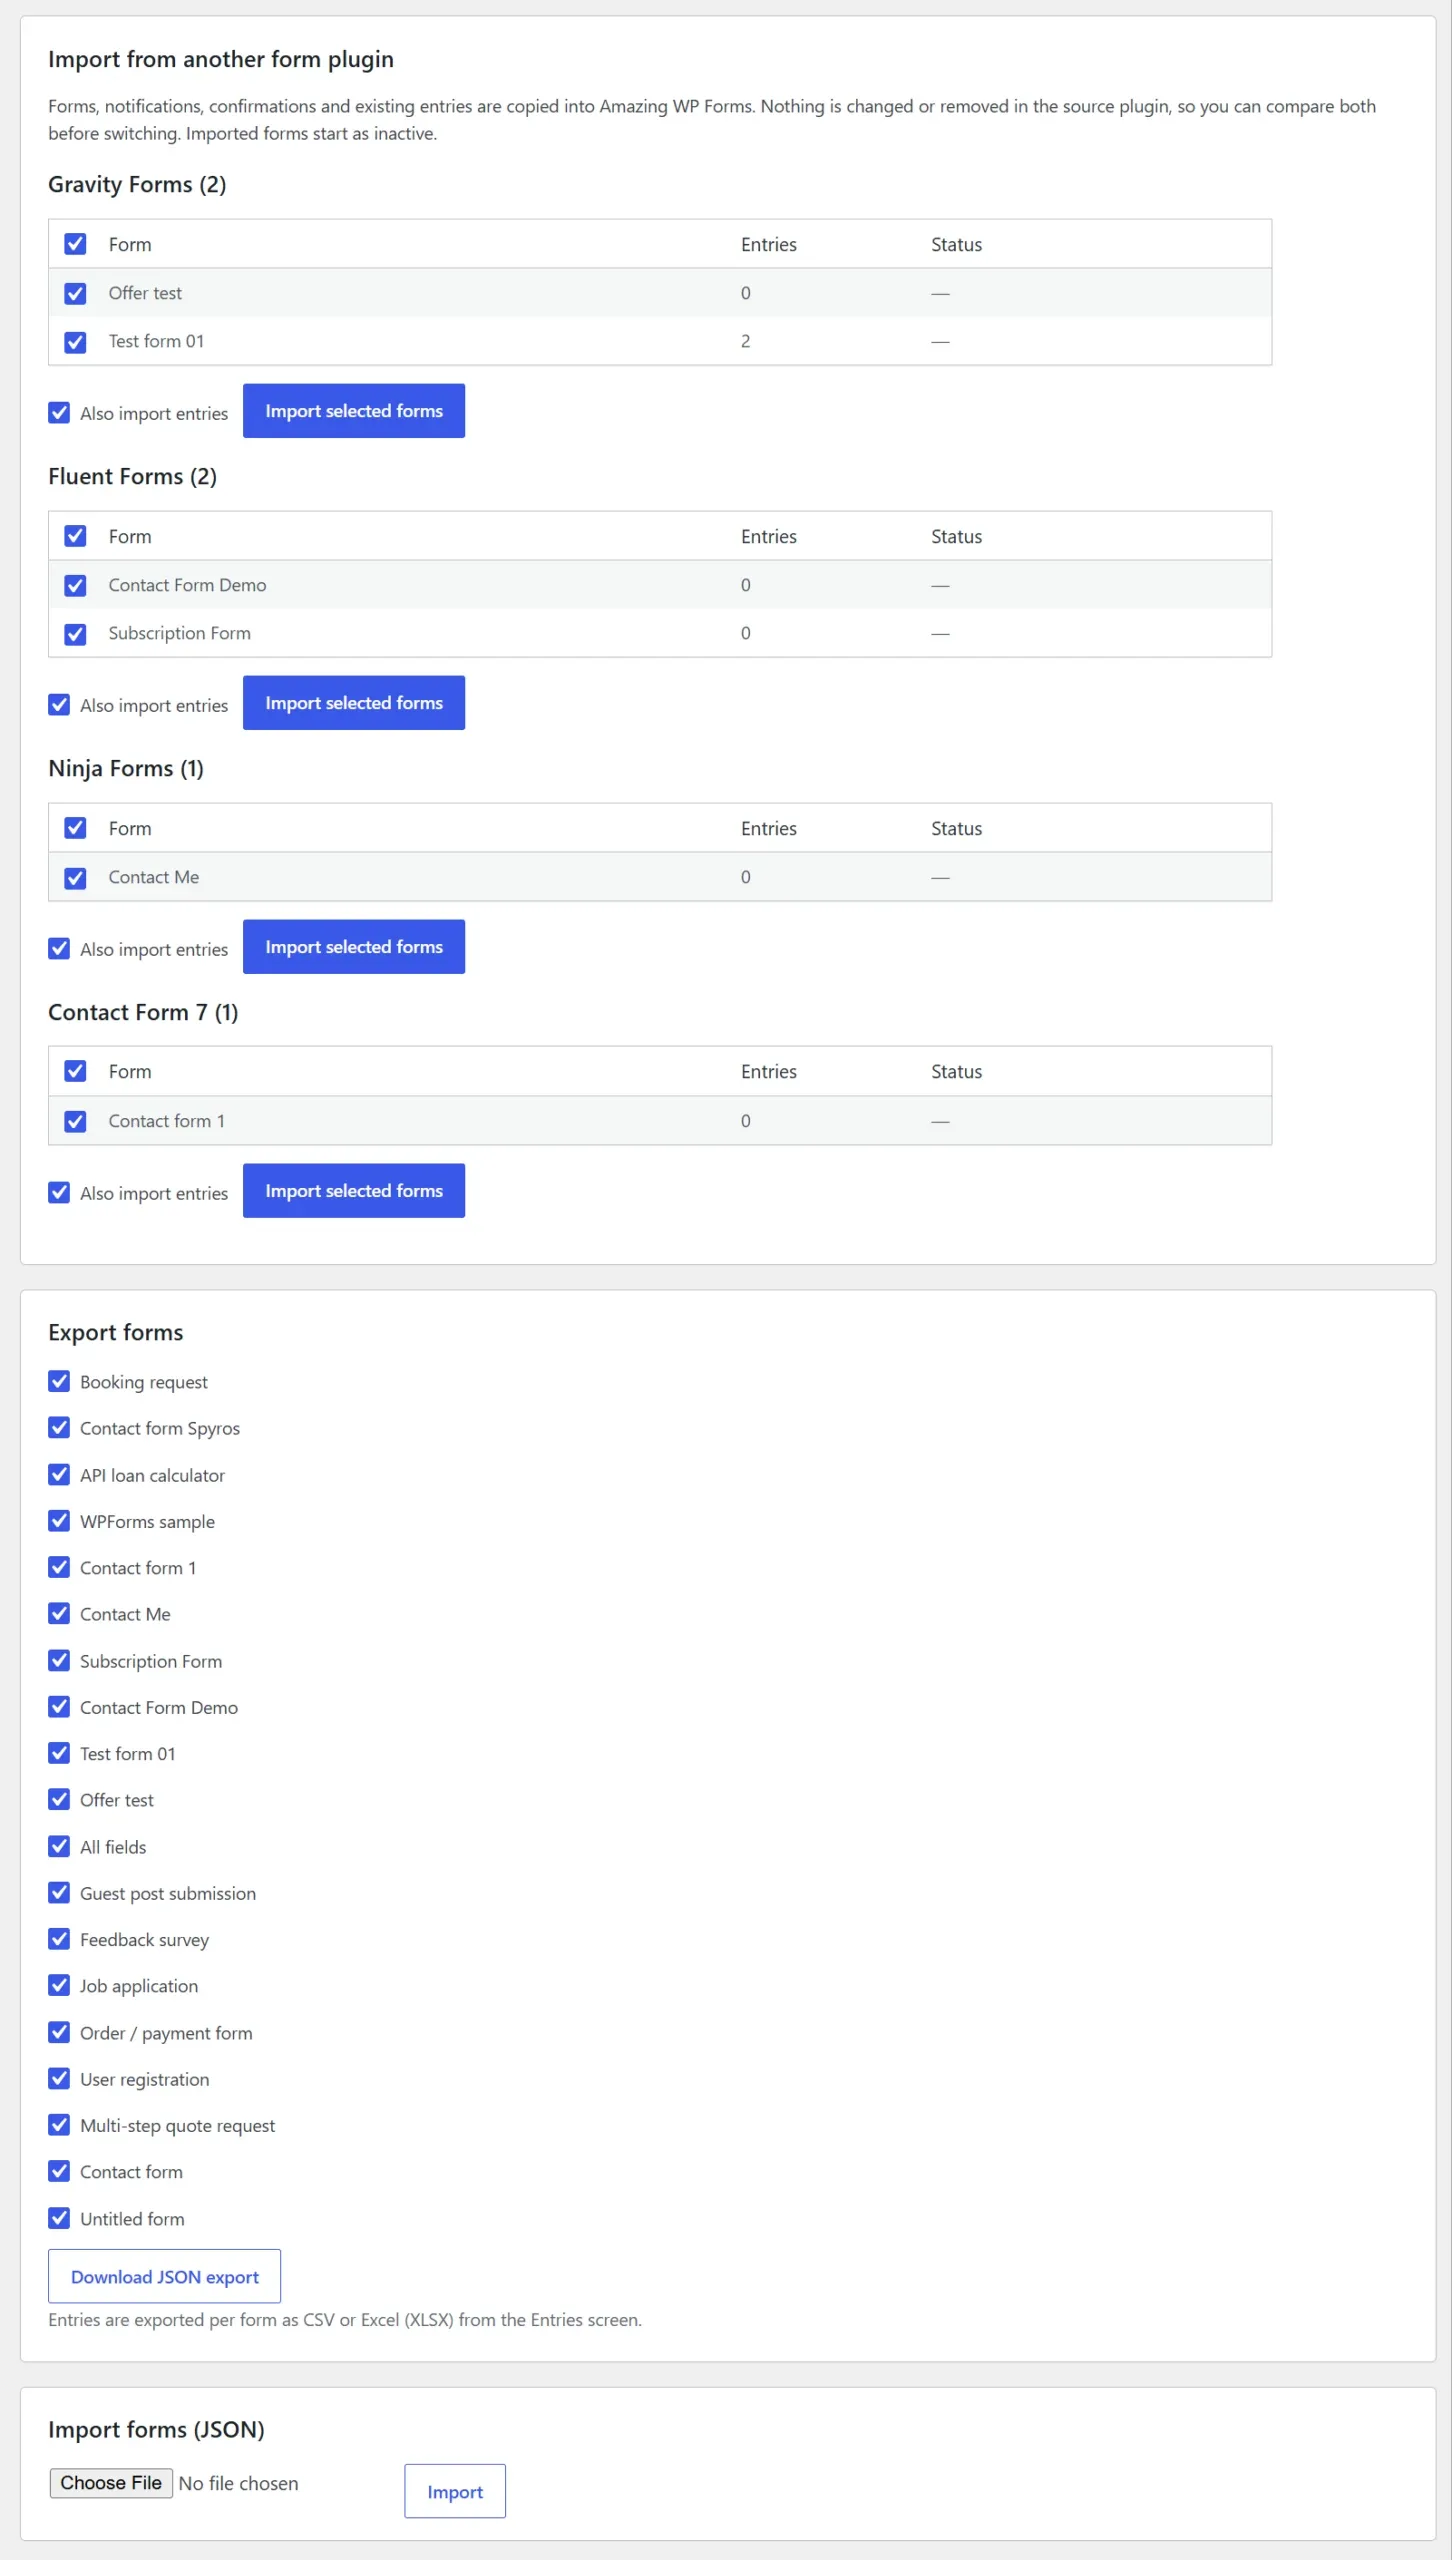
Open Forms → Import / Export. Every supported plugin whose data is found on the site is listed with its forms and entry counts — the source plugin does not need to be active. Tick the forms, choose whether to include entries, and press Import selected forms.
| Plugin | Forms & fields | Notifications & confirmations | Entries |
|---|---|---|---|
| Gravity Forms | Standard, advanced, post and pricing fields, pages, column widths, conditional logic, calculations | Yes, including routing and conditional logic | Yes, with status, read / starred flags and payment data |
| WPForms | Fields, page breaks, conditional logic, payment fields | Yes | Yes (WPForms Pro stores entries; Lite has none) |
| Fluent Forms | Fields, columns, steps, repeaters, conditional logic | Yes, including routing | Yes |
| Ninja Forms | Fields and options | Email, success message and redirect actions | Yes |
| Contact Form 7 | Form tags, labels, options | Mail, Mail (2) and the success message | Yes, from Flamingo |
- Nothing is changed or deleted in the source plugin. Imported forms start inactive so you can review them first.
- Translations come along: when a Gravity Form was translated with WPML (Gravity Forms Multilingual), its translations are copied to the imported form's strings in WPML → String Translation, so the form is translated right away. See Translating forms.
- Merge tags of the source plugin are translated to Amazing WP Forms tags.
- Entries are imported in batches, so large sites do not time out. Uploaded files stay where the source plugin stored them and remain linked.
- Unsupported field types (for example credit-card fields of gateway add-ons) are skipped or imported as text fields; payment gateway, CRM and other add-on feeds need to be set up again.
After importing
open each form in the builder, check conditional logic and notifications, send a test submission, replace the old shortcode with [awpf id="…"], and only then deactivate the old plugin.
Export and import between sites
The same screen exports selected forms to a JSON file and imports such a file on another site. Entries are exported per form as CSV or Excel (XLSX) from the Entries screen.
Embedding forms
[awpf id="1"]
[awpf id="1" title="false" description="false"]
[awpf id="1" field_values="ref=newsletter&plan=pro"]
[awpf id="1" ajax="false"] (reload the page on submit for this placement)- Block editor (Gutenberg): add the Amazing WP Form block, choose the form, and toggle title / description in the sidebar. The block shows a live preview, supports wide / full alignment and spacing, and links to edit the form. Its sidebar also has Form styles, Input styles, Label styles, Description styles and Button styles panels that override the form's Appearance settings for that block only, and an Advanced panel with the submit mode (AJAX or page reload) and field values.
- PHP:
<?php awpf_form( 1 ); ?>orawpf_form( 1, array( 'title' => false ), false )to return the HTML. - Elementor: drag the Amazing WP Form widget (search "form") from the General category and pick the form in the Content tab.
- Beaver Builder: add the Amazing WP Form module from the Basic group.
- WPBakery Page Builder: add the Amazing WP Form element from the Content category.
- Bricks: add the Amazing WP Form element from the General category.
- Divi: add the Amazing WP Form module in the Divi Builder (Divi and Extra themes, Divi Builder plugin). The Visual Builder shows a server-rendered preview. Built on the Divi 4 module API; Divi 5 runs such modules through its backward-compatibility mode.
- Avada: add the Amazing WP Form element in Avada Builder (Fusion Builder).
- Widget areas and SiteOrigin Page Builder: the Amazing WP Form widget places a form in any sidebar or footer, with an optional widget title. Because SiteOrigin Page Builder is built on widgets, the same widget is available there; it also appears in the WordPress-widgets lists of other builders.
- Classic Editor: the Add form button next to Add Media opens a small dialog (form, show title, show description) and inserts the shortcode at the cursor.
- Any other builder: use the shortcode in a shortcode or text element.
- Preview: the Preview button opens
/?awpf_preview=ID, visible only to users who can manage forms.
Every builder element has the same three options: the form, Show title and Show description. Inside a builder's editor the form is shown as a preview that cannot be submitted; an inactive form is still previewed there, with a notice that visitors will not see it. Builder code is only loaded when that builder is active, so the integrations add nothing to sites that do not use them.
Submitting: AJAX or page reload
By default forms submit without reloading the page. Turn off Settings → General → Submit without reloading the page (AJAX) — or set it per placement with the block's Advanced panel or ajax="false" — and the page reloads instead: errors come back next to the fields with everything the visitor typed, and after a successful submission the visitor is redirected (so reloading never submits twice) to the same page, which shows the confirmation. Use it for analytics that count page views or for themes and plugins that expect a normal form post. All the spam checks, uploads and payments work the same in both modes.
Styling
Each form has Settings → Appearance: input size, border radius, input background / border / text colors, accent, label and description font size and color, and button colors. Empty settings keep the default look, and the block can override any of them for one placement. The form inherits your theme's typography. You can also adjust the look for all forms with CSS variables:
.awpf-wrap {
	--awpf-accent: #0a7c59;
	--awpf-accent-text: #fff;
	--awpf-radius: 10px;
	--awpf-border: #cfd4da;
	--awpf-gap: 20px;
	/* also: --awpf-input-bg, --awpf-input-text, --awpf-input-pad, --awpf-input-size,
	   --awpf-label-size, --awpf-label-color, --awpf-desc-size, --awpf-desc-color,
	   --awpf-btn-bg, --awpf-btn-text */
}
Prefer your own stylesheet? Enable Settings → Do not load the plugin stylesheet.
Settings reference
| Tab | Setting | Description |
|---|---|---|
| General | Currency | Used by pricing fields and payments. |
| General | Do not load the plugin stylesheet | For themes that style forms themselves. |
| General | Submissions allowed per IP every 10 minutes | 0 disables the limit. |
| General | Store / anonymize the visitor IP | Privacy options for entries. |
| General | Delete entries automatically after (days) | 0 keeps entries forever. |
| General | Delete partial entries after (days) | Default 30. |
| General | Delete uploaded files with their entry | On by default. |
| General | Count form views | Views and conversion rate on the Forms screen. See Form views. |
| General | Send form events to Google Analytics / Tag Manager | Only when gtag.js or a dataLayer is already on the page. |
| General | Remove all data when the plugin is deleted | Off by default: deleting the plugin keeps forms and entries. |
| CAPTCHA | Default provider, keys, reCAPTCHA type and v3 score | See Spam protection. |
| Payments | Stripe mode, publishable and secret keys, webhook signing secret; PayPal mode, client ID, secret, Webhook ID | See Payments. |
| Integrations | API keys of each service, on / off per service, default SMS country code, Google service account | See Integrations. |
| PHP mail() warning, test email | See Notifications. |
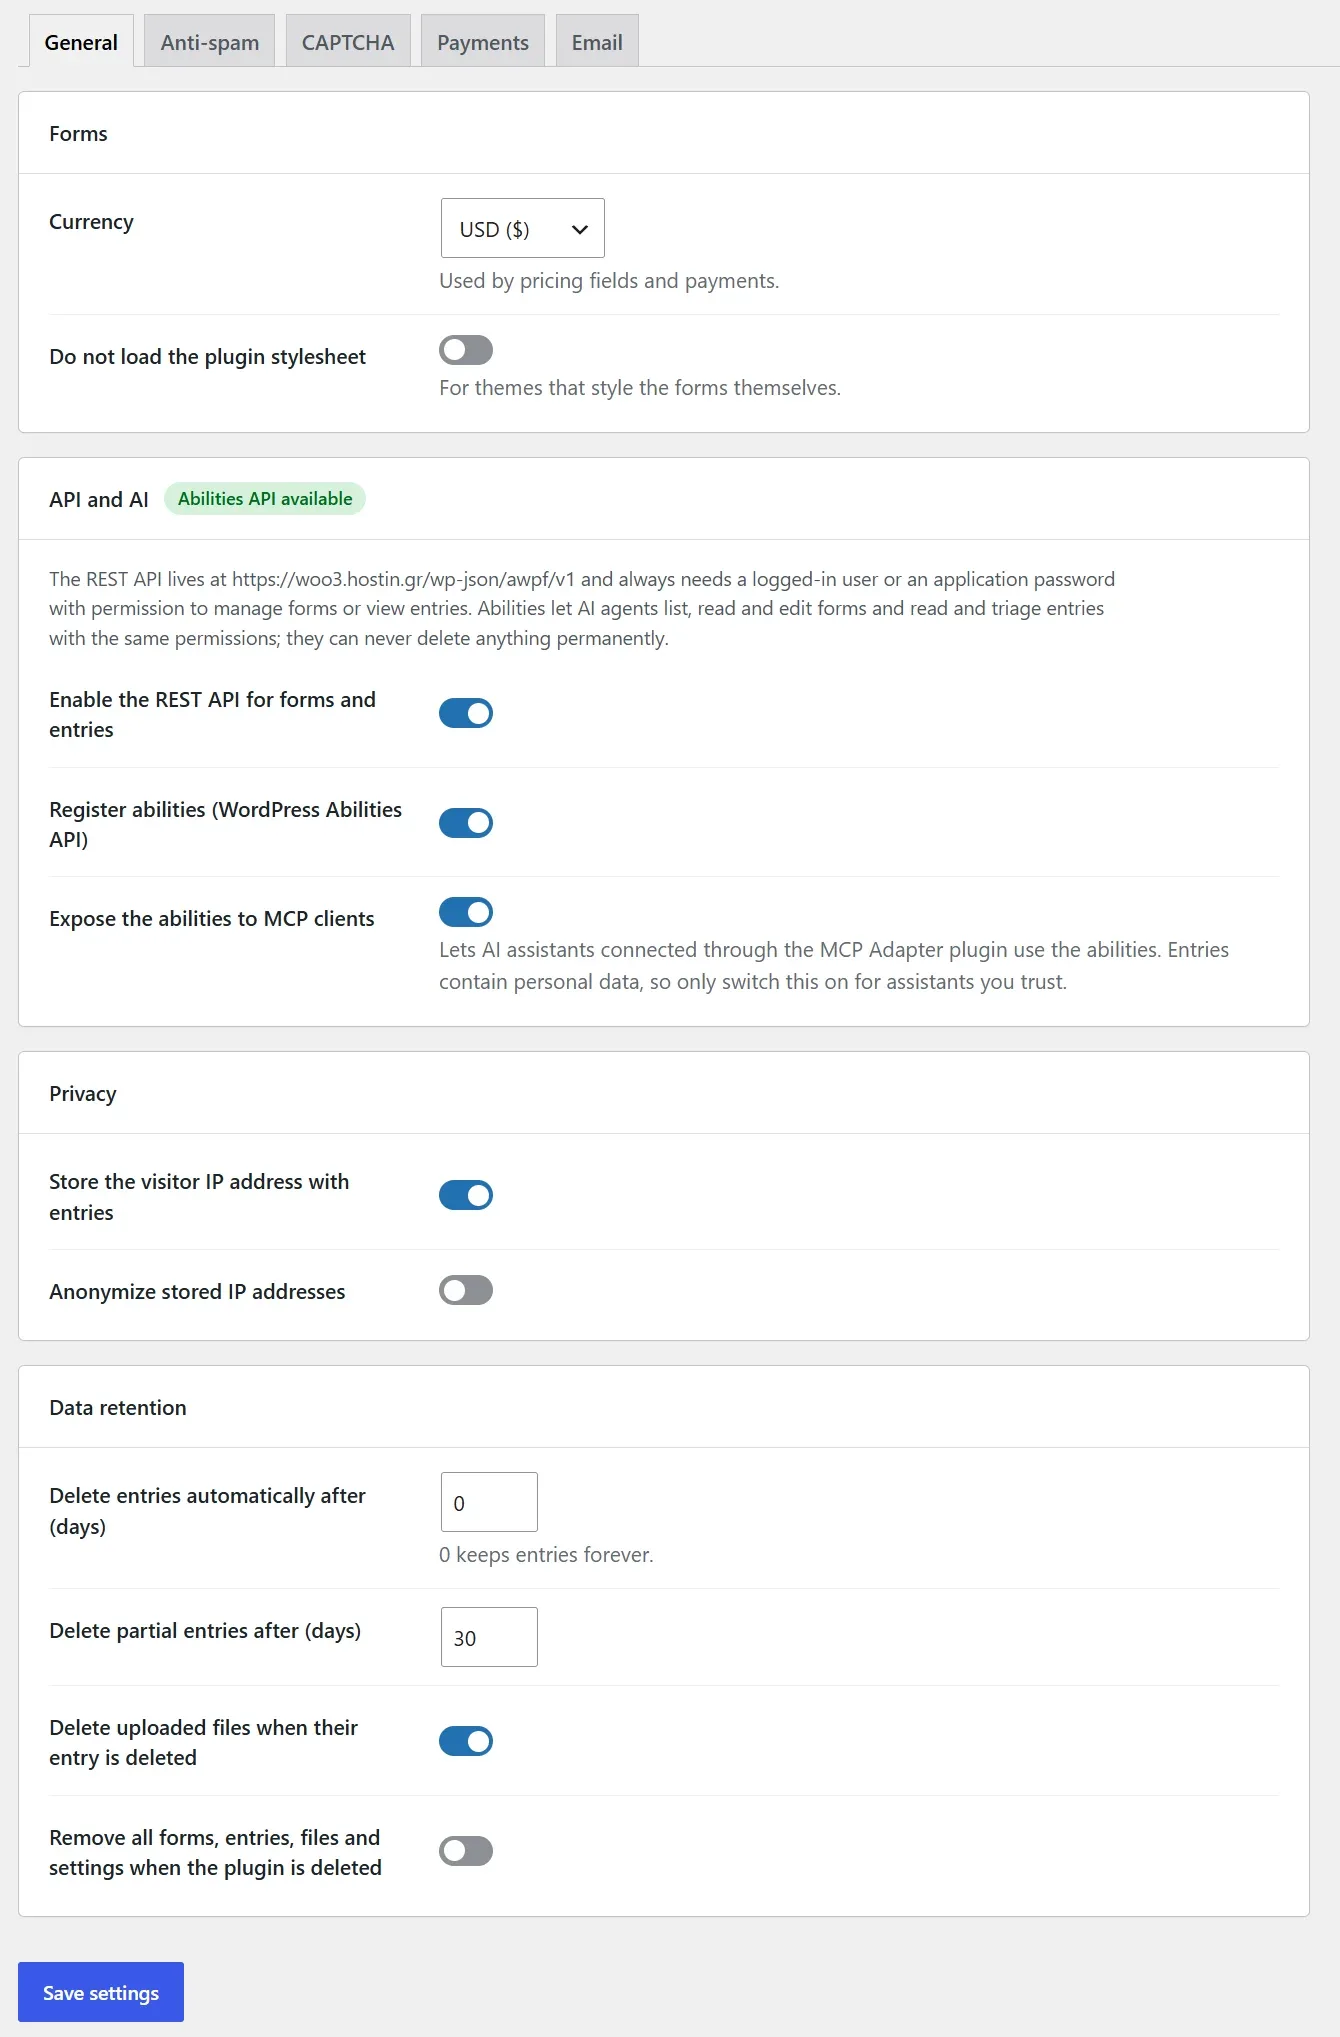
Secret keys are write-only: they are never printed back into the page. Leave a secret empty to keep the saved value, or type DELETE to remove it.
Capabilities
Administrators receive three capabilities that can be granted to other roles with any role editor: awpf_manage_forms (build, delete forms and entries), awpf_view_entries (read and triage entries) and awpf_manage_settings (settings, import / export).
Security
Submissions
Every value is sanitised by its field type and validated on the server. Choices are checked against the configured options, hidden-by-logic fields are discarded, administrative fields ignore request data, and prices and totals are always computed on the server.
Request forgery and bots
A signed, time-limited token bound to the form and the current user is required for submissions, uploads and partial saves; plus honeypot, time trap, per-IP rate limits and optional CAPTCHA and Akismet.
Uploads
Extension allow-list, a hard block-list of executable types (also inside double extensions such as file.php.jpg), real MIME-type verification, image decoding checks, size and count limits, random file names, a non-public temporary area, and an .htaccess that disables script execution in the upload folder.
Output
Entry values are escaped everywhere they are shown. Form texts accept safe HTML only; raw HTML and scripts in HTML fields are kept only for users allowed to post unfiltered HTML. Shortcodes in confirmations run before visitor data is inserted, so a visitor can never inject one.
Admin
All admin actions require a capability and a nonce. API secrets are stored in a separate non-autoloaded option, never sent to the browser.
Payments and accounts
Hosted checkout only. Paid status is set only after verifying the gateway's response (entry, amount, currency) and Stripe webhooks are signature-checked. Registration cannot grant privileged roles; passwords are never stored in entries.
Nginx note.
.htaccess rules apply to Apache and LiteSpeed. On Nginx, add a rule that denies execution of scripts under /wp-content/uploads/awpf/ and access to /wp-content/uploads/awpf/tmp/. Dangerous file types are rejected by the plugin regardless.
The visitor IP is taken from REMOTE_ADDR. Behind a trusted proxy or CDN use the awpf_client_ip filter to supply the real address — never trust forwarded headers blindly.
Performance
- Nothing loads on pages without a form. No CSS, no JavaScript, no database query.
- The front-end script is dependency-free vanilla JavaScript (no jQuery), deferred and loaded in the footer. The upload / signature module is a separate file loaded only by forms that use it.
- One small stylesheet, printed next to the form when the form is rendered late (widgets, page builders) to avoid unstyled flashes.
- A form is read with a single indexed query and cached in the object cache.
- CAPTCHA and token requests happen on first interaction, not on page load — so forms are compatible with full-page caching and score well in PageSpeed.
- PHP classes are autoloaded on demand; admin, importer, payment and WooCommerce code is never loaded for ordinary visitors.
- Date and time pickers are native browser inputs; images are resized in the visitor's browser before upload.
Privacy and data storage
- Entries are stored in your own database. Nothing is sent to third parties except the services you enable (CAPTCHA provider, Akismet, Stripe, PayPal).
- IP storage can be switched off or anonymised.
- The plugin registers with WordPress' Export Personal Data and Erase Personal Data tools: entries containing the requested email address, or submitted by that user, are exported or deleted.
- Retention periods delete old and partial entries automatically.
- Entries are never shown on the site unless a form allows it, and then only the fields ticked on that form, to the audience chosen there (see Showing entries on the site).
- Deleting an entry deletes its uploaded files (configurable).
REST API
Forms and entries are available over the WordPress REST API under /wp-json/awpf/v1. Every request must be authenticated — with an application password (Users → Profile → Application Passwords) for external systems, or the usual cookie and nonce inside WordPress. There is no public access: entries contain personal data.
| Request | What it does | Permission |
|---|---|---|
GET /forms | List forms. Parameters: status, search, page, per_page. | Manage forms or view entries |
GET /forms/{id} | One form with its fields and settings. | Manage forms or view entries |
POST /forms | Create a form: title, fields, settings, status. | Manage forms |
PUT /forms/{id} | Update a form. settings are merged; fields, when sent, replace the whole list. | Manage forms |
DELETE /forms/{id} | Move to the trash; with force=true delete permanently, including entries and files. | Manage forms |
POST /forms/{id}/duplicate | Copy a form. | Manage forms |
GET /forms/{id}/stats | Entry counts per list, today and the last 7 days. | View entries |
GET /forms/{id}/entries | List entries. Parameters: status, search, is_read, is_starred, filters, match, orderby, order, after, before, page, per_page (max 100). | View entries |
POST /forms/{id}/entries | Create an entry from values (field ID → value). Runs the form's validation, conditional logic and calculations; set run_actions=false to skip notifications and feeds. | Manage forms |
GET /entries/{id} | One entry. | View entries |
PUT /entries/{id} | Change status (active, spam, trash), is_read, is_starred. | View entries |
DELETE /entries/{id} | Delete an entry and its files permanently. | Manage forms |
GET /field-types | The field types a form can use. | Manage forms or view entries |
Lists return the items as an array, with the totals in the X-WP-Total and X-WP-TotalPages headers. Each entry contains its status, flags, payment details and a fields list with the field ID, type, label, stored value and readable text.
# Entries of form 2 whose email ends with .gr OR whose name contains Bob, sorted by email
curl -u "user:application password" -G "https://example.com/wp-json/awpf/v1/forms/2/entries" \
  --data-urlencode "filters[0][field]=2" --data-urlencode "filters[0][operator]=ends" --data-urlencode "filters[0][value]=.gr" \
  --data-urlencode "filters[1][field]=1" --data-urlencode "filters[1][operator]=contains" --data-urlencode "filters[1][value]=Bob" \
  --data-urlencode "match=any" --data-urlencode "orderby=2" --data-urlencode "order=asc"

# Create an entry
curl -u "user:application password" -H "Content-Type: application/json" \
  -d '{"values":{"1":{"first":"Maria","last":"Tester"},"2":"maria@example.org","4":"Hello"}}' \
  "https://example.com/wp-json/awpf/v1/forms/2/entries"
Filter field is a field ID or one of id, _date, _payment, _user, _ip, _source; operator is one of contains, notcontains, is, isnot, starts, ends, gt, lt, empty, notempty. Validation problems come back as a 400 response with the messages per field under data.errors. File uploads, signatures and payments are not available through the API.
The API can be switched off under Forms → Settings → General → API and AI.
Abilities for AI
On WordPress 6.9 and later the plugin registers abilities with the WordPress Abilities API, so AI agents and automation tools can discover what the plugin can do and use it with typed inputs and permission checks. On older WordPress versions nothing is registered.
| Ability | What it does | Permission |
|---|---|---|
amazing-wp-forms/list-forms | List forms with status and entry counts. | Manage forms or view entries |
amazing-wp-forms/get-form | One form with fields and settings. | Manage forms or view entries |
amazing-wp-forms/list-field-types | Available field types. | Manage forms or view entries |
amazing-wp-forms/get-entry-stats | Entry counts of a form. | View entries |
amazing-wp-forms/list-entries | Search, filter (AND / OR), sort and page through entries. | View entries |
amazing-wp-forms/get-entry | One entry with all values. | View entries |
amazing-wp-forms/update-entry | Mark read / starred, move between active, spam and trash. | View entries |
amazing-wp-forms/create-form | Create a form (inactive unless asked otherwise). | Manage forms |
amazing-wp-forms/update-form | Change title, status, settings or fields. | Manage forms |
Safe by design.
Abilities run with the permissions of the user the agent acts as. No ability deletes forms or entries permanently — the most an agent can do is move an entry to the trash or set a form to inactive, both of which you can undo.
MCP. To let AI assistants reach the abilities through the MCP Adapter plugin, switch on Expose the abilities to MCP clients under Forms → Settings → General → API and AI. It is off by default because entries contain personal data. The abilities themselves can be switched off in the same place.
Developers can add or change abilities with the awpf_ability_definitions filter; the awpf_ability_executed action fires after every ability that changes something, for audit logs.
Developer hooks
Helper functions
awpf_form( $form_id, $args = array(), $echo = true ); // render
awpf_get_form( $form_id );                             // form array
awpf_get_entry( $entry_id );                           // entry row + values
AWPF_Entries::query( array( 'form_id' => 1, 'status' => 'active', 'per_page' => 20 ) );
Run code after a submission
add_action( 'awpf_submission_complete', function ( $entry, $form, $values ) {
	if ( 3 !== (int) $form['id'] ) {
		return;
	}
	// $values is keyed by field ID.
	my_crm_push( $values[2], $values[1]['first'] );
}, 10, 3 );
Custom validation
add_filter( 'awpf_validate_field', function ( $error, $field, $value, $form ) {
	if ( 'email' === $field['type'] && is_string( $value ) && substr( $value, -12 ) === '@example.com' ) {
		return 'Please use your work email address.';
	}
	return $error;
}, 10, 4 );
Dynamic choices
add_filter( 'awpf_field_choices', function ( $choices, $field ) {
	if ( 'location' !== ( $field['cssClass'] ?? '' ) ) {
		return $choices;
	}
	return array_map( function ( $post ) {
		return array( 'label' => $post->post_title, 'value' => (string) $post->ID );
	}, get_posts( array( 'post_type' => 'location', 'numberposts' => 100 ) ) );
}, 10, 2 );
Register a field type
add_filter( 'awpf_field_types', function ( $classes ) {
	class My_Color_Field extends AWPF_Field_Type {
		public $type  = 'my_color';
		public $group = 'advanced';
		public $icon  = 'dashicons-art';
		public function label() { return 'Color'; }
		public function render( $f, $v, $c ) {
			return '';
		}
		public function sanitize( $f, $raw, $form ) {
			return is_string( $raw ) && preg_match( '/^#[0-9a-f]{6}$/i', $raw ) ? $raw : '';
		}
	}
	$classes[] = 'My_Color_Field';
	return $classes;
} );
Actions
| Action | When |
|---|---|
awpf_loaded | Plugin bootstrapped. |
awpf_validation_failed($form, $errors, $values) | A submission had errors. |
awpf_entry_created($entry_id, $form_id, $values) | Any entry row was inserted (including partial, spam, imports). |
awpf_entry_status_changed($entry_id, $new, $old) | An entry moved to another status (active, spam, trash, …), from the admin, the REST API or the abilities. |
awpf_entry_saved($entry, $form, $values) | A valid submission was stored, before payment / feeds. |
awpf_before_feeds, awpf_submission_complete($entry, $form, $values) | Before / after registration, post creation, WooCommerce and notifications. |
awpf_payment_completed($entry, $form) | A payment was verified. |
awpf_stripe_webhook($event) | A verified Stripe event arrived. |
awpf_gateway_error($gateway, $message) | A gateway request failed (for logging). |
awpf_notification_sent($ok, $email, $notification, $form, $entry) | After each email. |
awpf_user_registered, awpf_registration_failed | Registration feed results. |
awpf_post_created, awpf_post_creation_failed | Post feed results. |
awpf_partial_saved($entry, $form, $values, $manual) | Progress was saved. |
awpf_form_saved, awpf_form_deleted, awpf_form_imported, awpf_entries_deleted | Data lifecycle. |
awpf_enqueue_form_assets($form) | Enqueue your own assets with a form. |
awpf_daily_cleanup | Daily maintenance ran. |
Filters
| Filter | Purpose |
|---|---|
awpf_field_types, awpf_builder_controls, awpf_builder_schemas, awpf_builder_data | Extend the builder. |
awpf_form_templates, awpf_default_form_settings | Templates and defaults for new forms. |
awpf_notify_on_not_spam | Return false to skip the held-back notifications when a spam entry is marked as not spam (receives the entry row and the form). |
awpf_form_style | Change the CSS variables / size class generated from a form's Appearance settings. |
awpf_get_form, awpf_pre_render_form, awpf_render_field, awpf_field_input_html, awpf_form_html | Change a form or its markup at render time. |
awpf_prefill_values, awpf_field_choices | Pre-populate values and choices. |
awpf_form_js_config, awpf_js_vars | Data passed to the front-end script. |
awpf_form_restriction | Return a message to block a form. |
awpf_validate_field, awpf_validation_errors, awpf_hidden_fields | Validation. |
awpf_pre_save_values | Modify values before storage. |
awpf_is_spam, awpf_spam_reason, awpf_spam_content, awpf_akismet_data, awpf_pow_bits, action awpf_spam_blocked | Flag spam yourself, change what the spam filters see, tune the JavaScript challenge, log blocked submissions. |
awpf_pricing, awpf_currencies | Order totals and currencies. |
awpf_notification_email, awpf_resume_email | Change outgoing emails (return false to skip one). |
awpf_confirmation, awpf_submission_redirect | Confirmation behaviour. |
awpf_merge_tags, awpf_merge_tag_catalog, awpf_all_fields_rows, awpf_user_merge_tag_meta_keys | Merge tags. |
awpf_upload_validate, awpf_blocked_extensions | Upload rules (return an error string to reject a file). |
awpf_payment_gateways, awpf_gateway_enabled, awpf_gateway_configured, awpf_form_gateways, awpf_start_payment_{gateway}, action awpf_payment_return_{gateway}, awpf_stripe_session_args, awpf_paypal_order_args | Payments; add your own gateway (see below). |
awpf_captcha_providers, awpf_captcha_enabled, awpf_captcha_configured, awpf_captcha_provider | CAPTCHA providers; add your own (see Spam protection). |
awpf_calc_functions, awpf_calculation_result; JS awpfCalc.functions, event awpf:calculated | Custom formula functions; adjust a calculated value. |
awpf_rest_enabled, awpf_abilities_enabled, awpf_ability_definitions, awpf_api_form, awpf_api_entry, actions awpf_api_form_saved, awpf_ability_executed | REST API and abilities. |
awpf_settings_tabs, action awpf_settings_tab_{tab} | Add tabs, cards and fields to the settings screen. |
awpf_entry_columns, awpf_export_columns, awpf_export_row | Entries table columns and CSV / XLSX exports. |
awpf_public_entry_fields, awpf_public_entries_audience, awpf_public_entries_query, awpf_public_entry_value, awpf_public_entries_html, awpf_public_entries_denied | Entries shown on the site. |
awpf_registration_roles, awpf_registration_user_data | User registration. |
awpf_post_creation_types, awpf_post_creation_data, awpf_post_creation_allow_protected_meta | Post creation. |
awpf_woo_field_products, awpf_woocommerce_feed_products | WooCommerce. |
awpf_importers | Register an importer (extend AWPF_Importer). |
awpf_client_ip, awpf_rate_limit, awpf_min_submit_seconds, awpf_captcha_fail_open, awpf_captcha_verified | Security tuning. |
awpf_settings, awpf_countries, awpf_entry_list_columns, awpf_html_setting_keys | Miscellaneous. |
Adding a payment method
A registered gateway gets its own card with an on/off switch and key fields under Settings → Payments, a toggle in every form's Payments tab, and a place in the visitor's payment method choice.
// 1. Register it.
add_filter( 'awpf_payment_gateways', function ( $gateways ) {
	$gateways['mygateway'] = array(
		'label'      => 'My Gateway',            // admin name
		'title'      => 'Bank transfer / iDEAL', // what the visitor sees
		'fields'     => array( 'mygateway_key' => array( 'secret', 'API key' ) ),
		'configured' => function () { return '' !== awpf_secret( 'mygateway_key' ); },
	);
	return $gateways;
} );

// 2. Start the payment: return the checkout URL. The amount was calculated on the server.
add_filter( 'awpf_start_payment_mygateway', function ( $url, $form, $entry, $values, $pricing ) {
	$return = add_query_arg( array( 'awpf_return' => 'mygateway', 't' => $entry['token'] ), home_url( '/' ) );
	return my_gateway_create_checkout( $pricing['total'], $entry['currency'], $return );
}, 10, 5 );

// 3. The visitor is back (or your webhook fired): verify with the gateway, then mark it paid.
add_action( 'awpf_payment_return_mygateway', function ( $entry, $form ) {
	if ( my_gateway_is_paid( $entry ) ) {
		AWPF_Payments::mark_paid( $entry['id'], 'transaction-id' ); // runs feeds + notifications once
	}
}, 10, 2 );
JavaScript events
Dispatched on the form element and bubbling: awpf:init, awpf:page, awpf:submit, awpf:success, awpf:error. Call AWPF.init( container ) after inserting a form with AJAX.
document.addEventListener( 'awpf:success', function ( e ) {
	gtag( 'event', 'generate_lead', { form_id: e.detail.form.id } );
} );
Troubleshooting
| Symptom | What to check |
|---|---|
| Notifications do not arrive | Use Settings → Email → Send test email. If WordPress accepts the mail but nothing arrives, configure an SMTP plugin; leave the From email empty or use an address on your own domain. |
| "Your session has expired" | A security or caching plugin is blocking or caching admin-ajax.php. Exclude it from caching and from bot challenges. |
| The form shows but nothing happens on submit | Look for a JavaScript error from another script in the browser console. Optimisation plugins may delay scripts until interaction — that is fine — but must not remove frontend.js. |
| Uploads fail | Check the PHP limits upload_max_filesize and post_max_size, and that wp-content/uploads/awpf is writable. |
| CAPTCHA always fails | Site and secret keys must belong to the same provider, type (reCAPTCHA v2 vs v3) and domain. |
| Payment stays "Pending" | The visitor did not finish checkout, or closed the tab before returning. Add the Stripe webhook so such payments are still confirmed. |
| Legitimate entries land in Spam | Akismet flagged them. Restore them from the Spam tab, or switch Akismet off for that form. |
| The form looks unstyled | A CSS optimisation plugin removed "unused" CSS. Exclude amazing-wp-forms/assets/css/frontend.css. |
Frequently asked questions
Does it work with page caching and CDNs?
Yes. Nothing user-specific is printed into the page; security tokens are fetched when a visitor starts using the form.
Can I use my own SMTP service?
Yes — through any SMTP / mailer plugin for WordPress. Amazing WP Forms deliberately does not include its own mail integrations.
Is jQuery required?
Not on the front end. The admin builder uses the jQuery bundled with WordPress.
Will importing change my Gravity Forms / WPForms data?
No. Importers only read. You can run both plugins side by side until you are ready to switch.
Can the same form appear twice on a page?
Yes, each instance works independently.
Do forms work without JavaScript?
No. Submissions, uploads, steps and logic require JavaScript; a notice is shown otherwise.
Where is card data processed?
On Stripe's or PayPal's hosted checkout pages only.
What happens to my data if I delete the plugin?
Nothing, unless you enabled "Remove all data when the plugin is deleted" in Settings.
Changelog
1.9.1 Everything translatable
- The labels under the inputs of Name, Email / Password confirmation and Address fields (First, Last, Enter, Confirm, City…) can be changed per field in the Appearance tab and translated with WPML or Polylang.
- The plugin's own visitor texts (validation messages, upload texts, payment messages…) can be translated in WPML String Translation (amazing-wp-forms-texts) or Polylang (Amazing WP Forms – texts).
- Country names in Address fields follow the page's language.
1.9.0 Integrations, form views, per-form settings, translations
- New Integrations tab: Amazing WordPress Newsletters, MailPoet, Mailchimp, Klaviyo, Kit, ActiveCampaign, MailerLite, Brevo, GetResponse, Campaign Monitor, Moosend, SendFox, Omnisend, Drip, EmailOctopus, Mailjet, Sendy, HubSpot, Pipedrive, Slack, Discord, Microsoft Teams, Telegram, Twilio, Vonage, Clickatell, SMSGlobal, Google Sheets, Airtable, Notion, Webhooks, Zapier, Make, n8n and Pabbly Connect. Conditional logic, "after payment" timing, test button, automatic retries, per-entry results with Run again.
- Form views and conversion rate on the Forms screen, and Google Analytics / Tag Manager events.
- Override global settings per form: currency, rate limit, CAPTCHA provider, IP storage, retention, file deletion, not-spam notifications, view counting.
- Entry limits can count all entries, per visitor or per IP address; periods follow the site's time zone.
- WPML and Polylang: labels, placeholders, choices, buttons, messages, confirmations and emails can be translated. Importing a Gravity Form translated with WPML copies its translations too.
- Fixed: a Date field with an earliest date of "today" allowed past dates when the page came from a page cache, when a date was typed in, or on a linked departure date while the arrival date was still empty.
1.8.4 License required for the admin screens
- Entries, Sales, Import / Export and Settings need an active license. Without one, these screens lead to the License page (marked with a lock in the menu); forms keep working on the site and new entries are still saved.
1.8.3 License activation and updates from WordPress
- New Forms → License page: activate your license key to get new versions through Dashboard → Updates, with optional automatic updates. Forms keep working without a license.
- The plugin's "View details" window shows the description and changelog correctly.
1.8.2 Payment fields always visible, debug log
- Fix: on forms that take the payment on the page, the card field and PayPal buttons were hidden until a product was chosen. They now show straight away (PayPal buttons stay disabled while the total is zero).
- New debug log under Settings → Log (off by default) for gateway errors, webhooks, payments, refunds, failed emails and payment-field errors in visitors' browsers.
1.8.0 Payments on the form, PayPal subscriptions, Sales report
- Payments on the form itself: Stripe payment field (cards, wallets, 3-D Secure) and PayPal buttons, as an alternative to the gateway's payment page.
- PayPal subscriptions. Subscriptions support a free trial, a setup fee and a number of payments.
- Charge the form total or a single Product field; customer name, email and address passed to the gateways; billing/shipping address collection; products as separate lines.
- New Forms → Sales report with chart, filters, transaction list and CSV export.
- Entry screen: payment history, Refund (full or partial) and Cancel subscription.
- Webhooks for Stripe renewals, cancellations and refunds; new PayPal webhook.
1.7.5 No page scroll from long field settings
- Long field settings and long Settings, Notifications or Confirmations tabs scroll inside the builder instead of making the whole page scroll.
1.7.4 Full-screen builder
- The admin menu is hidden on the builder screen, so a long menu no longer makes the whole page scroll. Use All forms or the admin bar to leave.
1.7.3 Builder fits the window
- The builder fits the window even when other plugins show notices above it, so only the field panel and the form scroll, not the whole page.
1.7.2 Keyboard navigation in the builder
- Keyboard focus stays in place when a switch, a dropdown or a setting that shows other settings changes, so Tab moves on to the next setting.
1.7.1 Not spam sends notifications
- Marking a spam entry as not spam sends the notifications the spam check held back (once per entry; can be switched off).
- New hooks:
awpf_entry_status_changed,awpf_notify_on_not_spam.
1.7.0 Plugin icon
- The plugin logo is now the icon in the admin menu, on the form block and on the Classic Editor Add form button.
1.6.2 Color swatches
- Block styles: the sidebar color swatches show the chosen color.
1.6.1 Theme palette colors
- Block styles: colors picked from the theme palette (CSS variables such as
var(--wp--preset--color--primary)) now apply, and the sidebar swatches show them.
1.6.0 Styles per form, page-reload submits, character counter
- Appearance settings per form (input size, radius, colors, label / description / button styles); the block can override them per placement, GF-style.
- Submit with AJAX or with a page reload, per form, per block or with
ajax="false"; the block's Advanced panel also takes field values. - Field descriptions below the label or below the field (form default + per-field override).
- Paragraph Text: maximum characters with an optional live counter.
- Builder: the settings tabs no longer show a second scrollbar.
1.5.0 Entries on the site
- Show form entries on the site:
[awpf_entries]shortcode, "Form Entries" block, classic widget, and elements for Elementor, Beaver Builder, WPBakery, Bricks, Divi and Avada; the Classic Editor button can insert a list too. - Each form opts in and chooses the fields that may be shown and who may see them (admins, each user their own entries, logged-in users, everyone).
- Table, list and cards layouts; search over the shown fields; paging, sorting, limit and numbering; tables stack on phones.
1.4.0 More places to put a form
- Divi module, Avada (Fusion Builder) element, classic widget (widget areas, SiteOrigin Page Builder) and an "Add form" button for the Classic Editor.
1.3.0 Page builders and linked dates
- Elementor widget, Beaver Builder module, WPBakery element and Bricks element; improved block (live preview, alignment, spacing, edit links).
- Linked Date fields (e.g. departure after arrival, minimum / maximum stay); the two calendars limit each other in both directions (1.3.1).
- Confirmations always show their conditions; fields can be dragged from the sidebar to any position.
1.2.0 Advanced calculations, REST API, abilities
- Advanced calculations: functions for math, statistics, finance, dates and times; if / elseif / else conditions; text comparisons; field shorthand; live formula validation in the builder.
- REST API (
awpf/v1) for forms and entries. - Abilities for AI agents (WordPress 6.9+), with optional MCP exposure.
1.1.0 Anti-spam, entries and settings
- CAPTCHA-free protection per form: JavaScript challenge, configurable time trap, disallowed keywords, link limit, and Antispam Bee next to Akismet.
- Entries: entry counts in the form selector, sortable columns, filters by column / field value with AND / OR, a per-form column picker, export as CSV or Excel (XLSX) with column and date options.
- Redesigned settings screens; on/off switch for every payment method and CAPTCHA provider.
- Registries for payment methods and CAPTCHA providers (
awpf_payment_gateways,awpf_captcha_providers). - Drag-to-resize field widths in the builder; conditional steps.
1.0.0 Initial release
- Drag-and-drop builder with 42 field types, column widths, templates and form duplication.
- Conditional logic, calculations, multi-step forms, repeaters and list fields.
- Drag-and-drop file uploads with rules; image uploads with previews, reordering and in-browser resizing; signature pad.
- Partial entries and save-and-continue.
- Multiple notifications with routing and logic; multiple conditional confirmations; merge tags.
- reCAPTCHA v2 / v3, Turnstile, hCaptcha, honeypot, time trap, Akismet and rate limiting.
- Stripe and PayPal hosted checkout, Stripe subscriptions and webhooks.
- WooCommerce product forms and add-to-cart feed; user registration; post creation.
- Importers for Gravity Forms, WPForms, Fluent Forms, Ninja Forms and Contact Form 7 / Flamingo; JSON form export / import; CSV and XLSX entry export.
- Privacy exporter / eraser, retention settings, capabilities.
- EDD Software Licensing integration (disabled in this release).